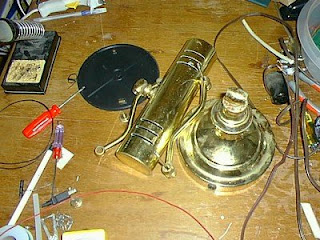
About a year ago, while walking through a large parking garage downtown, I spied a brass table lamp in a trash can. Knowing that most lamp problems are caused by a faulty bulb or a loose connection in the wiring, I decided to take the lamp home and fix it up. Hey, let's face it, nothing says "captain fancy pants" like a brass table lamp. Actually, being a captain and wearing some fancy pants would also be a captain fancy pants indicator.
Anyway, about 2 months ago I finally decided it was time to fix the lamp so I performed the first step in debugging a broken lamp: I plugged the lamp in and flipped the switch. Oh, well what do you know? The lamp was working perfectly... or was it? The 60 watt T-10 bulb in the lamp
did seem a little too dim for my tastes and um... if the lamp is going to be on my computer desk, shouldn't it get it's power from the USB port on my computer? OK so I was just looking for an excuse to convert the lamp to LEDs powered by USB. Lets get on with it, shall we?

Step 1: buy supplies (more on that later)
Step 2: take the lamp apart
Now I've been taking things apart since I was able to pick up a screwdriver and let me tell you, lamps are easy to take apart. For the most part, a lamp is a hollow tube with some do-dads and space filler-uppers all held together with a few bolts. A twist here and twist there....and bam, you have a pile of junk. Taking the lamp apart allowed me to replace the old heavy gauge lamp wires with narrower colored wires. Since LEDs only let electricity flow in one direction, using colored wires is a good way to keep track of positive and negative electron flow. I used red for positive and black for negative.

The nice twisty switch for the lamp was a part of the bulb socket, and since I didn't want to get a new switch, I decided to just mangle the socket and make it work. I had previously purchased a bunch of 5mm white LEDs from the
Hack-N-Mod Store for wicked cheap and I took a trip to my local bulk electronics supplier for some 91 Ohm resistors. the LEDs had a fairly tight light spread so I gently filed the entire surface of the LED, which I find helps diffuse the spread the light quite a bit.

Slicing and hot-gluing a Dr. Bronner's soap container gave me a nice platform onto which I could adhere my LEDs and resistors.
Keep it clean! use
Dr Bronner's Magic "All-One" soap. I prefer the peppermint.

Here is the finished circuit of LEDs and resistors glued to the Bronner platform. Since my digital camera was "Top of the Line" 10 years ago, it doesn't exactly take the best pictures. Well, actually, it is my fault for not putting the camera on the macro setting. Anyway, the circuit was designed using the
LED calculator at the LED center. I could have used a lower Ohm resistor and my lamp would have been brighter... maybe next time. Basically, the circuit is 5 LEDs in parallel, each with it's own 91 Ohm resistor.

This is the wiring at the base of the lamp. The positive wire from the USB cable is connected to my red replacement lamp wire and the USB ground is connected to my black replacement lamp wire. Fancy that.
There is a cover that screws on over these wires but I decided not to include a picture of it because I already have enough crappy pictures in this post.

My heart sank when I plugged in the lamp, turned the switch and nothing happened. sigh. It took about 15 seconds with a voltmeter to find the loose connection near the switch.
CLICK
Let there be light; the lamp in it's natural environment.

My keyboard, in the dark, in all of it's USB powered LED illuminated glory. Oh scary. Not bad for 5 volts.
When the lamp was finally completed, I celebrated by
cleaning my computer desk and then sticking a bunch of glow in the dark stars and planets to my wall.
