
Recently, I was given a 1 gallon pot with some yellow water lilies in it. The lilies could be planted near the edge of my pond, but my pond is seasonal and the edge is always changing. There is no point in planting a flower on the edge of a pond when, in a few weeks, the edge will be 10 feet from where the flowers were planted.
Gears churned and a plan was hatched. I'll make a floating planter!
Step 1: Gather some supplies
 There are quite a few empty 15 gallon pots at my place from all of the trees that I've been getting at Kurt's Garden. Add in some 45° 2" PVC couplers and some scrap PVC pipe, and I was ready to get crafty.
Cut some pipe
 A few quick measurements, and a couple minutes with a hack saw and I had 8 short lengths of PVC to work with.
Make a ring
 The couplers and pipe lengths where joined together with PVC glue and I soon had a nice ring that a 15 gallon pot will easily fit within.
Prepare the pot
 After cutting the bottom off of the 15 gallon pot, 6 cuts were make down the side of the inverted pot to create some flaps. The flaps were folded over each other, drilled, and then bolted together.
At this point, I put the pot into the PVC ring, added soil to the pot and then tested the contraption in the pond. It sank like a brick.... back to the drawing board!
Make the pot wayyyyy shorter
 Obviously the pot filled with dirt was too heavy, so the bolt as undone, the pot was shortened, and then folded and bolted again.
Atempt #2
 Oh hey look, the new short pot is also sinking.
A few seconds after this picture was taken, I was knee deep in water, pulling the "floating planter" off the bottom of the pond. :/
Floaty platform
 Fuck it. A 1 gallon pot in the middle of a circular platform shouldn't have any problem floating.... should it?
With some string and a thumb tack, a few circles were drawn on a piece of plywood and then cut. After the cutting, the wood was painted with exterior grade paint an then hung up to dry.
Make a couple mounting brackets
 twist twist, twist twist, snip. A mounting bracket is made! Repeat the process, and there are 2 mounting brackets. Being lazy, only 2 mounting brackets were made to affix the PVC float to the platform.
It floats!
 Once the platform and float were attached, the 1 gallon pot was put in the platform's center hole and filled with soil and some lilies (which were a bit eaten by some sheepies), and the planter was placed in the water.
It floats!
 Did I mention that the floating planter actually floats? Well it does, and I am quite pleased with the result.
Now quit reading, and go make something float.
My neighbors are nice and all, but there are no plants growing on our shared property line and it would be absolutely splendid if I could enjoy my morning coffee while gazing at greenery and not simply staring at their back porch. Privacy between neighbors is a wonderful thing to have, and it didn't take long for me to hatch a sweet privacy screen plan: plant evergreens along the property line and irrigate them!
Finding some nice evergreen plants (or any plants for that matter) is easy enough, it just entails a trip to Kurt's Garden. Actually, I took a few trips and picked up a nice variety of drought tolerant evergreens. The difficult part was finding a way to get water to the newly planted trees and shrubs.
Fortunately, there is a seasonal pond and plenty of sunshine at my place. Obviously I needed a solar powered irrigation system to pump water from the pond to the newly planted trees.
Gather some supplies
A Renogy 100W Solar Panel provides the juice
A Cheapo dc well pump does the pumping. (I absolutely purchased the 2 year warranty)
The panel is wired directly to the pump and the pump will push about half a gallon per minute when supplied with 12 volts of power. When the panel is getting straight blasted by the sun, the pump will push close to a gallon a minute.
Build a frame to hold the pump
Since I didn't want the pump to sit at the bottom of the pond and get fouled by all the muck, I decided to build a floating platform to keep the pump by the water's surface.
Gather some more supplies

- a 5 gallon pot (probably from Kurt's Garden)
- a metric tape measure
- some string
- a marker
- a nice square of plywood
measure the circumference of the pot
 The circumference of the pot was measured with string just under the lip of the pot. The idea is to cut a hole in the plywood and put the pot in the hole.
do some math
 Fittingly, this took place on March 14th, but I am just now writing about it. Damn what a slacker. :)
The string wrapped around the pot was 83.5 centimeters, and a bit of formula replacement quickly gave me the radius of the hole that I needed to cut.
trace a circle
 Using a thumb tack, some string, and a pen, I quickly drew a circle using the previously determined radius.
Hot damn, that's a good fit
 Awesome! Now I need to add some supports and a flotation device.
oh hey!
 Not only did I add some supports and a top piece, I also added a nice handle to the top of the platform. The wooden piece that holds the pot is on the bottom of this platform.
floats and paint
 A square of 2" PVC attached to the bottom of the platform adds quite a bit of buoyancy. Hopefully the coat of exterior paint will help the wood survive in the water.
pumping away!
 A small hole was added to the top deck and lid for the power cable and water line to pass throught. Obviously the hole is just too small. Oh well.
The solar panel leans against a 4 foot tall post and I can move the panel around to change when the plants get watered. At the moment, the panel is facing due East so that the plants get watered for a couple hours every morning.
Recently, a few ducks have taken to relaxing on the platform. This in turn results in quite a bit of duck crap getting added to the irrigation water. Booyah! free fertilizer!
Now quite reading, and go be a water wizard.
The hole was just with a jig saw. There is no battery, or timer, or level sensor.
The solar panel is directly wired to the pump and the "timer" is the positioning of the panel. For a level sensor, I use my eyes. Yup, there is still water in the pond. :)
Last night, I went out to a nice sushi dinner with some wonderful people and we shared a bottle of sake. This morning, I put the empty sake bottle on the glass cutting rig.
Make the cut
 This is one of my favorite parts of a project. Not cutting something, but being able to yell TAKE IT APART! ...and 'take it apart' is exactly what I did. :)
After cutting the glass, a diamond bit on the rotary tool smoothed the edges.
Don't cut yourself
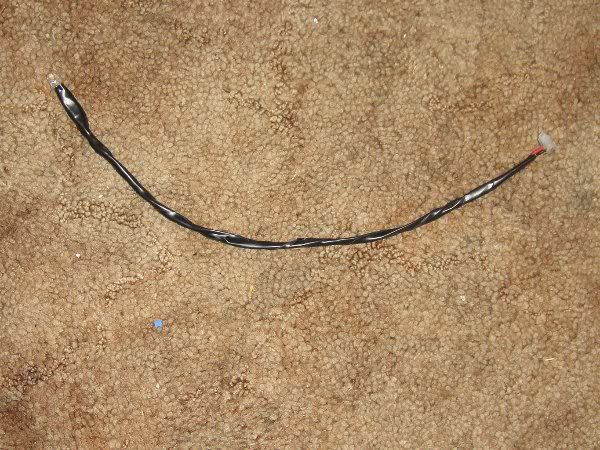
 Using a dull utility knife, I swore a lot while trying to remove the casing on some solid core copper wire. I think it is about 12Gauge wire.
Putting a fresh blade in the knife made the job easy and I was done in a jiff.
Twist and wrap
 My wire twisting skills are lackluster. Fortunately, I have access to more wire, and I'm looking forward to getting some tools to help with the wire twisting.
Um... does anyone want to have some wine? ha!
Get ready to grow
 The bottle with the wire was filled with potting soil and then I added some catnip seeds. meow meow meow
Aside from making the kitties go crazy, catnip apparently makes a nice tea. Hopefully I will be learning the truth of that soon.
Don't waste the rest of the glass
 The bottom of the bottle was left to soak in some soapy water, and after:
- a motorcycle ride to get some girl scout cookies
- a nice picnic
- building an algae/pond-muck collector
- catching a frog
- catching a tadpole with the muck collector
- catching a fish with the muck collector
- supervising some hole digging
- planting a yuzu
- planting a persimmon
- mulching the yuzu and persimmon with some collected pond muck
- munching on chips and guacamole
- catching more fish and tadpoles with the muck collector
it was time to scrape off the bottle's label and test its usefulness as a drinking container.
Survey says..... booyah!
Now quit reading, and go make some stuff.... or invite me over for some sake. ;)
After making my first windchime, I made a second, and a third and then a fourth, and while it is nice to know when the wind is blowing, I really wanted a wind chime that I could control (preferably with a computer).
Fortunately for me, I had some tools and materials.
Figure out the tube lengths
 I started out with about 3 meters of 1¾ inch conduit.
Whoa, am I mixing metric and imperial? No way Bub! I did all of the measurements in metric. That 1¾" pipe is actually 44mm in diameter.
Anyway, I fired up tubell, selected a full octave of notes and entered the total pipe length.
Cut to length
 Once I had the measurements, it was time to start cutting.
In hind sight, I probably shouldn't have used a haggard old sawsall for cutting the tubing. Although the sawsall is far preferable to using a hacksaw, a metal cutting blade on a circular saw would have made a much cleaner cut.
After this pic was taken, the holes for suspending the tubes were drilled.
Cut some pegs
 my "design" for this Tubular Music Thingy involved making a frame to hold 8 tubes strung together and some pegs would be used to keeps the tubes separate.
I don't remember the length, but these pegs have a 9mm diameter.
Drill some holes to hold the pegs
 Technically, I used a 9mm drill to make these holes, although the bit was actually measured in some horrid fraction.
In other news, I should really put "shop-vac" on my shopping list; because there is no way in hell that I'm going to stop building stuff indoors when it is raining out.
Put the frame together
 All lined up and screwed together.
See those notches on the short sides of the frame? That is where the end of the string holding the tubes will go.
Legs!
 After adding some legs to the tube holding frame, the tubes were threaded and put in place.
And thus completes step 1 of the Tubular Music Things. To be honest, I mostly build this thing so I could play Sudo Modprobe.
Now quit reading, and SWITCH TO THE METRIC SYSTEM!
A few days ago, the Inspiration Wizard cast a spell upon me, and through arcane forces unknown, the designs for some shelves rushed through my mind. In a hasty blur, the design ideas were hastily transferred to paper before the ephemeral images vacated my conscience.
After acquiring an assortment of hardware, there was just one more important tool to purchase... a metric tape measure. Sweet! Now it's time to get to business.
step 0: gathering the supplies
 Based upon the amazingly detailed schematic I created, it was fairly obvious what sort of material I would need.... haha just kidding.
I sort of moseyed about the local hardware store until I found the steel cable, cable locks, washers, and eye bolts that tickled my fancy. Then I bought a 6' 10"x1" piece of pine. pfffttttt "feet and inches"
Start at the top!
 Two 125cm pieces of so called 2x4s where screwed to the workshop rafters as the anchor supports. Before attaching the supports, holes were drilled and eye bolts were attached. The eyebolts will anchor the shelf to the supports.
Add some cables
 Some small goofy fraction measurement of cable was purchased in 5 foot lengths; it might have been 3/32 or 5/35ths or 1/8th. It was about 2 or 3mm.
A small loop was put through the eye anchor and then locked down. The bolt on the lock is about 7mm and I need to buy a 7mm open ended wrench to properly tighten these down.
Add a slab
 The 6 foot piece of wood was cut in half width-wise and 4 holes were drilled in each half.
the hanging cables were placed through the holes, followed by a washer and a cable lock. A level was used to make sure everything was level. fancy that.
Repeat!
 Go look at that hella sweet schematic again. It says "repeat", and that is what I did. :)
And there you have it, one sweet suspension shelf that is ready for me to put crap on.... and it is earthquake proof.
Now quit reading... and um... go read some Robert E. Howard
As for myself think I could not have such a shelf, since I would dufferdly bumble into it and break things ;-)
Those white things in the roof, is that insulation? And what it is made of?
We have had the metric system for ages here in Sweden, but in carpentry it lived on for a very long time. Until maybe 10 years ago, I bought wood in "2inch4" etc dimensions, even in shops aimed at consumers. Funny enough, the length was in centimeters. I still think in those terms. Not that I build anything, as I have no house anymore.
While sitting in the not-quite-scorching shade of a loquat tree, the dischordant tones of a problamatic windchime bothered me. After fixing the poorly tied string of the chimes, it occurred to me that I am lacking a windchime. Unacceptable! Fortunately, I have the internet and some crap laying about.
What Do I Know About Windchimes?
Ahem... "What did I know about windchimes?" "Not much". However, a bit of internet searching led to http://www.phy.mtu.edu/~suits/windchime.html which is a trove of information about the lengths tubes need to be in order to make a musical scale.
What I Now Know
- The lovely pentatonic scale is:
- The Root Note
- The Major Second
- The Major Third
- The Fifth
- The Major Sixth
- A chime should be suspended at 22.4% of the chime's length
- I should really really really double check my measurement and "cut once"
- A metric tape measure needs to be in my future because fractions are proof that the imperial system is fucking evil.
Making a Calculator
Before even thinking about what to make the windchime out of, I needed a calculator that would take the largest length of tubing (the lowest note) and compute the lengths needed to make a pentatonic scale of tubes. Originally, I wanted to make the calculator a native application for one of the GNU Linux based mobile operating systems, but none of seem to have native apps. bummer. Anyway I just wrote a crappy Javascript app thingy I'm calling tubell.
The Pain of Fractions
Due to the lack of a metric tape measure, I had to deal with some shitty fractions in order to get a semi-precise measurement. The 1/8th of an inch was my "precise" measurement, and my longest tube would be 2 feet in length; which is 192 eights of a inch.
Sadly, I had to go from eighths to a percent back to eighths. blech gimme that sweet metric system!
The Build
Gather Some Supplies
 Make some wrong computations, get some tubes, borrow a hacksaw.
This is my original computations where I use the first 5 notes of a justified scale instead of a pentatonic scale.
Cut the Tubes
 Forsome reason, I have not yet built/bought/acquired some form of miter box. Anyway, my hacksaw cuts are a bit wonky, but hey, that's the way I roll.
Make a Metal Drill Bit
 After failing miserably to drill a hole through the metal tube with what I can only assume was a drill bit made for wood, I had to improvise.
With my rotary cutting tool, I removed the head from a self tapping metal screw, and used the remaining bit of the screw as a metal drill bit.
The Suspending Frame
 The bottom of my PBR bucket was the perfect size for making a circle from which I could suspend my cut tubes.
Divide the Circle Into 5 Parts
 Because the windchime will have 5 chimes, it was necessary to mark off the circumference in 5 increments in order to determine where to drill holes in the suspending frame. For this I used a bit of twine, a pen, and a thumb tack.
The smaller circle is from a tracing of my favorite orange cup, and it will be used as the chime hammer.
Make a Metal Drill Bit
 Holes were drilled
a rattle can painted things black
scrap was used for the wind catchy thingy
...and the wind chime was hung from an oak tree
In Action
So what does it sound like? Pretty damn good if you ask me!
Either way, yours do sound and look quite nice. Good work on such a meh item. (my opinion of course...) :P
When a varmint absconded with the deer skull that was sitting under my workshop, I was rather displeased. When the skull was later found at the end of the driveway (after having been crushed under a tire), I was even more displeased. Obviously, the only way to convert this travesty into something positive would be to make something out of the not too mangled antler..... like another bottle opener!
Gather Some Supplies
 For the actual "opener", I decided to use the end of a paint can opener.
Damn, I'm getting really low on epoxy. It is definitely past time for me to pick up some more at the hardware store.
Grind off Some Skull
 After a minute of using a rotary tool with a cutting wheel, most of the remaining bits of skull were removed from the antler.
Once the base of the antler was cleaned up, I drilled a hole into the bottom of the antler.
Cut the Paint Can Opener
 The metal used for these openers is quite strong, and I managed to break two cutting wheels while slowly grinding away at this thing.
Put it all Together
 The metal opener was placed in the hole drilled into the bottom of the antler and smothered with a hefty glob of epoxy.
Hey, all done! Now give it to someone for their birthday.
Survey says... I sit too much. Being sedentary for too long can be hazardous to one's health and many people in my profession have chosen to start using "stand up" desks; a desk that is tall enough to work on while standing. With the goal of owning a sweet stand up desk, I decided to see what I could craft with my carpentry skills.
Step 1
 Every good project starts with a well designed plan.... yet surprisingly this project still turned out OK.
After collecting some slightly soggy 2x4s, a tape measure, and a pen, I cranked up the Credence and got busy.
Step 2
 Armed with a degenerate right-handed circular saw, I managed to cut four legs at 41 inches in length.
Based on my best guestimation, I wanted my keyboard to be somewhere around 43 inches from the ground.
Step 4
 Using some less than nice looking two by four (s)crap wood, 3 foot long bracing were cut and screwed to a pair of legs.... twice.
Step 5
 hmmmm.... all of a sudden the desk is looking far more complete that it should. Someone might have forgotten to take enough pictures.
Two 2 foot long 2x4s finished the top table bracing and some 1x4 was use for structural strength* at about 20 inches from the floor.
Step 6
 After a smoothing with a random orbital sander, and 2 foot by 37 1/2 inch piece of plywood was screwed to the top of the desk frame. Yea, that's a Care Bear wastebasket...
I'm thinking of putting a few slats of wood across the mid-leg supports for storage, but that would be more work and I'd rather be hacking on some code.
Now quite reading, and go make something.
*You might expect this footnote to be about "structural strength". Well you are wrong. Apparently "strengths" is the longest single syllable word in the English language.
Who's a packrat? me, that's who. For about 8 years I've had a piece of antler stored under my bed because I figured that eventually I would find a use for it. Last week I received a Deschutes Brewery bottle opener from my buddy, and this morning I decided that "Today is the day"!
Oh Deer!
 This piece of antler had previously been used to make a button for a rabbit sporran, but that is a tale for another time.
With my handy dandy generic rotary tool and a cutting wheel, the end of the antler was removed and I was ready to get on with the project.
De Shortened Dechutes Opener
 De bottom of de opener was removed so it would fit a bit better in de antler handler. Thanks Dechutes!
I had forgotten how hot metal gets when being cut. Fortunately I have some crappy pliers that held de opener while I was cutting.
Speaking of forgetting...
Ready for the opener
 After about 20 minutes of grinding, carving, and shaping the antler, I was ready to add the opener.
If you have never used a grinding wheel to cut antler, I highly suggest trying it because the stink is something everyone should experience. For the most part, the stench is reminiscent of concentrated burning hair. Yum! How did I forget that smell?
Epoxy
 A bit of epoxy was applied to the opener, which was then placed in the antler. A few pieces of masking tape were used to keep the epoxy from running out and getting all over the place.
Success!
 A quick jaunt to the store... and I was the proud owner of a sixer of Anchor Steam and a lotto ticket.
Yea, that's my dinner: Ramen with broccoli, carrot, and tapatío; and an Anchor Steam.
Let me tell you about antler dust. That stinky crap gets everywhere, and if you happen to have a significant amount of facial hair, expect to collect a lot of stink on your face. blech!
As a wonderful sidenote: I can use this as a sgian-dubh when traveling by airplane. Double win!
For some reason, I needed make an art project water fountain, and what started as a very simple idea quickly turned into an epoxy consuming evening.
First Batch of Supplies
 A quick trip to the local hardware store resulted in a glass baking dish that would become the base of the fountain. While at the hardware store, I also purchased the first of 3 tubes of epoxy that would be used to create my fountain.
A few bags of glass stones were purchased from the Dollar Store. rad.
Happy New Year!
 New Year's is a great time to find cheap champagne bottles. About 5 minutes with a glass bit on my rotary tool resulted in a decent size hole near the bottom of a small champagne bottle.
A water pump was procured from an old fountain that was taking up space in my kitchen, and some tubing attached the to the pump was epoxied into the hole in the bottle.
A Pile of Rad Movies
 Using what I had on hand (which happened to be a stack of sweet VHS tapes), I built a frame to position the bottle where I wanted it.
Now the fun begins...
Getting Tubular!
 After mixing some epoxy, I started adhering the glass stones around the water pump. In order to make a fairly solid base for the bottle, a toilet paper roll cardboard tube was cut open and taped around the tube going to the bottle, and the glass stones and epoxy were dropped into the tube.
All Finished
 A wine glass was added to the fountain base for an eternal pour.
Now I need to get a box of red wine so I can have an eternal pouring wine fountain.
On Saturday, August 25th, I was in Davis California for the First Davis 'Stache and Beard Throwdown organized by the Mustache and Beard Social Club. It was a damn fun event and I made a bunch of new friends. I also managed to win First Place in the Sideburns Category. But you know what? This isn't about that. Before I was in Davis, I was at my Mom's place and she has two new kittens. Awwwww....... I keep forgetting their names so I call them Turtledove and Lilypond.
Not being a very nice person, I decided that I should really find a way to be mean to the kittens, and thus was born the cat teaser!
Feathers
 There are wild turkeys all over the place at mom's, and thus, there are wild turkey feathers everywhere.
While collecting these feathers, I also found what I think is a hawk feather. BIRD FIGHT!
String
 Did I ever mention that orange is my favorite color? Well it is. It has come to my attention that I do not have any string or twine at my home, and I should really remedy that problem.
Anyway, a few feet of this orange twine will suit my needs perfectly.
Tie a Knot
 It's a good thing that I have a book of knots. Unfortunately, I didn't have the book with me and I don't remember any of the rad knots from the book so I just tied the feathers as best I could.
Branch
 When visiting a place where there are more trees than people, it is quite easy to find branches for a variety of uses.
For example, this little branch I salvages from the yard waste pile could easily be a:
- fishing pole
- campfire hotdog roasting stick
- campfire marshmellow roasting stick
- campfire trout roasting stick hmmm.... I should have a campfire soon. mmm smores.
With my trusty Swiss Army knife, I notched a straight branch and tied the other end of the string into the notch.
Finished Cat teaser
 Damn, what a terrible photo. Hopefully you get the point though. Basically, this thing is an easy way to dangle feathers in front of a cat.
You may not find it that interesting, but woooooweeeee, shake those feathers in front of a cat and we are talking hours of sadistic, cat teasing fun. shazaam!
Not a Cat Toy
 Sideburns are not cat toys, no matter what those cute little bastards think.
Fortunately for me, a few kitten nibbles didn't hamper my competitive edge.
Where does one put their bearding flair?
At various bearding events, it's quite common to pick up some sweet pins either as part of the competition, or handed out by the various clubs attending the events. Some people put the pins on their hat, while others might choose to put their collected pins on their jacket or on their competition outfit. So where do I put my collected pins?
Hey! If I put the pins on something I can easily remove from my jacket, I'll be able to rock the pins on just about any outfit I wear. Damn, the "dork" is strong with this one.
To the sewing machine
 Digging through my collection of scraps, I found some black fabric that would suit the purpose ideally. After a bit of folding and sewing, I had the start of what I was hoping to make.
Ideally, I'll end up with a sort of vertical epaulet that I can button to my jacket and cover with event pins.
Add some button holes
 At both ends and in the center of my bling holder, I added button holes. This was my first time making button holes and they came out looking like crap. That's fine. It is more important that they work.
This is the second button hole that I made and it is probably the best of the three button holes that I made.
Button it
 All finished. The top button hole on the bling thing goes over the jacket's pocket button and two new buttons were sewn to the jacket to match up with the middle and bottom button holes of the bling thing.
It is purely coincidental that the Austin Facial Hair Club patch is in the armpit of my jacket.
See you at the next comp.
Cue the Dramatic Music
It was Lancaster PA, October something something 2011 and in a stunning turn of events that rocked my world to it's very foundation.... I didn't make the cut. Obviously I need quite a bit more training.
Pffftttt stop being so dramatic; let me spin you a yarn: In mid-August, I suffered some fairly debilitating muscle spasms that rendered my right arm mostly useless. By the end of September (6 weeks later), the pain had subsided to the point where I was finally able to drive a car.
Now, at about 8 weeks later, I can look in the mirror and see a noticeable lack of muscle mass in my right shoulder and arm. Apparently the muscles had atrophied from lack of use. Time to bring those muscles back!
The 3 Point Plan to be Hella Sick Rippin


Oh yea!!!!!!
To put my plan into action, I needed to cut up some ugly old shorts so that I could sort of make cubes of fabric. Once I had my basic pattern, I sewed that crap up into little bags and filled the bags with the filling from some diving weights.
The final product: three soft fabric bags that weight one pound each and are ugly eye-sores.
Put the Plan to Work
 Since I have already typed the word "plan" a few times, you should now have the theme to the A-Team playing in your head. if you don't have the theme playing in your head, something is wrong with you.
The Training
- Put on a sweet wizard cap (any hat with a feather in it: feathers make everything magical)
- Take off your shoes
- juggle while walking around Petaluma
How is this a 3 point plan? I'm glad you asked.
- juggling improves my hand eye coordination
- juggling 3 one pound bags for 10 minutes is quite a nice workout for my shoulder
- walking around barefoot will toughen up my feet (Lancaster gave me blisters)
How exactly is this training for a Beard and Mustache championship? Hey! Just because it isn't related in any way, shape, or form, doesn't mean wuggling (walking and juggling) isn't an important aspect of training for a facial hair contest.... and most importantly, it is fun.
Now quit reading and go do something completely unrelated to anything you should be preparing for.
After re-purposing a larger case with more storage for the server on my home network and filling the server with my ripped DVDs, I figured it was about time to replace my media playback machine with a machine that was actually capable of decoding my rips without running the CPU at 100%.
Gather Some Components
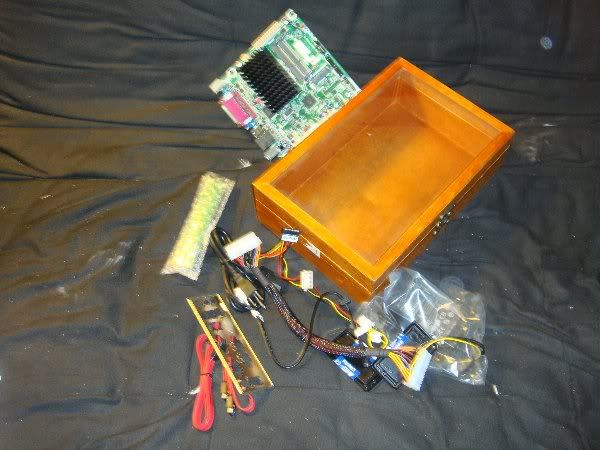 The case for the new machine is box that was part of a Wild Turkey holiday gift set: a cheaply crafted piece of crap made of low grade wood, with a clear plastic cover.
The Electronics
- Dual core 1.8Ghz Atom processor on a mini-itx motherboard
- 2 x 2Gb RAM
- A far too powerful power supply
- 80Gb SATA laptop hard-drive that I pulled out of a busted laptop
Because this machine is going to be fanless, I decided to layout the components in a way that would maximize convection cooling. What this means, is that the component that generates the most heat needs to be closest to the exhaust and the most temperature sensitive component needs to be located by the air intake.
Cutting, Drilling, Bending, JB-Welding
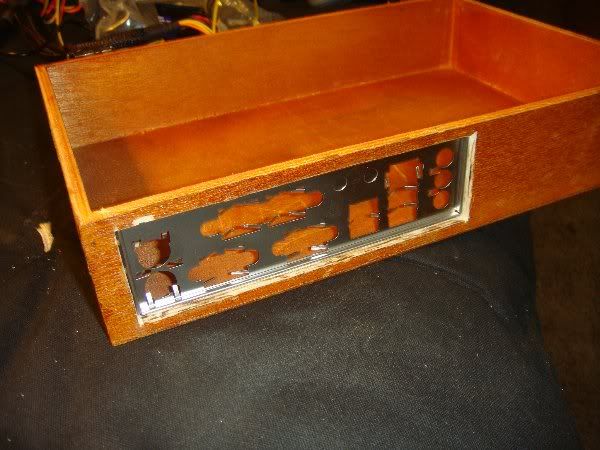

First things first: the hinged lid needed to be removed so I could muck with the inside of the box more easily.
- After aligning all of the internals, I traced where the metal port plate is supposed to go and then cut... not a bad fit.
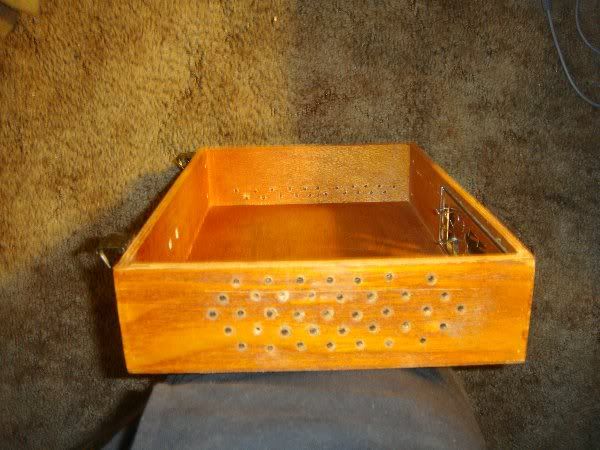
- A lot of small holes where drilled on both sided of the box. Technically, it was the top and bottom that were drilled ( the machine is going to be on end so as to provide the best convection airflow.
- Those metal things with the points are my component stand offs and I bent the points down before using JB-weld to attach them to the inside of the box.
Fire Up the Soldering Iron
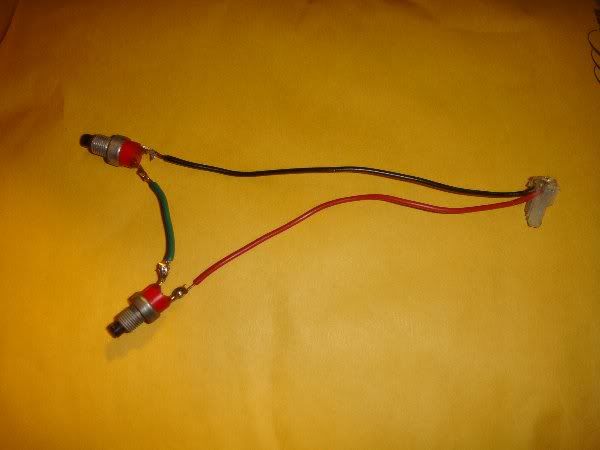
- That two pronged thing-a-ma-bobber is my power switch. Because it consists of two switches in series, both switches must be pressed in order to power the machine on and (most importantly) power off the machine. The last switch I put in/on a machine has a tendency to accidentally get pressed when I least expect it; like when I open my scanner.
- A red LED was soldered to some wire and wrapped with electrical tape. This is the Power On indicator and bit a sandpaper helped diffuse the light coming out of the LED.
Put It All Together
 This is the mostly finished machine with the lid put back on. The locking clasp on the side had to be moved, but it still functions perfectly.
At this point, everything was going extremely well and the computer looked absolutely fantastic, so I figured something was terribly wrong. After connecting everything and pressing the power buttons .... nothing happened. Bummer.
Note to self: when powering up a computer, make sure it is plugged in properly.
After properly plugging in my power converter, the machine booted and I installed Arch Linux.
Installed
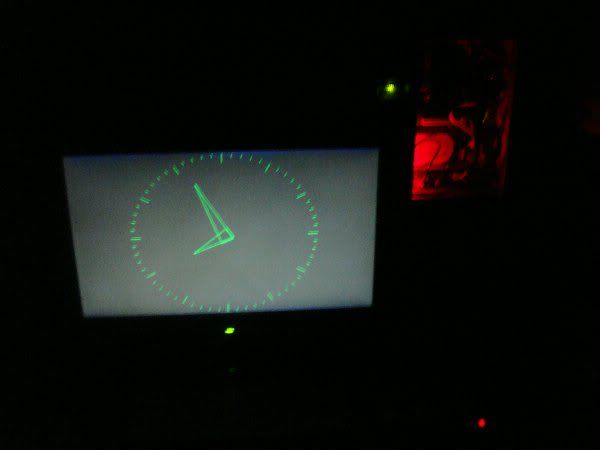
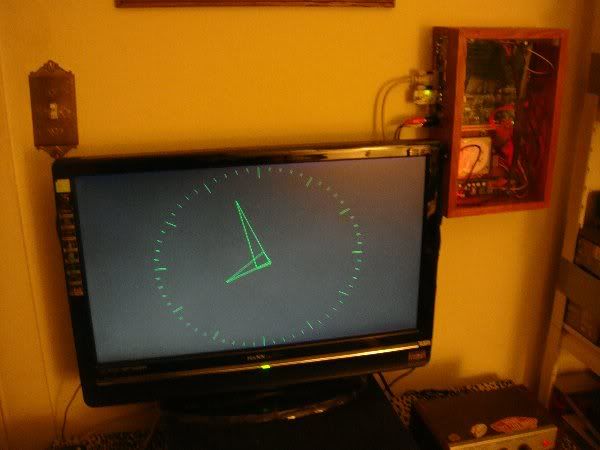

The final resting place for the machine is on the wall next to the TV.
- Don't be afraid of the dark
- Computers are just fancy clocks
- The two power switches are just barely visible on the right side of the machine.
Still to do: The audio out can use a smaller adapter and the current external USB wireless adapter needs to be replaced by an internal PCI-Express mini card. I need to either hack the XMBC to properly handle my NES controller, or I need to write my own software for browsing and playing media from my collection.
Due to the lack of a fan, this computer is silent; therefor, I have named it Wind.
Now quit reading, and think of wind related things.
like:
- What's next? A computer named Earth and a computer named Fire?
- Make 3 more, and Crom will laugh at them.
Also, I'm fairly certain that you can map the keys on your controller with just an edit of a particular file. Which file is it you ask? I can't quite remember but, it seems I seen it on the XBMC forums.
A few days ago on Google+, some friends posted pictures of the chili sauce they made. Not wanted to be left out of the awesome-sauce party, I asked for the recipe.
Although the directions for the chili sauce are in German, there are plenty of pictures on the page, and my web browser is configured to translate non-english webpages for me. Awesome!
Gather the ingredients
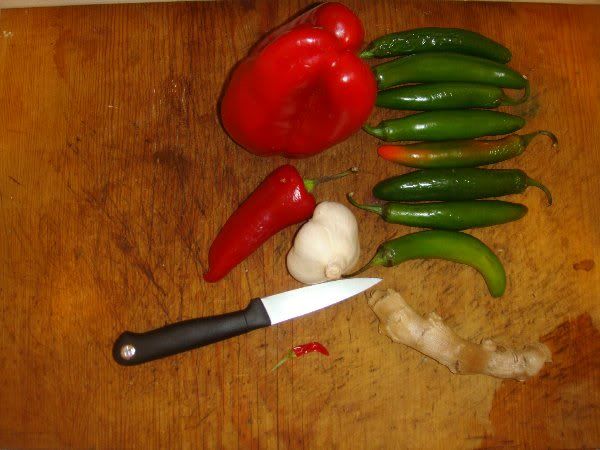 Since I didn't want my sauce to be very red in color, I used a mix of red and green chilis and diverted from the recipe slightly.
- 1 Red bell pepper
- 8 Green serrano chilis
- 4 cloves of garlic ( most things need more garlic )
- a bit of ginger
- 1 lil red bastard of a chili that my buddy grew ( it is the hottest of the bunch)
- 125 ml garlic red wine vinegar
- 1 cup of dextrose (priming sugar is the only sugar I have at home)
- 500 ml water
lost in translation
 Step 3 is brutal.
German: Auch die Knoblauchzehen und die Chilis in grobe Stücke schneiden. Danach nicht vergessen, die Augen zu reiben und in der Nase zu bohren. Nur so kommt man zu der Vorfreude auf die spätere Schärfe der Sauce!!
English: Also, the garlic cloves and chillies cut into chunks. Then do not forget to rub your eyes and picking your nose. Only one comes to the anticipation of the later sharpness of the sauce!
Not wanting to veer to far from the original recipe, after I chopped the chilis and garlic, I immediately started to rub my eyes. Although the pain made me forget to pick my nose, I did manage to take what could arguably be the least becoming picture of Yours Truly ever taken.
the finished product
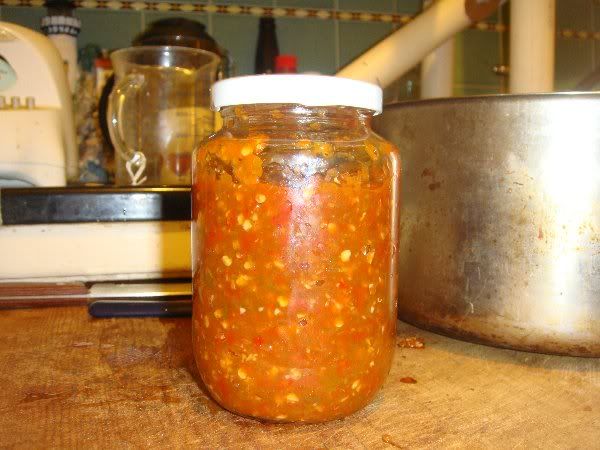 After blending and reducing my mixture, I had almost enough chili sauce to fill my 16oz jar.
The Taste
The various ingredients certainly give this sauce a distinct and excellent flavor. It starts with the sweet, which fades to a garlic/ginger flavor, and ends with the lingering heat of the hot chilis.
For future chili sauces, I plan to skip the sugar and use a variety of fruits and sweet vegetables, as well as different types of chilis.
Now quit reading, and go skip step 3.
I took out most of the seeds though, not realizing/remembrering that they are needed for the texture as well...
But I did good, and thanks to your pictures I managed to skip step 3 ;)
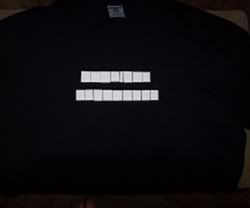
On one of the forums I frequent, there was a discussion about using a QR Code as a forum avatar. And I thought "Damn, I should put a qr code that links to my website on a t-shirt".
The Code
 First things first, get a QR Code that links to http://www.jezra.net
Simple enough. Now I just need to transfer this to a t-shirt.
The Stencil
 The code is a grid of 21 squares by 21 squares. So I grabbed some butcher paper from Petaluma Market and drew a 21x21 grid on the paper. The grid spacing is half an inch per square. I really should have used the metric system.
Why butcher paper? one side of the butcher paper is lightly waxed and after cutting the stencil I will iron the stencil onto a t-shirt. This will give me nice crisp lines.
Is that a Dungeons & Dragons map?
 The code is black on white, but since I was putting the code on a black shirt, I needed to mark the negative spaces that would need to be removed.
After a couple of screw ups, I think I have everything mapped out.
Laying It Out
 With my trusty left-handed scissors, I cut out all of the pieces and arranged the pieces on the t-shirt in preparation for the iron.
White Fabric Paint
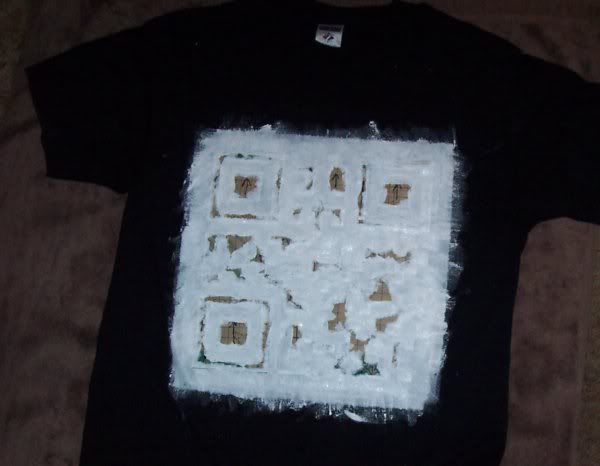 After using an iron to affix the paper to the t-shirt, I began slopping on fabric paint to create the white pattern of the QR Code.
Amazingly, all of the fabric paint went where I wanted it to go. That is to say, I didn't spill any paint or make a mess.
Showing It Off

- Let the paint dry
- Peel off the butcher paper
- Use a hot iron to fix the paint to the fabric
- Find a sexy model to show off the shirt
When I told my buddy about this project, he said "just have Kinko's print the image of the code onto transferable paper", to which I replied "no, this way will be more interesting". Yea, well this way was a pain. I probably should have listened to my buddy.
While I'm reminiscing, I might as well add that if I were to do it all over again, I would definitely use a t-shirt that actually fits me. Why the hell was there a plain black medium t-shirt at my place?
Now quit reading, and go listen to your buddy. Oh yea, now I need to find out if it works...
Due to an unfortunate series of events, Shemp ( my homemade banjo ) is out of commission. However, I recently purchased a used Sovereign banjo that needed a bit of work to get into a somewhat decent playing condition. One thing I really wanted for this banjo was a strap. You know, just in case I want to wander around the block while picking a tune.
For my banjo strap, I wanted something fairly easy to remove and very easy on the wallet. For two bucks spent at the thrift store, and bits of stuff lying around my home, I had a pretty sweet banjer strap in no time.
Four Bottle caps
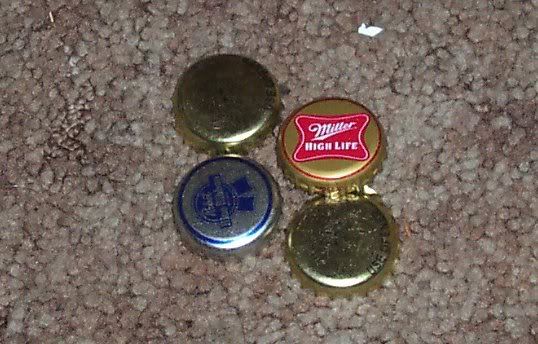 Beer bottle caps, hot glue, and magnets make great bottle cap fridge magnets, but that's not what I'm making right now. From the bottle cap collection, I selected two Red Tails, a PBR, and a Highlife.
Gettin Hammered!
 All four of the caps was hammered flat. The Red Tail caps flattened nice and clean, the other two.... well not so much. Notice that the PBR cap is a Jack of Diamonds? That was intentional.
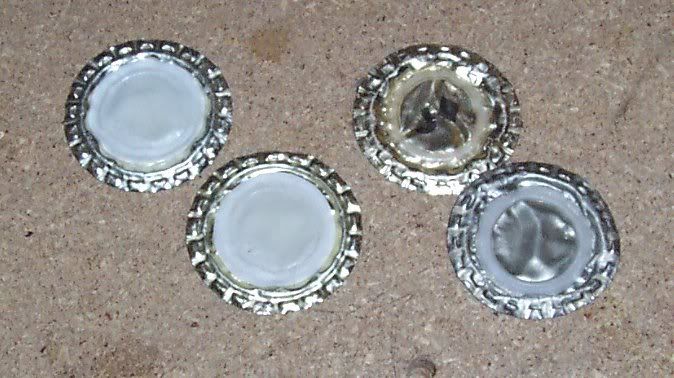
Stuck Together
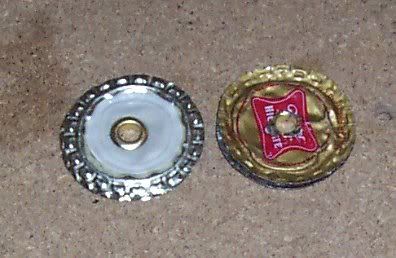 The flat caps where paired up and a hole what punched through their centers. To keep things neat and to cover any sharp edges, an eyelet was popped into the center of the stacked caps.
The actual "strap"
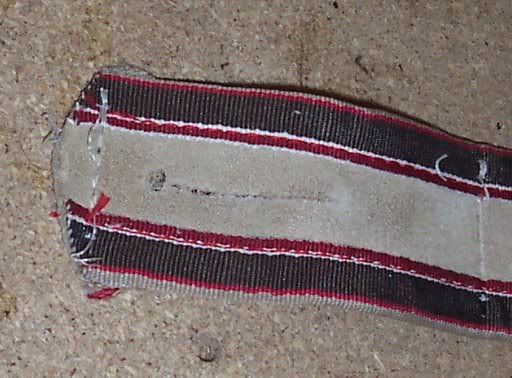 Two dollars at Sack's Thrift Avenue purchased a leather belt. Damn, I'm busting the bank on this one. A slit the length of the flat caps diameter was cut into each end of the belt and a small hole was punched for good measure.
Hold on
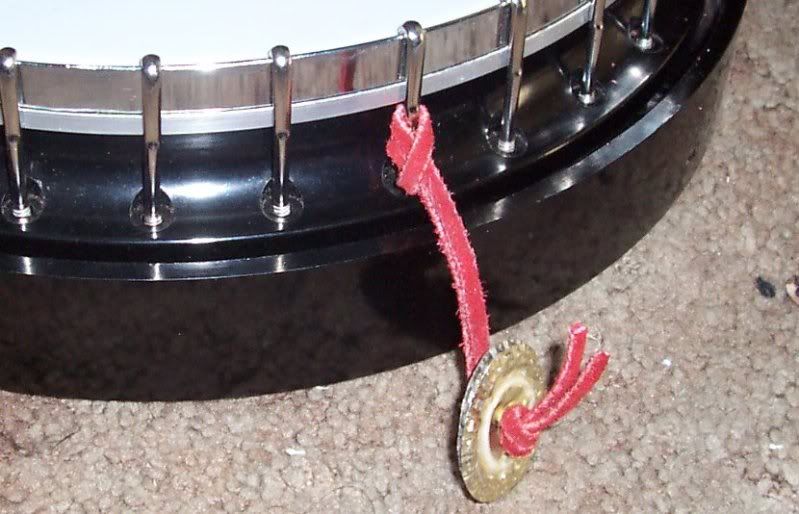 Some red leather cord was knotted at one end, fed through the cap eyelet, looped through the rim bolt and over the caps to secure the whole thing nicely. It's quite easy to remove and adjust. This was done twice.
Done
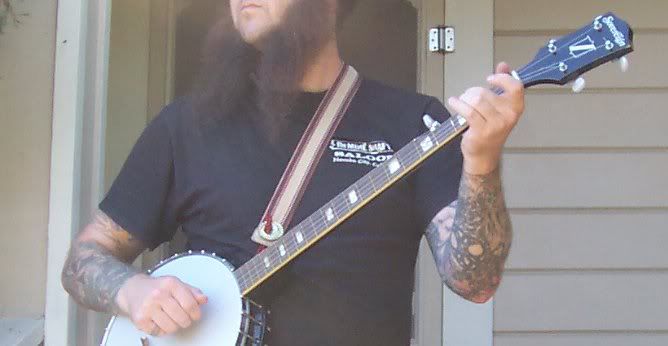 "Button" the caps through both ends of the belt, throw that baby over the shoulder and frail some Cripple Creek on the front porch!
It is really weird to play standing up, as I am so accustomed to easily seeing the strings and frets when sitting.
Now quit reading, and go parse the following with lilypond:
\version "2.12.2"
\header {
  title =   "~$ sudo modprobe"
  composer =  "Fabian Scherschel & Dan Lynch"
  copyright = "Creative Commons Attribution-Share-Alike 3.0"
}
melody = \relative c' {
  \key e \minor
  \time 4/4
  \numericTimeSignature
  e4 d8 e4 d8 e[ fis] | % 1
  g2. b4 | % 2
  a2. r8 b8 ~ | % 3
  b8 a g a g a g fis | % 4
  e4 d8 e4 d8 e[ fis] | % 5
  g2. ~ g8 fis | % 6
  d1 ~ | % 7
  d2 r | % 8
  \bar "|."
}
\score {
  \transpose c' c
  \context TabStaff = "banjer" <<
    \set TabStaff.stringTunings = #banjo-open-g-tuning
    \set Staff.instrumentName = #"Banjo"
    \context TabVoice = "banjer" { \melody }
  >>
  \layout {}
}
...and thank you Dr. Kulp
ha, nice idea for a strap, jez. how come i get the feeling, if left to your own devices, in a few years you will be living in a house made of choice recyclables and duct tape?
;)
Sorry it took so long to respond...had a hard time figuring out the math problem to prove my humanness.
It is now the first of May, and the scriptfrenzy challenge has ended (I wrote my 100th page with 45 minutes left before the ending deadline) and it's time to finish the stickers.
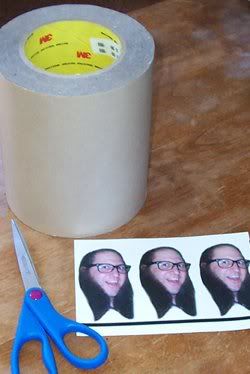
1: Take picture of Jezra with a digital camera.
2: manipulate the image using GIMP to isolate and duplicate my head
3: put the image on a flash drive
4: print the image at a local image printing kiosk for ¢29
5: go to my buddy's house ( hey buddy, you should start a photo blog so I can link to it)
On the way to my buddy's house I was almost hit by a car while I was walking in a crosswalk. The driver of the car started yelling at me for walking in the crosswalk. For some reason, when I informed the driver that California state law requires automobiles to yield to pedestrians in crosswalks, the driver insisted that there was no such law. Wow! Apparently anyone can get a California Driver's license.
 My buddy is, amongst other things, quite an image fanatic. Aside from taking a lot of pictures, he also likes to do things with pictures, and one of the things he does with pictures is turn them into stickers.
Here is my picture, my buddy's scissors (they are not lefthanded), and my buddy's roll of double sided adhesive that will turn any image into a sticker with a peel off back.
A properly sized piece of double sided tape was applied to the back of my image
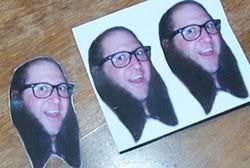 Having one big sticker is not the desired outcome, so using the righthanded bastard scissors, I cut out one of the duplicated images of my head.
Awesome Possum!
After this picture was taken, I went home and used proper scissors to cut out the other two Jezra images.
So where does that leave me? I have three Jezra stickers that are too large to put on the bottom of a coffee cup and I don't plan on sending them to Dan Lynch.
OK, I'm going to give the stickers away in a pathetic contest type thing.
Here are the rules:
1. you must send me a post-card from your current city of residence
2. you must write your address on the post-card
now stop reading, and get a post-card.
(awaiting an email ;) )
So, I tried really hard in my brain, and finally found the solution ;)
Off to buy some stamps.
I swear, every year my kilt shrinks just a smidgeon. Some naysayers may think that it is me getting girthier and not kilt shrinking that leads to the kilt not fitting anymore. Well, damn you naysayers! This is my blog and I can blame the kilt if I want to. Now get off my lawn!
 It seems to me, that the kilt straps are just too damn short. Look at those sad little rinky dink straps.
My first thought was that I should cut open the kilt, replace the straps with longer straps and then sew everything back together. What a terrible idea! That would require semi-decent sewing skills and a lot of time. I certainly don't have that sort of kilt alteration skill.
Why not just bolt on some extensions?
 $2 dollars, spent at a local thrift store, got me a leather belt that is just a tad bit wider than the straps on the kilt. Mix this with a leather punch and a few Chicago bolts that my buddy gave me (thanks buddy), and I was ready to start "fixing" the kilt.
  For my kilt, I need three straps that are a few inches longer than the current straps.
Now I just need to cut the straps to my desired shape, punch a few holes in them, and bolt them to the current straps.
 Well looky looky!
Cut,bolted in place, and working like a charm! Since the Chicago bolts are chromeplated just like the strap buckles, everything looks quite nice and the fit is absolutely perfect.
New kilt: $450
Adjusting kilt: $2 and some Chicago bolts
Looking good at my friends wedding: priceless, and by priceless, I mean $452
Feeling smug like Garak the Cardasian tailor on Deep Space Nine: priceless
now quit reading, and go alter some garments before the Dominion invades!
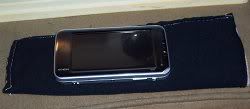
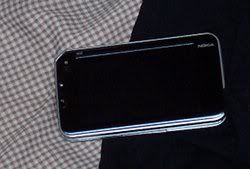 Why Yes; that is the Nokia N810 that I purchased on Ebay. Again, yes; the nokia is resting upon a torn black t-shirt and some ugly old shorts that no longer fit me.
The N810 has a wonderful screen that I fear will get scratched to hell if it stays in my pocket for too long. For portability reasons, I'm going to need a screen protector or, even better, a Nokia Coozie.
 First things first, cut out a large strip of fabric from the t-shirt. Follow this by cutting a large strip of that ghastly fabric from the shorts.
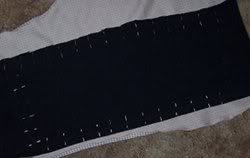
Pin the pieces of fabric together and then sew the fabric together. This will make it easier to handle.
That's a lot of pins. Hopefully the screen will respond to bloodied fingers.
 After wrapping the fabric around the N810, it is possible to determine where to sew the fabric in order to make the beginning shape of the coozie. After sewing and cutting off the excess fabric, things are starting to really take shape.
I left plenty of extra fabric on the length-wise measurement so that I would have some slack to make hemming easier.
Putting the N810 in the almost coozie, I marked where I needed to fold and hem the opening, and like Riker does after Picard says "Make it so", I made is sew.
Yes, I made a Star Trek sewing joke. Engage!
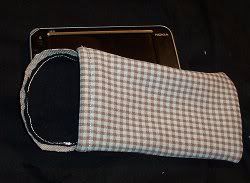 After hemming the coozie, half of the extra fabric was removed and the other half was shaped and sewn to make a flap that I could tuck into the coozie after the device.
Originally, I wanted to use velcro to hold the opening shut, but I would have had to either sew the velcro on very early in the process or sew it on by hand, which I am too lazy to do.
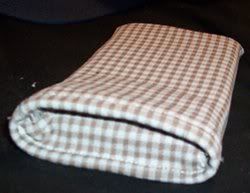 Finally.
Here is the coozie with the N810 inside and the flap tucked in. It may not be pretty but it is pretty damn useful and pretty damn ugly.
Sweet, I've got Linux in my pocket.
Now quit reading, and go make something ugly and useful.
Oh well, I don't embroider, it takes a bit too long and doesn't really add to the functionality. Besides, I don't really *want* it to look nice.
 Oh man, how many times have you been in this situation?
There is a madman with a gun trying to kill you, and he keeps yelling "you're not carnival personnel" because, why trying to flee from the madman, you ran past a sign that clearly states "Carnival Personnel Only".
Damn, I hate when that happens.
 What's with that sign? Don't they know that there is a madman after me? Perhaps running by that sign makes me a jerk, but I'll be damned if I'm going to stand around waiting for a madman to kill me. If only there was some way to alleviate the guilt associated with clearly violating the "carnival personnel only" rule.
A Ha I have the solution.....
 For starters, I'm going to need a black t-shirt, some iron-on letters, an iron, and some sweet left-handed scissors. Some of the letters are missing because, for a toddler's birthday, I made a special birthday present tank-top that says "bullshit" on it.
Let's get crackin, shall we?
start by cutting out the letters needed for the shirt.
 Carefully align the letters on the t-shirt. Since the letter on the paper are mirror images of what will show up on the shirt, special care is needed to make sure that the letters get placed right. This looks pretty good, so plug in the iron and move along to the next step.
( actually, this isn't that good, I'll explain later)
 Make sure that the iron is dry. We don't want any steam to mess up our letters. With the iron set to "wool", press on the iron-ons for about 15 seconds. If you press too long, or use too high of a heat, you might burn the letters a bit; which is exactly what I did on the "bullshit" tank top.
Flip the tshirt over and iron the other side of the letters for about 5 seconds.
 Hot Diggity! Problem solved.
Now, when the madman starts yelling "you're not carnival personnel", one can simply point to their shirt and say "Well actually, Yes I am".
The alignment issue: When I think of all of the issues that I've encountered while utilizing typography in a graphic, it amazes me that I didn't think about the kerning of the letters. The "V" and "A" in Carnival should be a lot closer together.
The best part: This isn't for me. This t-shirt is a gift for a friend. Hey buddy, when you read this give me a call, I have a gift for you.
Keep making stuff, and rock on.
Cheers,
Andrew
Please fix how your pages look in RSS readers like Akregator. Maybe tweak the CSS so classes are used instead of inline CSS, like Blogger does? Or maybe include a "clear" declaration in the inline CSS?
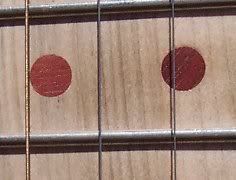 My friend with the wood shop has made a few stringed instruments before and he let me use some spare fret wire. Here is the 12th fret with fret markers. the markers are made from the same piece of bloodwood that I used to make the bridge,tuning pins, string saddle thing, and the pot rod. Speaking of blood, there are a few drops on the 7th fret from when I had to say "oops, that's finger", while hammering in the fret wire.
A forchner bit drilled the hole in the neck and a plug bit cut plugs of blood wood that I gently tapped into place. Well, it might not have been that gentle and two of the pegs broke just below the level of the neck. Hey! it adds personality.
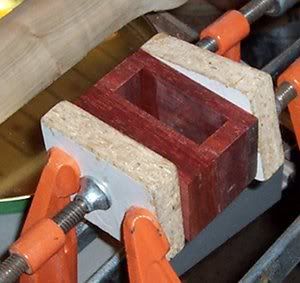 This is the string saddle thing in a vice. After the glue dried, I sanded and smoothed the thing, drilled some pilot holes and attached some brass screws to attach the strings to. The whole thing slips on over the pot rod, so if I ever find a nicer tin or my tin needs to be replaced, I can slide the saddle thing off with little hassle.
 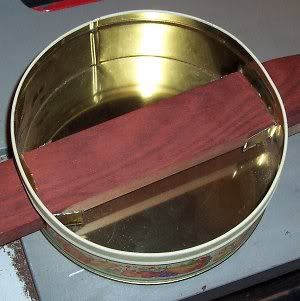 The tin was cut with a dremel tool and the flanges from the cut were folded into the tin to run parallel to the pot rod.
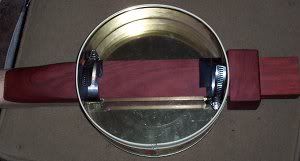 Two hose clamps and a bit of old bicycle innertube keep the tin in place on the potrod. These aren't really needed because string tension on the saddle thing keeps everything quite snug.
 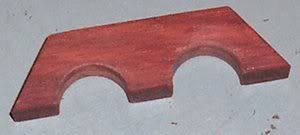 Hey it's the bloodwood bridge!
 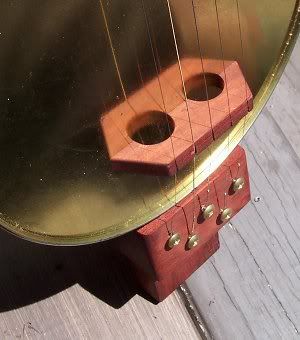 There is something about the reflection of the bridge on the tin that I find quite mesmerizing. Don't forget to look at the string holder thingy with the brass screws.
 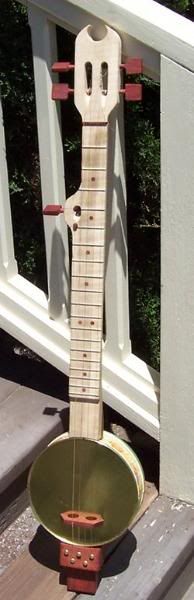 And finally.....the finished product.
For reason's that most people probably wouldn't understand, she has been affectionately named Shemp in honor of Shemp Howard: my favorite of the six Three Stooges.
After sitting down and taking the time to properly tune Shemp, she sounds quite nice and hopefully, in a few weeks, I'll have gained enough skill on the banjer to make a recording to share (it will be 'Banks and Braes'; I love that tune ).
For the next banjo, should I decide to make another, I'll use a dark wood for the fretboard as it is currently hard to see the strings against the light wood; especially with the grain going with the strings. I would also like to make a wooden pot, although I don't think I'll make a proper banjo head. Hmmm, my buddy does have a lathe.......
I'd like to thank my buddy for the use of his shop, Pat and Patrick Costello for inspiring and teaching me through their blog posts, books, and videos. Frail on!
Well that's all for now, time to get back to banjo practice!
 The first thing that needed to be done was the creation of the last tuning peg. Since all of the pegs are quite unique in shape, I decided to etch numbers in the peg face so that it would be easier to keep track of which peg should go where when I taper the tuning pegs holes in the neck.
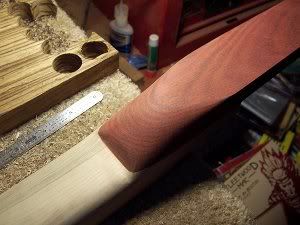 Where the potrod was glued to the neck, I rasped and sanded to get the shape just the way I wanted it. After the neck and potrod was shaped, I sanded with various grits to get the neck as smooth as possible.
 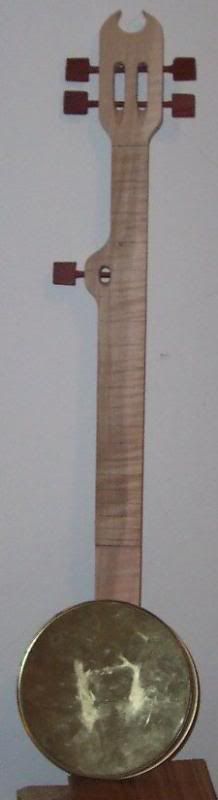 The tails were trimmed off of the tuning pegs and the corners where rounded with a rough grit sand paper. At this point, I simply had to see what the finished banjer would look like with my new cookie tin banjo pot. Since the potrod is quite a bit longer than the diameter of the tin, in the future I will probably make a wooden banjo pot with a drum head. It could be a neverending project.
Next up (in theory): fret dot inlays, cutting the pot to fit the potrod, crafting the nut and bridge, figuring out the tailpiece/saddle.
There is a certain level of "how the crap am I going to do that?" when I get to each step of making pieces of the banjer. Sometimes, the problem is solved with a bit of woodshop instruction from my buddy and the use of a jig that he has made. Other times, well, there is probably a tool to do what I need, but it isn't in the woodshop.
 A 2" by 12" by 1" piece of bloodwood was glued to the base of the neck. The bloodwood piece will pass through the pot and hold the pot in place, as well as being an anchor for the saddle and strap. It is going to take a lot of rasping to round the heel of the potrod.
 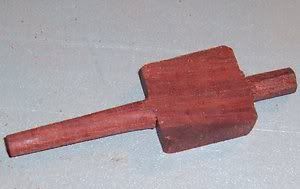 The pegs are also made of bloodwood, and they are semi-typical friction pegs. Friction pegs need to have a slight taper in order to work properly. The basic shape of the peg was hand cut with a coping saw and a small tail was left on the top. The tail of the peg was rounded with a rasp and placed in a drill press. As the peg spun in the drill, a block of wood, with a 1 degree cut on one face, was covered with sandpaper and used to create the taper of the peg. For some reason, the 1 degree cut in the block was done by my friend and it is the only part of the banjo creation that I didn't do myself.
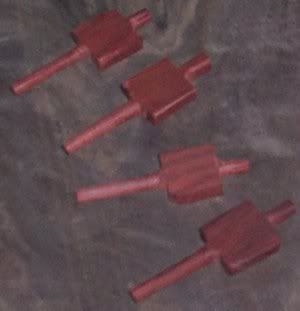 After a bit more time with the coping saw, rasp, and custom taper maker, I now had a total of 4 pegs, enough for the head. Damn that rasp! I was just too tired to create the 5th tuning peg so I relaxed in my buddy's backyard and looked for ducks.
Next up: making the 5th tuning peg, tapering the peg holes on the neck, shaping the neck and potrod, making a nut and bridge and string saddle, attaching the pot to the potrod, learning to play the banjo.
I am a fortunate person with good crafty friends.
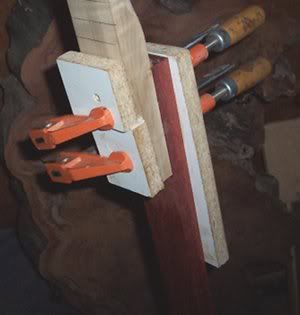
A very good friend of mine happens to enjoy crafting wood and he agreed to let me make a banjo in his wood shop during the weekends. First thing first, select a piece of wood for the neck. To be honest, the first thing that I did was to purchase a candy tin from a local thrift store to be the pot of my banjo. Back to the neck. While searching through the scrap wood in the shop I found a piece of maple that my friend said was a poor choice because it was sap wood. Oh the poor rejected piece of wood. Just kidding, I chose the sap wood piece. It was about 35"x3"x1". There were probably a few 16ths, 32nds,8ths, or quarters that should be included in the measurement but I don't like fractions. Metric System; for the win!
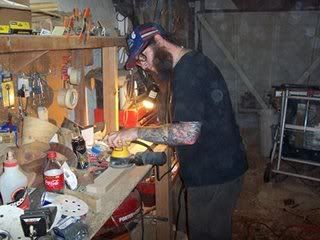 Anyway, after a lecture on shop safety and instruction on power tool usage, I was ready to start making the neck. A few passes on the joiner and the planer and the neck was squared up nicely and it was time to sand what would be the fret board ( I'm not actually using a seperate board for the fret board).
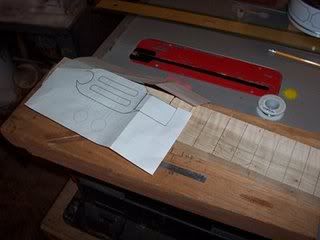 After cutting the channels for the frets, I needed to design a head stock. Thanks to inkscape, I soon had a nice printable vector graphic of my headstock.
 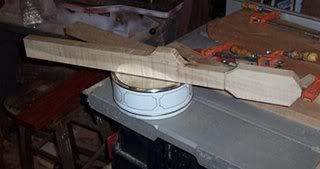 The rough cut shape with the tin that will be the banjo pot.
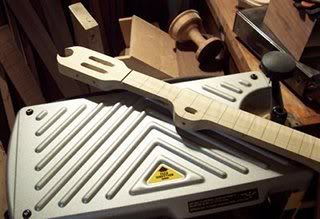 With a lot of rasp work, the neck is really starting to take shape. Someone should call Indiana Jones because I think the grail has been found.
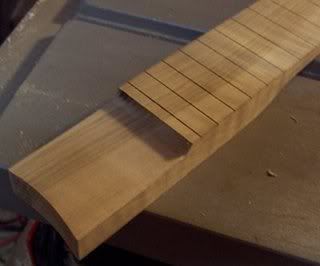 The base of the neck needed to be rounded in order to sit flush against the pot and a "strum area" was routed out.
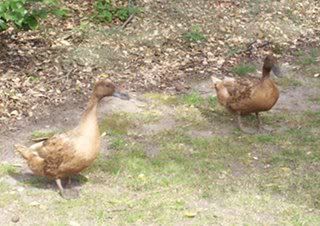 Later that day, these two ducks decided to visit my friends back yard in search of bugs.
That's it for part 1. Next weekend is tuning pegs and other assorted nick-nacks.

 Every year, on Bike To Work day, I stop at the Bike To Work station to get a cup of coffee, a bagel and a goody-bag. The goody-bag is a nice canvas bag containing band-aids, tube repair kits, a blinky light and informational fliers. The canvas bag, although quite nice, isn't exactly ideal for carrying stuff while riding. Fortunately, a little bit of cutting and stitching can repurpose a canvas bag into a bike-seat bag that holds:
an adjustable wrench
a spare tube
a patch kit
a spoke wrench
a tire pump
a pen
a lighter
a swiss army knife
a set of tire irons
a folder plastic bag
I should really get a small bike lock for the bag, as well as a some allen wrenches.
While riding my bicycle home from a friends house, I look down and saw that my right pant leg was not rolled up and I thought, "I should pull over and roll up my pant leg". Being three blocks from home, the pant leg rolling never took place, as I opted to just head home.
Can you guess where this is going?
Seconds later, I felt an extremely strong tug on my leg and heard a loud ripping sound in the vicinity of my right leg....... My pants, my favorite bike riding pants, my comfortable light pants, torn from ankle to knee were missing a large chunk of fabric that disappeared mysteriously. The damage was irreparable.
Looking on the bright side
A few months ago, a sewing machine that was destined for the thrift store, was diverted to my humble abode. Now, thanks to the sewing machine, my former favorite pants are my favorite shorts. But the fun doesn't stop there. After cutting of the pant legs to make shorts, I was left with some perfectly good black fabric. hmmmmm....
Thanks to a sewing pattern for a cycling cap, I now have a favorite cycling cap. Actually, it is a good all around cap, but the bill needs to be a bit wider. So without further ado, I present, "The Cap".
 Ah.... the award winning sideburns.
 Moving straight from Degoba and into our hearts.
 Just in case you where wondering what the cap would look like on a small bunya pine fruit.
 I know what you are thinking. "where the hell is bike trailer part 1?" Well... um.... I didn't take any pictures so I'll give you a quick run down of part one.
 A friend gave me an old baby stroller that he no longer needed. With hacksaw in hand, I chopped up the aluminum frame into what I envisioned to be workable pieces. A few PVC pipe fittings and a few nuts and bolts later, I had a working frame. Sweet sweet duct tape made the platform of the trailer.
Done.
On to part 2:
 As much as I love duct tape, a more firm trailer bed seemed to be in order so the duct tape was stripped off, leaving the frame in all of it's aluminium glory. ha, I said "aluminium". Previous to removing the duct tape, I had decided to use plywood slats for the bed of the trailer. Since I only needed about 2' by 2' piece of wood, I felt it would be best to ask the woodworkers that I know if they have any scrap wood that I could use. Being polite is the first step in asking a friend's father for some scrap plywood. In a show of pure awesomeness, my buddy's father not only gave me some scrap, but he cut and sanded the wood as well. A quick jaunt to my local Ace Hardware for some nuts,bolts, washers and brackets, and BOOYAH! One mighty fine trailer.
And here is the trailer attached to "The Green Squeaker" and ready for action.

 Every once in a great while, one might get the urge to create something nice for another person. Recently, I had the aforementioned urge and decided to make a hair pretty for a particular someone. In case you don't know what a hair pretty is I will give you the basic description. A hair pretty is something that one puts in their hair to add a bit a pizazz to their coif.
For this particular hair pretty, I used the following:
- a hair thingy that holds hair in place
- orange, yellow, and white plastic flowers
(do not use real flowers, no one wants rotting flowers in their hair.) - some plastic leaves
(a little bit of foliage goes a long way) - orange ribbon
(I like orange )
To bind all of the components, I chose hot glue. Hot glue comes from a hot glue gun. It's called hot glue because it is hot, as the burns on my fingers prove.
 Anyway, I wrapped the ribbon around the top and glued it in place. Next, the flowers were added and finally, the leaves where added to cover up the ugly glue joints at the base of the flowers. About an hour later, I presented the hair pretty to a special someone and got quite a nice smile, hug and kiss in return. BOOYAH!
 On a recent trip to the FNBG(friendly neighborhood bicycle graveyard), I came across a horribly weathered Brooks B15 saddle. By horribly weathered, I mean that the years of neglect in rain, and heat had turned the leather into a torn, dried out, shrunk, crumbling, decrepit piece of jerky on a rusted steel frame.
 So Sad. Wait... What? That isn't sad. That's an opportunity for some leather crafting! Here is a quick breakdown of the process I used to add some new leather to the saddle.
 First I used duct-tape to hold the old leather in what I figured was it's original shape. I then traced the shape onto some leather that was graciously supplied by my buddies father, who happens to be quite a leather crafter. In case you were wondering, it is 13-15# vegetable tanned butt leather.
 The leather was soaked in room temperature water for about an hour and then wrapped in a plastic grocery bag and the whole thing was placed in the fridge overnight. The next day, the leather was quite malleable and easily molded over the old leather. Duct-tape held the molded leather in place while it dried.
 Here is the molded leather and the frame with the old leather removed. 220 grit garnet paper cleaned the frame up to some of it's former glory.
 A leather punch and a pop-riveter attached the leather to frame quite well.
Cuir Bouilli, a process of using hot water to harden leather was used on my new saddle to really firm things up. A few coats of red stain later, I was ready to rock and roll. Shazaam!!


Many years ago, I had read about a style of stitching that is used when making a flag. Move forward to the mid-oughts: pirates are all the rage and the skull and cross-bones abound. Boring. It is the pirata generica of our times, lacking flair and individuality. So what happens when I mix fabric, flag stitching, and an idea for Jezra's pirate flag? Not a whole hell of a lot. The memories of the stitch had drifted to obscurity, and I lost motivation.
 Tick tock, tick tock; welcome to the present. Fondly remembering the image of my pirate flag as I saw it in my minds eye, fluttering on the breeze of memories, I can't help but smile. Oh what the hell, I grab some canvas and paint and make my little pirate flag. It's not perfect, it's not the best; but it is mine, and it beautifully adorns the base drone of my Dunbars.
- Tubular Music Thingy Part 2
- Beaglebone console output and a faster boot
- Tubular Music Thingy (part 1)
- get and speak the weather
- Getreel youtube-dl wrapper
- Two hours with the Archos 43
- HTML5 for a specific platform? I prefer to develop native apps
- a bit of dev talk about MuttonChop media player
- case for my status server
- my tiny todo list and some ruby
- The Camp Mug (almost) Test
- 2012 Tizen Developers Conference in San Francisco
- Freedom Jar is Full
- Web UI speed up using HTML5 Server Sent Events
- LEDs, BeagleBone, and my ToDo List
- a case for the BeagleBone
- fixing the car mirror
- Basic HTTP server in Vala using GIO Sockets
- sewing up a bling thing
- Trip to Austin
- convert hexadecimal string to an integer with Vala
- Training for 2012: Wuggling
- ABC tune grabber/converter
- A trip to Lancaster
- a new media playing machine
- Don't turn Tizen into WebOS
- making some chili sauce
- grumpy kid
- beer network improvement
- Ripping my DVD collection
- ruby script to search files in a directory for a string
- Pacific Pinball Museum Mission
- A Tale of Two Mugs
- shishi odoshi prototype
- file downloader in Node.js that handles redirects
- Travelling Far Part II
- python shell-fm web interface
- not quite a letter to cherrypal
- Audio playing class in Ruby with Gstreamer
- A quick fix
- my resized images using Ruby and Imagemagick
- one pound of coffee
- noise-canceling headphones that actually work
- updating my dynamic IP DNS information with Ruby
- Hello World in Ruby
- Bacon Apple Cider
- clawhammer sudo modprobe
- a web.py introduction
- The Skillet
- banjer strap on the cheap
- The Letter to Dell
- Linux Outlaws episode 170
- Not the 2010 Petaluma Whiskerino
- Monte Rio
- a new power switch
- the coffee cup review
- seriously, that thing is garbage
- keeping a GTK TextView cursor in view
- A tale of three sticker
- minimize/close to system tray in Python GTK
- A markdown editor/viewer in Python
- Red Phone Mumble Test
- Saturday Sassafrass
- A Friday Frolic
- Toshiba laptop review
- Google no longer uses Microsoft
- regarding Heybuddy and python stuff
- I'm calling you!
- heybuddy identi.ca client
- making a change holder thing
- Did I win? Yes and No.
- photograph sticker
- share this on facebook
- the damn computer died
- kilt alteration
- audcast streamer in vala with gstreamer, gtk and webkit
- The Mullet Adventure
- A Letter to the California State Legislature
- will dogfooding the frenzy leave me bitter?
- basic sitemap file maker in Python
- rock and rolling down the street
- Time to Celebrate
- game of life : Vala, SDL
- game of life : python, clutter
- networked timed text-to-speech goodness
- battery status in a screen session
- Bright Bike
- turning gears
- incremental screenshot namer wrapper
- a nice little feature/bug
- drawing circles
- broken VHS fixed
- cloudy phone number finder
- network quitter fixer
- the hot sauce experiment
- non-delivered emails sent to AOL domains
- GIMP mathmap experiment results
- tri-force tuna gift
- leave early, take your time, enjoy the solitude
- N37°49'8 W122°28'48
- rotary phone computer interface in action
- python script to play the latest version of an audio broadcast
- rotary phone computer input device
- server log spam from Microsoft?
- creating a CAPTCHA
- hello HTML 5! a simple audio player
- How does that increase security?
- getting familiar with GWT, a porting experiment.
- You're Not Carnival Personnel!
- "disable" a web app's buttons using javascript and css
- litterbugs and jaywalkers
- a basic web-app with pyjamas
- shell script to aid in compiling Vala projects
- Banjo part 4: she's finished
- Accent Characters in Linux with Xorg
- Terminal emulator part deux!
- Community
- Terminal Emulator in Vala using GTK and VTE
- Where is the MPAA on this one?
- pyclutter stage fullscreen hack
- Banjo part 3
- from necessity comes something
- If you build it, they will spam
- writing blogging software ( using data from blogspot )
- From WBEZ Chicago......
- Simple Switch Input to Enter a Command
- perplexing ponderence, pertaining penguin presents
- baby steps: the evolution my feature-free PHP framework
- ruining a perfectly good lamp?
- thank you bazaar
- quick not-so-little bikey bag
- Vala musings : int to string, packages, and starting with main
- my motor vehicle warranty is about to expire? really?
- Bike Trailer Part 2
- getting dandy with a hair pretty
- a not so elegant fixer up
- use python and gstreamer to get the tags of an audio file
- trials with gstreamer, pygst, and goom visualization
- Gaarrrrrrrrr!
- more pyclutter: get a move on - behaviourpath
- scrollwheel css div Internet Explorer 7 problem fixed
- Hello World using pyclutter - a half assed tutorial