
A few days ago, the urge to create an internetted thingy was upon me. Recently, I had been reading documentation regarding machine to machine communication using MQTT as well as BLE, and then I took a quick look at my tinker pile. The amount of neat things that I purchased for use in a project was far too high.... and then it hit me: LESS HOARDING, MORE MAKING!
What I was craving to make, was a network accessible pixel LED, inside an orb light fixture, that could be controlled using MQTT.
For this build, I used:
- an orb light fixture from the ReStore
- an Unwired One single board computer running OpenWRT
- a single ws2801 pixel LED that was left over from the Glimmer build.
The Build
The Fixture
 The orb light fixture appears to be a run of the mill wall or ceiling CFL fixture. If I remember correctly, the orb cost around $5. The cost of computer cases these days is getting out of hand. :)
Take it Apart!
 For some reason, the fixture manufacturer decided to put a bunch of unnecessary crap in my new computer case. Fortunately, it only took a few minutes to get the orb in a usable state.
Test the Circuit
 ws2801 pixel LEDs are controlled using SPI.
On the Unwired One device, there are no GPIO pins that are dedicated to SPI. Instead, the SPI bus is created by loading a kernel module with arguments to determine which GPIO pins will be used for SPI.
ws2801 pixel LEDs are controlled using SPI.
On the Unwired One device, there are no GPIO pins that are dedicated to SPI. Instead, the SPI bus is created by loading a kernel module with arguments to determine which GPIO pins will be used for SPI.
Solder Leads to the LED
 Once the circuit was working, leads were soldered to the LED so that it could be connected directly to the GPIO headers.
After the soldering was complete, the leads were wrapped in electrical tape.
Make a Notch for the Power Cable
 Since the orb is intended to rest on a table, it was necessary to make a notch in the base for the power cord to fit through. Thus ensuring that the orb will be flush on a flat surface. After a bunch of waffling around trying to find my files and metal snips, a grab and twist with some needle nosed pliers did the trick.
Put it Together
 After more waffling while trying to determine the best way to make some fancy standoffs for the computer board, I opted to simply hot glue the board to a piece of cardboard, and then hot glue the cardboard to the underside of the orb base.
Fast
Simple
Effective
... and I'm lazy
The LED was also hot glued to the base, pointing upward into the glass orb. /
Now me has ORB!
Have Some Coffee
 Technically, this picture is for the morning after the Orb Device had been created, but it does a damn fine job of showing what the orb thingy looks like.
The Code
Enable SPI
As previously stated, the SPI on the board needs to be configured by added a kernel module. In order for the kernel module to be loaded each time the device is restarted, the /etc/rc.local file was edited to launch the following script:
#!/bin/sh

#see http://www.unwireddevices.com/wiki/index.php/Working_with_SPI_(C/C%2B%2B)
#BUS : SPI bus number, can be bus0, bus1, bus2, bus3
#ID : SPI device ID (integer number)
#SCK, MOSI, MISO : GPIO numbers for the corresponding SPI signals
#MODE : SPI mode (0, 1, 2 or 3)
#FREQ : max SPI frequency (Hz)
#CS : GPIO number for the CS signal (optional)
# insmod spi-gpio-custom BUS=ID,SCK,MOSI,MISO,MODE,FREQ,CS

bus="bus1"
id=1
sck=20
mosi=23
miso=18
freq=25000000

cmd="insmod spi-gpio-custom $bus=$id,$sck,$mosi,$miso,0,$freq"
echo $cmd
`$cmd`
Honestly, the entire script can be replaced with one line of code: the final command. However, the script was written while reading the documentation of the process and if I ever need to edit the script, there are hella useful comments in there.
Control the Orb
The code for controlling the orb is written in Python and requires the Paho MQTT library.
code is available at https://gitlab.com/jezra/orb
oh... It would be really nice if I could copy the payload parsing documentation from the README.md in the code repository. Sadly, the lazy dev hasn't yet created that file. Well then, I know what I'm doing later!
Now quit reading, and go make an orb thingy.
A few months ago, a special someone told me they were going to be traveling to Petaluma and asked if there was anything I would like them to get for me. As it so happens, one of my favorite beers is brewed in that area: Oyster Stout by HenHouse. Unfortunately, it isn't possible to get Oyster Stout in a bottle. Fortunately, the beer is available in a growler . :)
Wow, what an absolutely amazing and delicious gift! It didn't take more than a weekend to empty the growler and imbibe the glorious nectar. Having a growler from HenHouse Brewery, while being quite awesome, is also somewhat depressing. The growler was empty and it would be a long time before I had the opportunity to fill it again. Obviously I needed to do something to the bottle...
"lamp fever" seems to have infected me lately, so... uh... why not make a lamp?
Okie Dokie!
Cut the bottom off
 Sometimes, the urge to make a vessel designed to hold liquids no longer have the ability to hold liquids is just too much for me to handle. Time and a little patience go a long way towards cleanly removing the bottom of a 64oz growler.
Put the cap back on
 Everything was flipped upside down, and the cap was filled with a thick layer of J-B Weld. After the J-B Weld had cured, a hole was drilled through the center of the cap. J-B Weld cures quite hard. To make the drilling easier, a ceramic/glass bit used.
Fill the inside
 Just to be on the safe side, some high temperature white paint was used to coat the inside of the growler bottle. Without paint, too much light passes through the glass. By diffusing the light with the light paint, the logo doesn't get over powered and will still be quite visible when the lamp is turned on.
Electronics
 Kits for a simple hanging lamp are about $18 at most hardware stores. The kits contains a socket with a pull switch, about 15 feet of cord, and some chain for hanging the lamp.
A bit of twisted copper and the original label that came on the growler were added to the pull switch.
Let there be light!
 After hanging the lamp in the lamp testing spot by the dart board, the power switch was pulled. Hot damn, that logo looks nice!
All in all, this was quite a fun project, and a soon to be birthday present.
Now quite reading, and ...um... bring me some beer. :)
Last night, I went out to a nice sushi dinner with some wonderful people and we shared a bottle of sake. This morning, I put the empty sake bottle on the glass cutting rig.
Make the cut
 This is one of my favorite parts of a project. Not cutting something, but being able to yell TAKE IT APART! ...and 'take it apart' is exactly what I did. :)
After cutting the glass, a diamond bit on the rotary tool smoothed the edges.
Don't cut yourself
 Using a dull utility knife, I swore a lot while trying to remove the casing on some solid core copper wire. I think it is about 12Gauge wire.
Putting a fresh blade in the knife made the job easy and I was done in a jiff.
Twist and wrap
 My wire twisting skills are lackluster. Fortunately, I have access to more wire, and I'm looking forward to getting some tools to help with the wire twisting.
Um... does anyone want to have some wine? ha!
Get ready to grow
 The bottle with the wire was filled with potting soil and then I added some catnip seeds. meow meow meow
Aside from making the kitties go crazy, catnip apparently makes a nice tea. Hopefully I will be learning the truth of that soon.
Don't waste the rest of the glass
 The bottom of the bottle was left to soak in some soapy water, and after:
- a motorcycle ride to get some girl scout cookies
- a nice picnic
- building an algae/pond-muck collector
- catching a frog
- catching a tadpole with the muck collector
- catching a fish with the muck collector
- supervising some hole digging
- planting a yuzu
- planting a persimmon
- mulching the yuzu and persimmon with some collected pond muck
- munching on chips and guacamole
- catching more fish and tadpoles with the muck collector
it was time to scrape off the bottle's label and test its usefulness as a drinking container.
Survey says..... booyah!
Now quit reading, and go make some stuff.... or invite me over for some sake. ;)
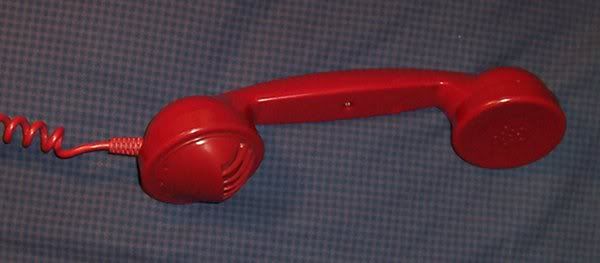
For a while now, I've been wanting to connect a microphone to Bonechop so that I could then use Blather to send commands to the various machines on my local network. After a bit of a quest, I finally found a sweet old CB radio microphone that I could repurpose to fit my needs.
The New Mic


The new microphone is an Electro-Voice 660-D Dynamic Microphone. From what I can tell, this thing is made out of bakelite. Sadly, I don't have a picture of the two-prong plug that needs to be replaced.
Take It Apart!


Ah, the best part of any repurpose: TAKING IT APART!!!
Damn, look at all of those doodads and zipper-zappers. After a bit of snipping and snapping, the old innards were removed.
The New Microphone
 A semi-adequate microphone was salvaged from an old touch-tone phone and glued/taped to the bracket that held the original microphone in place.
Finishing Up!
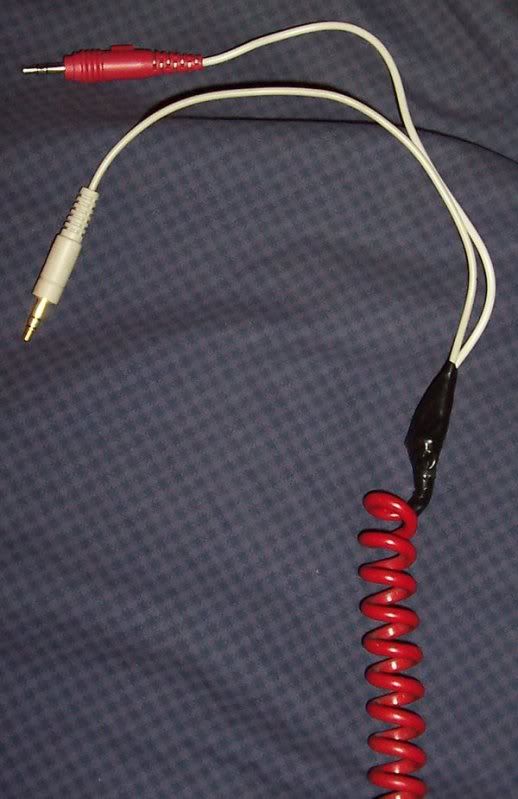
 To be honest, I have no idea where the curly cable came from, but it worked wonderfully for this project. After a bit of shenanigans with the wiring, I managed to get the mic soldered to the thumb switch, and a 1/8" microphone plug. sweet!
Oh Bummer
Unfortunately, the USB audio card that I'm using with Bonechop isn't getting any data from the microphone when the audio card is connected to the BeagleBone Black. It works when I plug the sound card into my laptop, so it may just be a driver issue. I blame the ARM architecture.
Now quit reading... and make that staticy sound that old microphones make when you press the "talk" switch.
Oh, if your browser doesn't play .ogg files, you should file a bug report with the creator of your browser.
Kind of like Simon Says: if you start out with "Breaker 1-9!", the audio will start working.
Someone once said that I was 'addicted to noise', while I don't necessarily agree with the 'noise' part, I certainly like to listen to music... all the time. With that in mind, you can understand my desire to have a sweet sweet music player in my workshop, and now I have one (sort of). Say hello to Bonechop!
What's in a name?
Bonechop is a Beaglebone Black computer running Debian Linux and using MuttonChop for network controlled audio playing, and the whole system is put in an old AM Radio. Since the Beaglebone Black doesn't have audio out capabilities, I opted to use a hella cheapo USB audio card; and it works wonderfully.
Gather Some Supplies
 Here we have:
- a nice big late 50s or early 60s Montgomery Ward Airline AM radio gifted by a friend (thanks buddy!)
- a screw driver
- some awesome glue
- white gorilla tape
- the beaglebone (and a USB audio card)
- a bunch of little wood screws
- a 1" x 1" piece of poplar to use a stand offs
OK, the Poplar Didn't Work
 aside from having a hell of a time just cutting the poplar into little pieces, every piece I tried to put a screw into would split before the computer was securely fastened. bummer.
Fortunately, there were some pine shims in the workshop that were left over from when my buddy framed in a door. Thanks buddy!
Here we have 3 small pieces of pine secured to the Beaglebone with little wood screws. I would have used 4 pieces, but the 4th hole is located near the micro-SD card slot and my blocky stand-off wouldn't fit properly. That's OK because 3 points make a plane.
A New Adhesive!
 This is the first time I've used Weldbond, and I must say that I'm quite pleased with the results. After tipping the radio onto its side, the 3 stand-offs were glued to the body of the radio.
The next day, I took my coffee picture with the finished product.
How about a video?
As an entry to a contest by Adafruit Industries, I made a video of Bonechop playing some music.
This project is definitely not finished, but it is in a damn fine usable state. Now I need to go find some switches to wire into the GPIO.
It was mounted on the wall of a local thrift store, and whenever I would walk by, it would whisper "destroy me". After a few weeks, I finally succumbed to the siren's call and, $12 later, I was walking home with a cheap crap clock.
I was hoping to turn the clock into a useful computer. sigh....
The Build
Destroy!
 Why don't I have a pre-destruction image of the clock? Damn, I'm slacking.
These are the components of the clock that I wanted.
P.S. Smashing a clock is not the same as killing time.
Amplify
 Much like the toaster, a small amplifier was disassembled and new speakers and plug were soldered on. Two power lines were also soldered on. The idea being that I could use 5 volts from the pins on my motherboard to power the amp (more on that later).
Mount the amp
 Using a paddle bit, holes were drilled on the sides of the case for the speakers to be mounted over.
Here we have all of amplifier bits mounted in place. In the middle is the little amp.
Mount a Laptop hard-drive
 Using some eye-screws, baling wire, and little bits of plastic, a simple system for handing a hard-drive was created.
Mount a crappy Single Board Computer Pt. 1
 For mounting the crappy SBC, I used some more eye-screws and zip ties.
"click click click"==done
This is how the top of the SBC was mounted, although in this case 'top' is quite relative.
Mount a crappy Single Board Computer Pt. 2
 For the bottom mounting holes, again, eye-screws were used, but instead of zip-ties, a short bit of yarn was used to secure the crappy SBC.
This was my first use of yarn in a custom computer case and it saddens me that it was with such a lousy SBC.
Put that crap on the wall!
 All done and on the wall.
Later I added a microphone to the machine so that I could use Blather to control my lights. Unfortunately, the crappy SBC had different ideas.
The Crappy SBC
Quite a while ago, I purchased an Odroid-X, because I read that there was support of Arch Linux. Unfortunately, after I had everything together and Arch was installed, I started running into problems. Audio wasn't working properly, and for a machine that has the main purpose of playing audio and accepting microphone input, this really shit in my oatmeal.
After trying, and failing, to get the machine to boot with any other version of Linux, I gave up on having this machine do what I wanted it to do. sigh
What's in a name?
"pissbox" is now a database backup machine, and I will always do a lot of investigation before purchasing any SBC that isn't designed to run GNU+Linux "out of the box".
There once was a time where I liked to pull my hair out trying to get Linux to install on a computer, but now I just want to install Linux and get cracking on making an odd/interesting/art computer that does what I want it to do.
Now quit reading... and recommend a SBC that I should/could use.
For quite a while now, I've been wanting to make a sweet replacement for the red phone. Fortunately, my good buddy found a fancy phone with a broken dialer and put it on my porch. All that was needed was a bit of hot glue and solder.


The Build
- strip it down and tear it apart! (this is my favorite part)
- put it back together with just a few of the original pieces
- always skip step 3
- find a speaker (this is the sister of the speaker in the toaster)
- glue the speaker in place and solder a bunch of wires
- plug the phone into a computer
What it does
When the phone handset is in the phone cradle, the two internal switches are open. One switch is connected to the microphone and this means that the microphone is only active when the handset is removed from the cradle.
The second switch is in parallel with the internal speaker (which is in series with the handset speaker). This way, when the phone is lifted, the internal speaker is effectively "off".
Much to my displeasure, the internal speaker is far quieter than I had hoped, and the audio quality of the phone's stock microphone leaves much to be desired.
Oh well, I still dig it. Now I need to record some audio using this thing... and give it a name.
Hack on!
Solitude is my muse, and taking things apart keeps me from getting depressed. However, it is still nice to hear other people say nice things so I decided to convert a toaster into an interactive art project that says nice things when something (usually me) walks in front of it.
The Build
TAKE IT APART!
 The first step to any great project seems to begin with a bit of destruction. Good. Nothing really clears my mind like taking something apart. Yea, I laughed when I bought the toaster and I'm still laughing now.
The toaster was soon gutted and a bunch of innards where chucked in the waste bin.
Make some mounting thingies
 For this build, I planned on using the Raspberry Pi from the NaNoBox and since someone is a hobby hardware hacker hater, there are no mounting holes on my Raspberry Pi. sigh. Who's a liar? ME (sort of). I said I wouldn't use the Raspberry Pi for a similar project. Fortunately, this project isn't too similar.
A small wooden block was epoxied to the toast box (at least that is my name for it). Similarly, a piece of thick plastic from VHS case was also epoxied to the toast box.
Circuit from the shell


Surrounding the toast box is the toaster shell, and this is the circuit board that was mounted inside of the toaster shell. On the circuit are 3 buttons and two LEDs.
After a bit of scratching at the circuit board and some soldering, the buttons and LEDs where ready to be wired up.
The circuit back in the shell
 Oh man, look at that rat's nest of wires.
This is the inside of the shell with most of the wiring finished. This includes the PIR thingy. What's a PIR thingy you might ask? good question.
PIR Thingy
 Hey look, kids, it's a PIR thingy! This Passive InfraRed sensor thingy was purchased at https://www.adafruit.com/products/189 for 10 bucks.
A notch was cut in the toaster's lever channel and the PIR was hot glued into place. Damn, I love adhesives.
Sound!
 My buddy gave me a small USB amplifier and speaker combo used for plugging into a mobile phone.
In my haste, I obliterated the amplifier before taking a pictures. What a shame. The wires on the amp were to frail for my needs so I soldered on some heavier wires for audio in, audio out, and the power connector. Since the amp was originally powered over USB I figured I could wire it to the 5v pin on the Raspberry Pi. The speaker is from another portable amplifier.
Buckle up
 Like I've said may times, the designer of the Raspberry Pi hates me and didn't include mounting holes on the board. Because of this, I needed to find a creative way to keep the board in place and my solution was a nice little 'belt'.
To keep the number of cable going to the toaster to a minimum, an old USB 802.11g was connected to the board.
Add some more LEDs
 Aside from the two bright blue LEDs on the toaster shell, I added a green LED to each slot of the toaster box.
All Together
 With much finagling, the toaster box and the copious amount of wires was stuffed into the toaster shell and the end result was put on a desk and pointed at the busiest foot traffic area of my home.
The toaster lever, although no longer in use, was hot glued back where it belongs and helps hide the PIR sensor.
What does it do?
When the sensor detects movement, an audio file is selected at random from a directory of audio files, and played through the speaker. While the audio is playing, the LEDs are flashing.
some of the setup
The code for running the toaster is written in python and utilizes gstreamer-0.10 for audio playing. In order to get gstreamer to default to playing through the 'audio out' on the Raspberry Pi, I had to edit the /etc/asound.conf file to look like the following:
pcm.mmap0 {
  type mmap_emul;
  slave {
    pcm "hw:0,0";
  }
}

pcm.!default {
  type plug;
  slave {
    pcm mmap0;
  }
}
Switches
Due to the lack of GPIO documentation for the Raspberry Pi, most tutorials for the device involved wiring in "pull-up" resistor which means that extra work is involved just to get a simple button press to register. However, pins 3,5,7,24, and 26 have built in pull up resistors which makes these pins ideal for connection switches.
Most (if not all) of the information I needed for programming the pins on the Raspberry Pi came from http://www.panu.it/raspberry/ and not from the Raspberry Pi website. Seriously, this is wrong. The RPi website should have some useful information, but alas, it does not.
What's next?
The power for the amplifier was specifically not taken from the one remaining USB port. It would be fairly trivial to plug a USB camera into the USB and, when the PIR detects motion, have the camera take a picture and then upload the picture to a back up server. Hella cheap home security system. booyah!
Also, I need to figure out what to do the the buttons.
if your browser doesn't play ogg files, you should switch browsers
Why? Because if your browser doesn't play ogg:
- your browser hates freedom
- you won't be able to hear
duh!
The System
Like almost all of my computers, the toaster is running Arch Linux
Now quit reading and go make something...
"Talky's the name, toasting's the game."
For some reason, I am drawn to Will-o'-the-wisp even though I have never seen them. Fortunately I have an inclination for breaking things and making things and it seemed obvious that I would need to make my own Will-o'-the-wisp with some hardware and software hacking.
In a nutshell, I wanted to put some LEDs in a lantern and randomize the LEDs brightness with a computer to emulate a flickering effect.
Hardware Used
- phone cord : because I have plenty of it
- tin candle lantern : because it was available
- beaglebone ( I used my wall mounted beaglebone ) : because it can have more than one PWM controlled pin
Will-o'-the-Wisp Hardware
The Lantern
 This tin candle lantern was the obvious choice for this project because it has been at my home for a few years and I don't really use it. TAKE IT APART!!!
There was a small tin cylinder in the lantern that held candles. Some gentle twisting quickly removed the holder. This was followed by sanding the inside of the lantern to make it more reflective and then small hole was punched in the bottom of the lantern.
This was my first time working with tin.
Solder some LEDs
 Three bright LEDs were soldered to a four wire phone cord. Three wires for power and one wire for ground. The phone line adapter was scavenged from a broken touch-tone phone.
pfffttt touch tone
Hack a Notch in the Box
 While putting together this hack, I thought it would be a good idea to include a phone cord jack for the rotary input device as well as the lantern.
Why Cringe?
 I have friends that are wood crafters, and whenever they see my wood working skills they cringe a little bit. The easiest solution to the problem is to not show them what I do, but that wouldn't be as much fun.
Two phone cord jacks hot glued into the notch. It looks fairly flush on the top... and functional (which is what I really want).
Move the Beaglebone
 While I had the box disassembled, I move the stand-offs closer to the wall of the box so that the beaglebone's USB port can be accessed more easily. I don't know what I'll use the USB port for, but it's nice to know that it is ready when I need it.
Plugged In Phone Jacks
 All glued up, the lid closes properly, and I'm happy.
On the left is the lantern cord and the rotary phone is on the right.
LEDs
 The LEDs are mounted in the tin lantern with a heavy dollop of hot glue! RAD!
Will-O'-The-Wisp Code
For this project, I opted to use the Ruby programming language because... well... just because. For now, all I need is a bit of File IO to write data to files. One of the reasons that I'm such a fan of the beaglebone is that in most instances, controlling the pins can easily be done simply by writing to a file.
All I really need to do, is have 3 instances of PWM on the Beaglebone and set the value of the pins to a random number in order to emulate a flickering effect.
Enter the Ruby
#define the pins that will be used, and their muxing values
#these are:
# 9.14
# 9.16
# 8.13
pins = [
{:mux_value=>6, :mux_target=>"gpmc_a2", :pwm_dir=>"ehrpwm.1:0"},
{:mux_value=>6, :mux_target=>"gpmc_a3", :pwm_dir=>"ehrpwm.1:1"},
{:mux_value=>4, :mux_target=>"gpmc_ad9", :pwm_dir=>"ehrpwm.2:1"}
]
#a class to represent an LED
class Wisp
def initialize( pin )
@min_val = 0
@max_val = 100
#set the pwm_dir
pwm_dir = File.join("/sys/class/pwm",pin[:pwm_dir])
#set the pwm duty_percent file
@duty_percent = File.join(pwm_dir, "duty_percent")
@run = File.join(pwm_dir, "run" )
#mux the target
target = File.join("/sys/kernel/debug/omap_mux", pin[:mux_target])
set_file_value(target, pin[:mux_value] )
#set up the PWM
set_file_value(@duty_percent, 0)
set_file_value(File.join(pwm_dir,"period_freq"), 100)
set_file_value(@run, 1)
end
def clean_up()
set_percent(0)
set_file_value(@run,0)
end
def set_percent( value )
set_file_value(@duty_percent, value)
end
def random()
val = rand(@min_val..@max_val)
set_percent(val)
end
def set_min_val(value)
@min_val = value if value >=0 and value <=100
end
def set_max_val(value)
@max_val = value if value >=0 and value <=100
end
private
def set_file_value(file, value)
#puts "#{file} : #{value}"
File.open(file, 'w') do |f|
f.puts( value )
end
end
end
#make an array of wisps
wisps = pins.each.map {|p| Wisp.new(p)}
#we want to create a controllable loop
loop = true
#let Ctrl+c break the loop
trap "INT" do
loop = false
end
#start looping
while loop do
#give each wisp a random percent
wisps.each do |w|
w.random()
end
#take a bit of a nap
sleep 0.1
end
#when the loop is broken, clean up
wisps.each do |w|
w.clean_up()
end
For easy copy and paste, this code is available at http://hoof.jezra.net/snip/o6.
It should be noted that this code is running on a beaglebone Rev. 3 using Arch Linux.
If I had the hardware, I probably would have used an ethernet cable instead of a phone cord. That way, I could run 7 LEDs instead of 3. Well it works, and that's what really counts. Now I have to start writing the web UI that will allow me to control the LEDs from a web browser. In case you haven't noticed, I like internetted things.
Now quit reading, and go find a will-o'-the-wisps.
In the trunk of my old car, I had a large speaker box that added quite a bit of volume to the music I was listening to. When it was time to retire the car, I put the speaker box into storage, and quite recently, I decided to actually do something with the box.
In my mind I saw an exquisite vision of what could be if I used all of my skill and determination to make something with the speaker box. Fortunately, I skipped all of that "skill" crap and just threw a bunch of components together to make a boombox of awesomeness.
A Bit of Soldering
 Knowing that I would need to connect some sort of audio playing thingy to my boombox, this adapter cable needed to be crafted from a pair of RCA cables and an audio plug from the local electronics store.
This was the only soldering that I did on this device.
The Box
 Oh man look at that massive, far too heavy box. The crappy carpet on the box is coming off and I need to glue it back into place.
The Box
 The hot glue gun was almost used, but then I remembered that I had this can of spray adhesive just waiting to be used.
With a spritz-spritz here and a spritz-spritz there, the carpet was put back in place.
The Box
 From an unused laptop bag, I salvaged some strap components that I attached with some wood screws.
The Box
 Some of the fabric from the laptop bag was hot glued to the back of the speaker box to make this pocket.
Within the pocket, I store two power adapters for the amplifier. One is a wall wart and the other adapter plugs into the cigarette lighter of a car.
The Amplifier
 On Amazon.com I purchased a little 12Volt amplifier
Right now, this thing is basically finished....
The First Test
 The boombox was taken to my buddy's place where a backyard deep fry was going on. The amp was plugged in, powered on, and a MP3 player was connected. BOOM! For such a small gutless amp, this thing really jams.
Here are some beer battered yam slices frying to a delicious golden brown. nom nom nom
The First Repair
 The plastic connectors from the laptop bag strap couldn't withstand the weight of the box and the epic sounds of Iron Maiden. A short length of heavy duty shoe lace came to the rescue.
Up the Irons! Don't blame the Maiden.
The finished product
The Future?
There are a few things I would like to do to the box...
- replace the heavy crap wood with a very light box. Seriously, this thing is too damn heavy.
- add a motorcycle battery to the box to make it more portable.
- add a solar panel on the top of the box to charge the motorcycle battery. Double win!
Now quit reading, and go rock out!
In mid-February, I purchased a $25 pink PogoPlug Pro on Amazon that I wanted to use for a Status.net micro-blogging server that I could run from my house. This would allow me to maintain control of my data, while still letting me connect and be social with buddies on the interwebs. While I was happy that the device was working as I wanted it to, my status server setup was little more than and exposed hard-drive plugged into the PogoPlug. A case for the machine was long overdue.
The Box
 Aside from clocks, there are plenty of jewelry boxes at the thrift store that will make a great case for a server.
When I was at the store looking for a new case, the decision was between this $6 jewelry box or an $8 clock. The dark wood of this box matches my Clock Server and Wall Bone Phone quite well.
Cleaning The Slate
 There is always stuff that needs to be removed from the inside of a new computer case. This is fun destruction.
Always remember, when tearing things apart it is necessary to use "controlled destruction" so that useful stuff doesn't get destroyed.
After this picture was taken, I spray painted the inside of the box black.
Put Some Holes In It
 This is the back of the box showing multiple small venting holes at the top, and one large cable access hole in the bottom.
Being to lazy to line everything up properly for external access, I will end up putting the network and power cable through the large access hole and connect them on the inside.
Hooks From Above
 Taking things a step further in "stupid design" land, I decided it would be a good idea to hang the hard-drive and motherboard from the top of the case using some bent baling wire.
These are the hooks for the hard-drive which will hang in front of part of the motherboard.
Hang'em High
 All put together.
The power converter on the bottom is hotglued to some wooden standoffs that are hotglued to the box. This was necessary due to the lack of mounting holes in the power converter board.
Power for the hard-drive comes from the USB adapter that is far too long for this project.
Closed Up
 Done and Done!
Let's talk about LEDs. I love those blinky little bastards, and they make see through cases awesome at night. On the motherboard there is one green and 1 blue LED, that are "on" when the machine is powered up. The Ethernet port has 2 yellow LEDs that light up when there is network traffic. The USB adapter has 1 red LED which lights up when the drive is accessed.
The Hardware
My PogoPlug is the "pro" version: Model number POGO-P01 - Pro
700Mhz Dual core ARMv6 Processor
128MB RAM
4 USB ports
1 SATA port
The machine is currently running Arch Linux which I installed by following the instructions at http://archlinuxarm.org/platforms/armv6/pogoplug-provideov3. Lighttpd is used to serve webpages and MySQL handles the database needs.
The biggest problem I encountered while putting this baby together was figuring out how to mount the power converter. Fortunately, the new Series 4 PogoPlugs have an external power adapter, a similarly sized motherboard, and 2 user controllable LEDs! Oh be still my blinking heart. Unfortunately, they also have the same paltry amount of RAM.
One day, I will find the perfect machine for a freedom box..... one day.
A few weeks ago I purchased a BeagleBone from Amazon. The BeagleBone is a small ARM based computer with programmable Input/Output pins developed by Texas Instruments and is part of their beagleboard line of ARM development boards. After finally deciding what to do with the computer, it was time to build a new computer case.
Where is it Going?
 At the thrift store, I purchased a nice jewelry box with flowers etched in its glass. The small, solid box was $3.00.
The plan (play the A-Team theme), is as follows:
- Connect a rotary phone to the BeagleBone for input
- Do some other sweet shit (more on that later)
Alrighty! time to get crackin
Gutted
 Step 1. Remove the guts.
For some reason, whoever created the box thought it would be a good idea to put a bunch of stuff inside that I don't want or need.
Here is the box with the lid removed and the crap removed.
Making Some Standoffs
 When I made the clock server case, I kept some of the wood bits that I needed to remove from the internals of the clock. A wood saw and some small screws made some sweet standoffs for the beaglebone.
A black marker was eventually used to color the light wood.
Mangle the Box
 Any dreams I had about making an very clean access hole in the case was dashed upon the rocks of my poor power tool using skills.
Oh well, it doesn't get seen, and it works as it should. Why am I complaining?
Wall Hanging Mount
 Some twisted baling wire and two wood screws will make it very easy to hang the box on the wall.
Time to warm up the hot glue gun.
So Far So Good
 Once the glue gun was hot, the standoffs were glued into the box.
Look at all of that empty space! The BeagleBone has a USB port so I will be putting something in the box, but I don't know what it will be. So far, I'm thinking it could be:
- a nice laptop hard-drive for file storage
- a character LCD to display information
- or... I could ditch the case and put the BeagleBone in the phone itself
On The Wall
 All plugged in a running sweet!
Currently, my BeagleBone is running Arch Linux.
Originally, the BeagleBone ships with Ångström Linux, but I couldn't find any documentation for configuring the opkg package manager that ships with Ångström, and since I was looking to eventually run Lighttpd and MySQL on the device, I switched to a distro with an extremely useful wiki.
The Computers in the Corner

The Phone
The Bone
The Router
The Clock Server
The DSL Modem
The Status Server (between the modem and the router)
Now What to Do?
Put some LEDs in the box and write a program to light up the LEDs when something happens. That something is to be decided
But what else?
Options include putting a hard drive in the box and use it as a federated status.net server or put a character LCD in the case and use LCDproc to display various bits of information.
Currently the machine is programmed to:
- Dial 666 : play random Iron Maiden track on my MuttonChop machine
- Dial 75337 (sleep) : shut down computers
- Dial 9253 (wake) : emit wake-on-lan signal to various computers
Now I need to write a bunch of little programs to be run when various numbers are dialed on the phone, and I need to find a way to get the cables out of the way.
Until next time, hack on!
The BeagleBone story continues at http://www.jezra.net/blog/LEDs_BeagleBone_and_my_ToDo_List
When I built my media playing machine, I swapped the motherboard of my previous media playing machine into my home server and added a two terabyte hard-drive. Due to the increased processor heat, I put in a fan which did a great job for quite a few months. Recently, the fan began to fail in a very noisy way and instead of replacing the fan, I decided to just build a new case.
 Lady at thrift store: oh, your buying the nice clock
Jezra: Yea, I wouldn't call it nice.
The clock in question was twenty-five dollars of cheap wood and a fancy yet broken clock mechanism.
Originally, I wanted to put the guts of my little ARM based pogo plug in the clock and have a sweet working clock / status.net server combination.
Fortunately for my "tic-toc" hating self, the clock was broken.
Clean It Out
 First thing first: remove all of that ticky tocky stuff from the clock.
It was during this part of the process that I realized just how poor the quality of the wood used to create this clock was.
The parts that weren't glued together were fastened with small flat-head screws. yuk.
Oh hey! look at that. An empty clock frame and a pile of clock crap.
Yes, I Sometimes Shave
 What is that design called? Art Deco perhaps?
Oh who cares. All I know is that I didn't want the ugly design painted on the glass to ruin the look I was going for.
Using my trusty razor, I shaved all of the crappy paint off of the glass. Let me tell you, it made a noise like fingernails on a chalkboard... and it was worth it.
Drill Some Venting
 For some reason, I decided that as a computer, the clock would be better if it were upside down and I wanted to drill some large vent holes in what would become the top of the computer.
Peek-a-boo, I see you. Oh, that's kinda creepy.
The OS Hard Drive
 The Machine is running Debian Squeeze from a 4 Gigabyte partition on a 60 Gig IDE laptop hard drive; the other 56 Gigs is for file storage.
The OS drive is mounted to the side wall of the clock case. Two smalls strips of plastic were screwed to the bottom of the drive and then screwed to the wall of the clock.
Although the OS is on a 4 Gig partition, only about 1.5 Gigs are used. Not that you care.
More Storage
 The majority of storage on the server is handled by a 2 Terabyte SATA drive.
Using some wood bits that I removed from the inside of the case, and some left over clock gears, I make mounting brackets for the big drive.
Oh how very steam punk of me.
I actually really like this look, and it makes me want to build a nice wood and brass computer case from scratch. Who am I kidding? That would take way more effort than gutting a broken clock.
Small 5Volt Fan
 Seriously, all I really needed to do was put this thing in the old case and everything would have been fine. It wouldn't have been as much fun, but it would have been fine.
This fan caused me a bit of a problem in regards to a power source. The fan is 5 volt, but the CPU and system fan power sources on the motherboard are 12 volt. I ended up getting 5 volts from the S/PDIF connector on the motherboard.
A bit of baling wire, two thumb tacks, and two hair elastics later, the little fan (which came from a busted Sega), was cooling that CPU properly.
Everything in Place
 Alrighty! Everything is in place and running properly.
Did you think I was joking about the thumb tacks and hair elastics? Oh wait, they are sideburn elastics.
A couple of zip ties keep the cables manageable.
On The Wall
 And there she is, miniserver mounted on the wall and looking good.
The system specs are:
- 1 Ghz VIA Processor
- 1 GB RAM
- 2 TB Storage
The motherboard has another free SATA slot and I am tempted to put another drive in the case. If I do, it will have to be a laptop drive due to limited space.
Now quit reading, and go hack some hardware.
Fancy clock + hammer = fun times
Less Stuff, More Fun
It started with a brief conversation with my buddy regarding my desire to de-clutter my abode. You see, some might say I'm a bit of a hoarder; to which I typically reply "I'm not a hoarder, I'm a pack-rat who happens to be a slob". Yea, that's how it started.
Anyway, I decided that it would be really good to do a few of the following things:
- get rid of some stuff
- clean up a bit
- make a place for stuff that doesn't have a place
- put stuff where it belongs
In this regard, I felt it would be a really good thing if my musical instruments could be put in a place that would keep them out of the way, but still make it really easy to pick up an instrument for playing.
One Man's Trash
 Me: I really need to make a wall mount for my bagpipes
Buddy: you can use the drop bars I ran over with a lawn mower
Me: shit yea!
Buddy: reduce, reuse, recycle
(events may not have been exactly as described)
...and after today's coffee, armed with a few brackets and screws that were lying about, I soon had a nice wall mounted bagpipe holder. aaaaaalright!
Next up, a banjo holder.
Now quit reading, and go put stuff out of the way.
This has led to me amassing a lot of crap.
After re-purposing a larger case with more storage for the server on my home network and filling the server with my ripped DVDs, I figured it was about time to replace my media playback machine with a machine that was actually capable of decoding my rips without running the CPU at 100%.
Gather Some Components
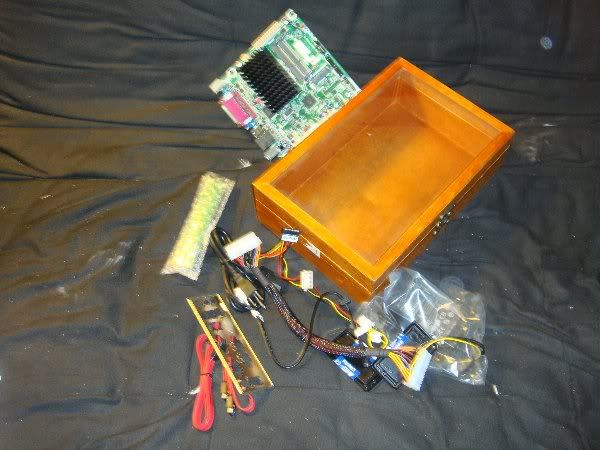 The case for the new machine is box that was part of a Wild Turkey holiday gift set: a cheaply crafted piece of crap made of low grade wood, with a clear plastic cover.
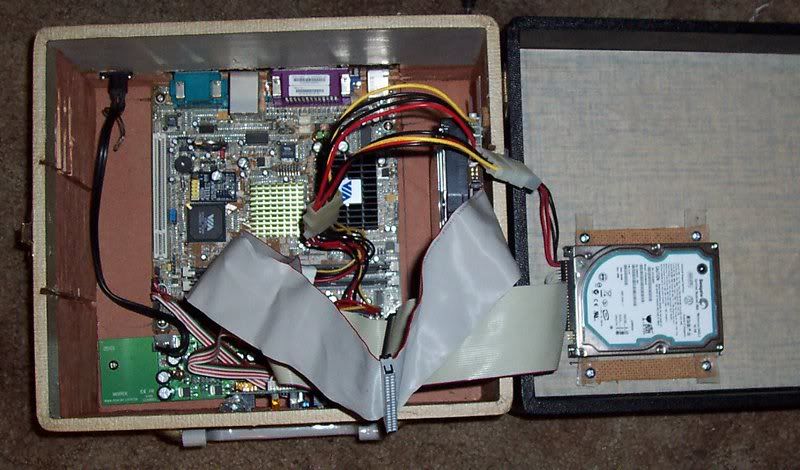
The Electronics
- Dual core 1.8Ghz Atom processor on a mini-itx motherboard
- 2 x 2Gb RAM
- A far too powerful power supply
- 80Gb SATA laptop hard-drive that I pulled out of a busted laptop
Because this machine is going to be fanless, I decided to layout the components in a way that would maximize convection cooling. What this means, is that the component that generates the most heat needs to be closest to the exhaust and the most temperature sensitive component needs to be located by the air intake.
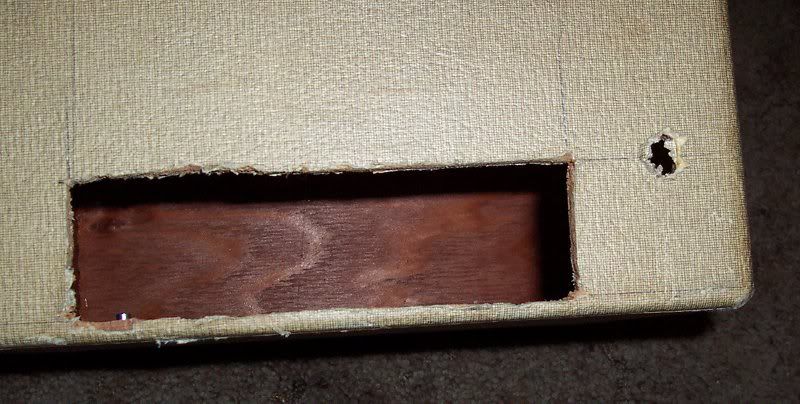
Cutting, Drilling, Bending, JB-Welding
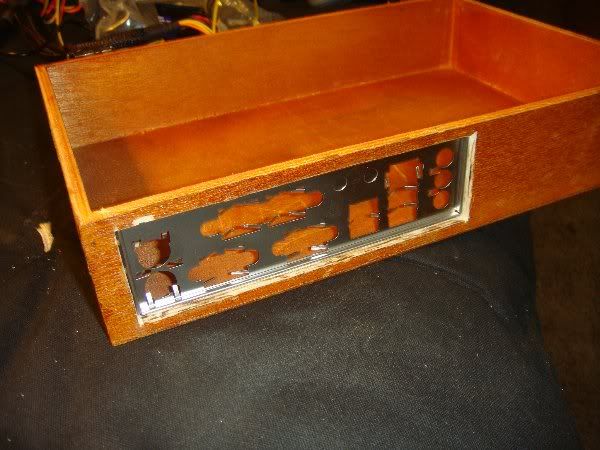

First things first: the hinged lid needed to be removed so I could muck with the inside of the box more easily.
- After aligning all of the internals, I traced where the metal port plate is supposed to go and then cut... not a bad fit.
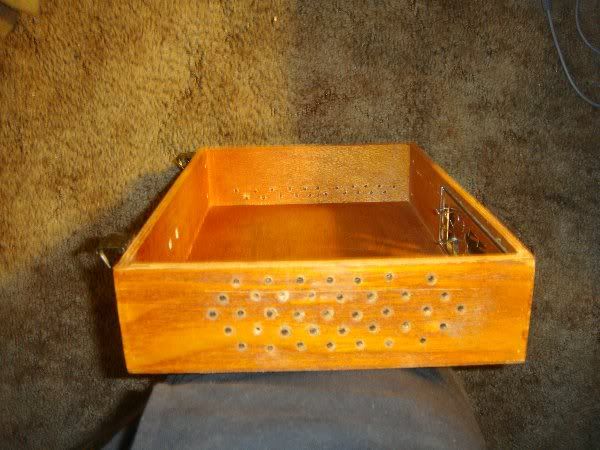
- A lot of small holes where drilled on both sided of the box. Technically, it was the top and bottom that were drilled ( the machine is going to be on end so as to provide the best convection airflow.
- Those metal things with the points are my component stand offs and I bent the points down before using JB-weld to attach them to the inside of the box.
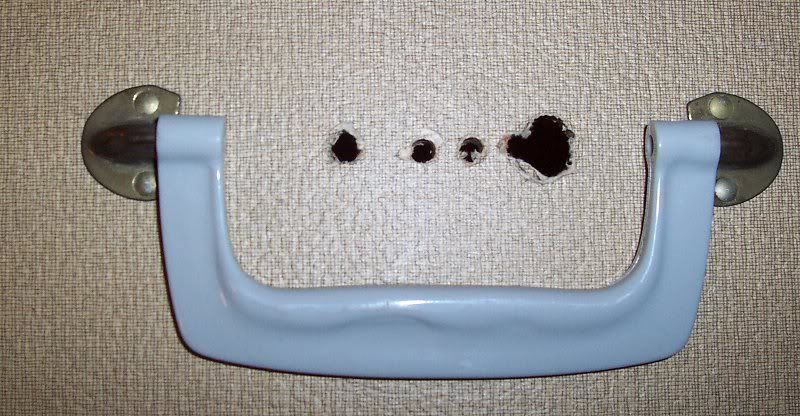
Fire Up the Soldering Iron
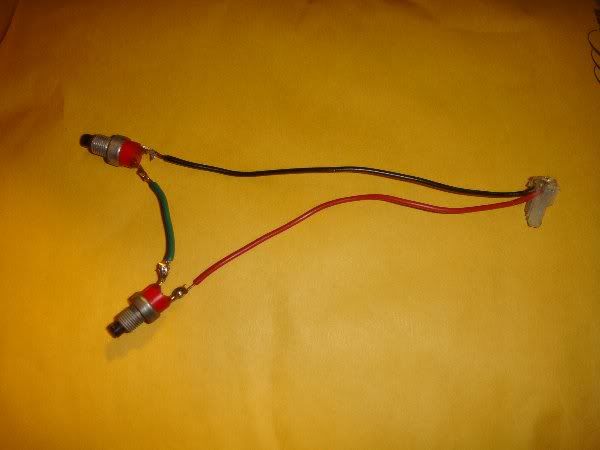
- That two pronged thing-a-ma-bobber is my power switch. Because it consists of two switches in series, both switches must be pressed in order to power the machine on and (most importantly) power off the machine. The last switch I put in/on a machine has a tendency to accidentally get pressed when I least expect it; like when I open my scanner.
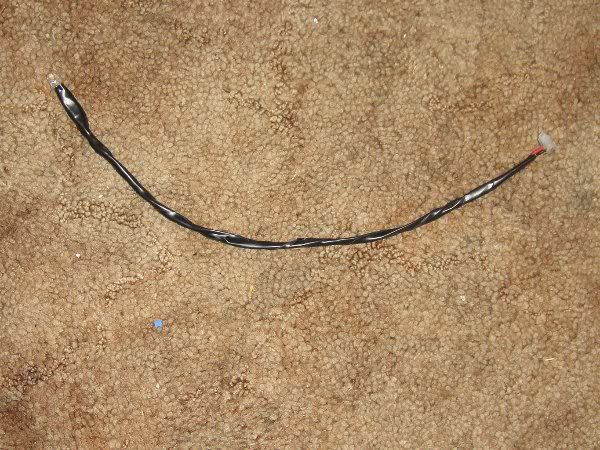
- A red LED was soldered to some wire and wrapped with electrical tape. This is the Power On indicator and bit a sandpaper helped diffuse the light coming out of the LED.
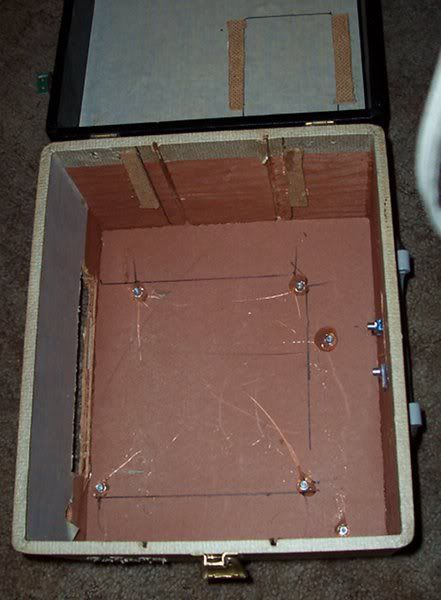
Put It All Together
 This is the mostly finished machine with the lid put back on. The locking clasp on the side had to be moved, but it still functions perfectly.
At this point, everything was going extremely well and the computer looked absolutely fantastic, so I figured something was terribly wrong. After connecting everything and pressing the power buttons .... nothing happened. Bummer.
Note to self: when powering up a computer, make sure it is plugged in properly.
After properly plugging in my power converter, the machine booted and I installed Arch Linux.
Installed
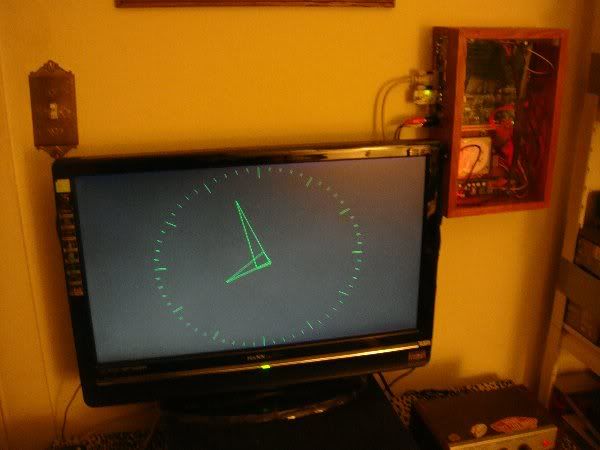

The final resting place for the machine is on the wall next to the TV.
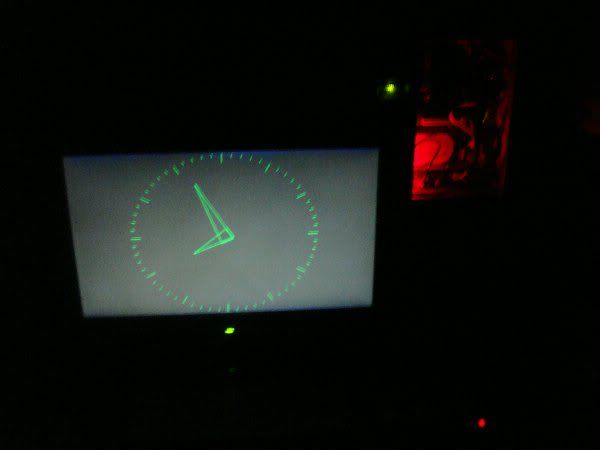
- Don't be afraid of the dark
- Computers are just fancy clocks
- The two power switches are just barely visible on the right side of the machine.
Still to do: The audio out can use a smaller adapter and the current external USB wireless adapter needs to be replaced by an internal PCI-Express mini card. I need to either hack the XMBC to properly handle my NES controller, or I need to write my own software for browsing and playing media from my collection.
Due to the lack of a fan, this computer is silent; therefor, I have named it Wind.
Now quit reading, and think of wind related things.
like:
- What's next? A computer named Earth and a computer named Fire?
- Make 3 more, and Crom will laugh at them.
Also, I'm fairly certain that you can map the keys on your controller with just an edit of a particular file. Which file is it you ask? I can't quite remember but, it seems I seen it on the XBMC forums.
While copying large files across computers on my network, I became rather frustrated with the amount of time it was taking. So I did a bit of research on ways to speed up my wireless network and performed a not quite scientific experiment to measure the fruits of my labor.
The Nerdoleum
 In case you were wondering, my network is the Nerdoleum. It's kind of like a mausoleum, but more nerdy and less dead.
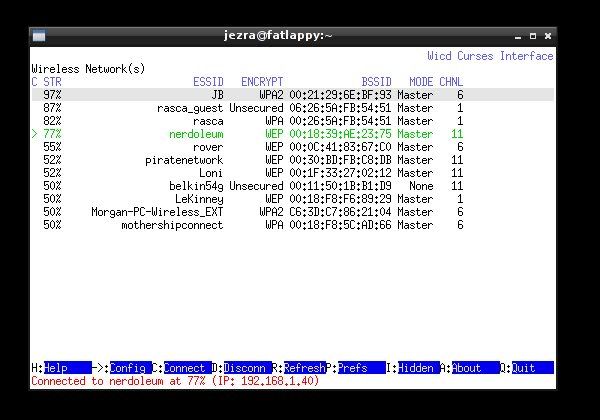
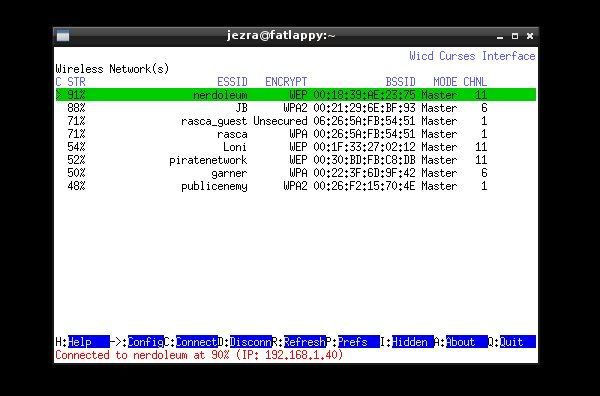
Oh damn look at that! 77% is a crying shame. I'm getting a better signal from my neighbor's network. How is that even possible? Copying my 491 Megabyte test file in this state took 6 minutes 15 seconds
Surely I can do something to change the situation
What can't cheap beer fix?


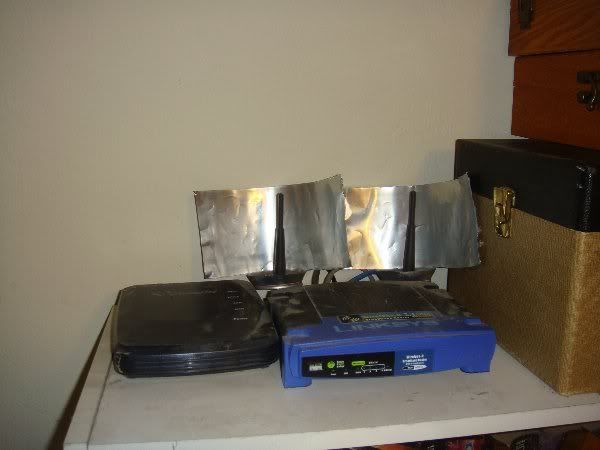
- drink two cans of cheap beer
- use some crappy right-handed scissors to cut off the bottom of the can
- slice open the can and pretend to bend into some sort of parabola
- throw those cans over the wireless routers antennas to direct wasted signal energy in an appropriate direction
- ?
- be thirsty
 Oh hay! That seems to be a bit better.
Copying the file across the network again took 5 minutes 29 seconds. That's about a 12% increase in speed. WOOHOO! It's not much, but it's not too shabby for two cans of beer and one minute of work.
Now quite reading, and go drink a cheap beer.
x1101, in the name of Science, please experiment and share your results.
Also... I looked at the attached screenshots this time and... Dude, you really want to choose a different channel for your wifi than everybody else has ;-). In your case I'd switch to somewhere around 8 (to be as far away from everybody else). And didn't your mom tell you WEP is insecure?
Fresnel zones aren't exactly at play here because the parabolic reflector is behind the antenna and not between the sender and the receiver causing line-of-site interference.
While I am fully aware of the limitations of WEP, I also drive a 50 year old car that doesn't have the safety features of modern cars. That being said, I get better fuel economy than most modern cars, replacement parts for my car are plentiful and inexpensive, and it is fairly easy for me to fix/maintain my vehicle. Like WEP, my car is old, reliable, and has locks that are easy to pick.
The Problem
Let me start by saying that I hate little earbud headphones. Sure they may send music to my ears but they do absolutely nothing to block ambient noise and I am forced to increase my volume to ear damaging levels in order to hear my audio above all of the crappy-ass racket I'm forced to endure on a daily basis. Having tried very expensive "active noise canceling" headphones that didn't work, I decided to make a cheap pair of passive noise canceling headphones that actually work as expected.
The Pieces
 My new headphones would be made out of some cheap headphones that I bought for $6 at Ross and a pair of $20 Peltor Optime 105 earmuffs from Amazon which reduce ambient sound by 29dB. (That's about the difference between a telephone dial tone and a power saw )
Take Stuff Apart
 There is a certain amount of enjoyment I get from being able to take something apart. A few screws and a bit of snapped plastic later, I had a nice pile of crap to work with. Unfortunately, I managed to sever the cable leading to one of the speakers.
Put Stuff Together
 One of the first times I used a soldering iron, I wasn't paying attention and I picked the iron up like a pencil and burned my fingers.
Nothing bad happened this time, unless you consider this crappy solder job to be bad. Hey, it works, so it is all good in my books. Besides, I simply covered the solder with some Gorilla tape and everything was pretty... pretty awesome!
Break Some More
 Fortunately the remaining speaker pieces were too large to shove into the earmuffs so I started breaking off the plastic until the speakers were small enough to fit.
Throw Those Babies On!
 Ohhhhh yeaaaaaaa! Looking sharp and working like a charm. After plugging the headphones into my portable music player, I sat in front of my home stereo speaker and I was extremely happy with the results. Seriously, these "under $30" homemade headphones cancel noise better than the $80 pair of active noise reducers that I had tried. D.I.Y. for the win!
Now quit reading, and go be quiet.
Stop copying me with that goatee!
The Problem
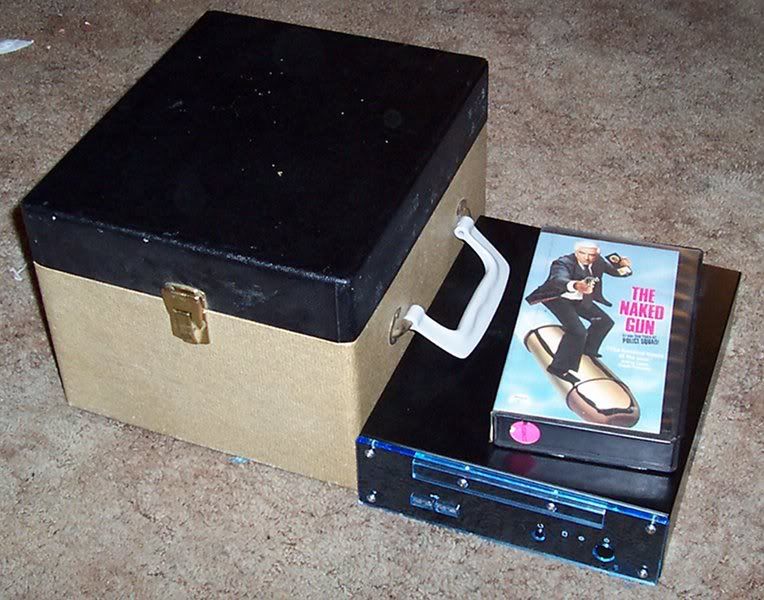
My little home server, affectionately named miniserver is a mini-itx machine with a 400Mhz processor, 512MB of RAM and a 60G harddrive; all in a nice little case that sits on top of my bookshelf. Unfortunately, 60G isn't enough room for my purposes and the extra 250G drive I have won't fit within the slim case.
Fortunately, a new computer case is just $5 at the thrift store; which means I spent 5 bucks for a box that I was going to turn into a new computer case.
Get Hacking
 In hindsight, I should have taken some measurements of the motherboard before I dropped my fiver on a box I thought I could stuff a computer into. Oh well, it all worked out.
Here is the new box next to the old case. Yea, that's a VHS tape for size comparison.
pull the guts out
 After pulling all of the parts out of the original case, I had a decent collection of old slow gear on my floor.
smash!
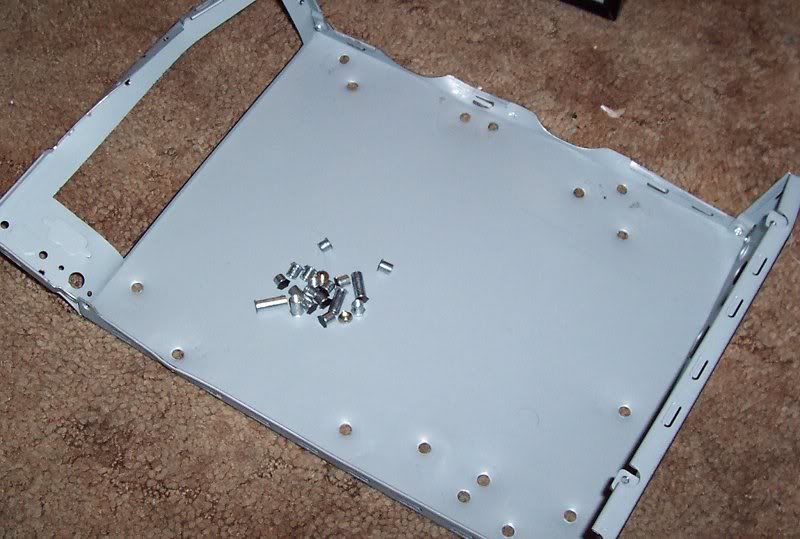 All of the stand-offs from the original case were removed. This was the "point of no return" because I smashed them out with a hammer.
If you've never hit a computer component with a hammer, I highly suggest giving it a go. pure joy.
chop it up
 With surgical precision, I cut a hole in the box so that the various ports of the motherboard can be accessed from the outside.
By "surgical precision" I mean that I drew some hasty lines and used a drill and the saw on my pocket knife to create the access hole.
drill baby drill (that's bad)
 A couple of holes were drilled for the power switch, reset switch, and some status LEDs. So far, so good.
getting close
 The interior of the box with the stand-offs hot glued into place and pairs of shims hot glued to the lid and wall of the box. The shims will be used for mounting the hard-drives.
mounting the hard-drives
 Remember those cumbersome plastic cases that Video Rental stores kept their VHS tapes in? Well I chopped one up to get a few lengths of flexible durable plastic. The hard-drives were bolted to the plastic and the plastic was screwed to the shims. It's easier than bolting the drives directly to the case, and it leave a but of room for airflow.
all set and ready to go
 Well looky looky; it's all of the components (minus two USB ports) in place and ready to be fired up.
Amazingly, everything worked just fine. It is also quite amazing that I didn't burn my fingers with the hot glue gun, or smash my fingers with the hammer, or cut my fingers with the saw, or damage myself in any way, shape, or form. weird.
sitting pretty
 All closed up and sitting on the bookshelf next to the linksys router and DSL modem thingy.
what does it do?
It runs Ubuntu server edition and :
- it serves files via NFS and SSHFS, so I can access my music, movies, and pictures from any machine on my network
- it runs Apache webserver and MySQL database, which allow me to develop and test websites at home
- it is a backup for my various coding projects and has a centralized Bazaar repository
What the machine doesn't do is process a lot of data, so the 400Mhz processor is just fine (and quite energy efficient). Actually, this entire box could be replaced by a nice little plug computer.
Note to self: write a letter to the manufacturer of a plug computer.
Alright, quit reading, and go spend 5 dollars at the thrift store.
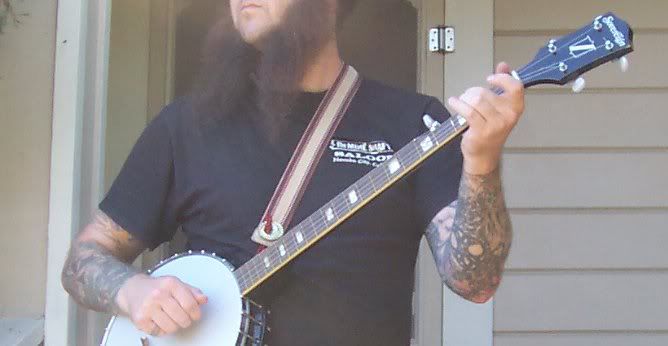
Due to an unfortunate series of events, Shemp ( my homemade banjo ) is out of commission. However, I recently purchased a used Sovereign banjo that needed a bit of work to get into a somewhat decent playing condition. One thing I really wanted for this banjo was a strap. You know, just in case I want to wander around the block while picking a tune.
For my banjo strap, I wanted something fairly easy to remove and very easy on the wallet. For two bucks spent at the thrift store, and bits of stuff lying around my home, I had a pretty sweet banjer strap in no time.
Four Bottle caps
 Beer bottle caps, hot glue, and magnets make great bottle cap fridge magnets, but that's not what I'm making right now. From the bottle cap collection, I selected two Red Tails, a PBR, and a Highlife.
Gettin Hammered!
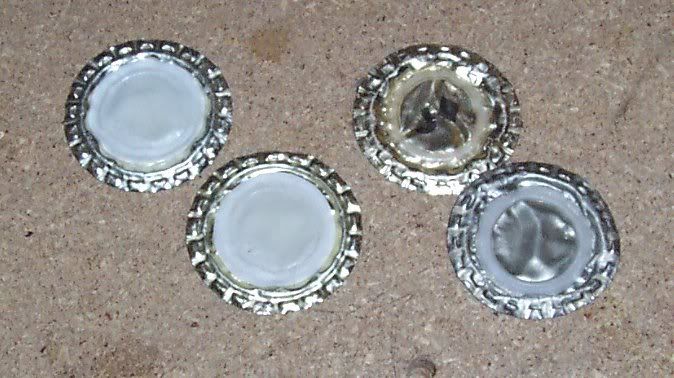 All four of the caps was hammered flat. The Red Tail caps flattened nice and clean, the other two.... well not so much. Notice that the PBR cap is a Jack of Diamonds? That was intentional.
Stuck Together
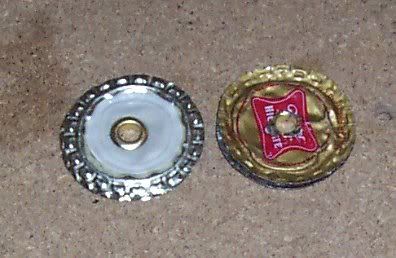 The flat caps where paired up and a hole what punched through their centers. To keep things neat and to cover any sharp edges, an eyelet was popped into the center of the stacked caps.
The actual "strap"
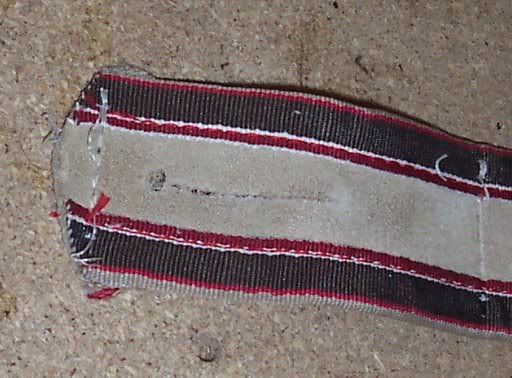 Two dollars at Sack's Thrift Avenue purchased a leather belt. Damn, I'm busting the bank on this one. A slit the length of the flat caps diameter was cut into each end of the belt and a small hole was punched for good measure.
Hold on
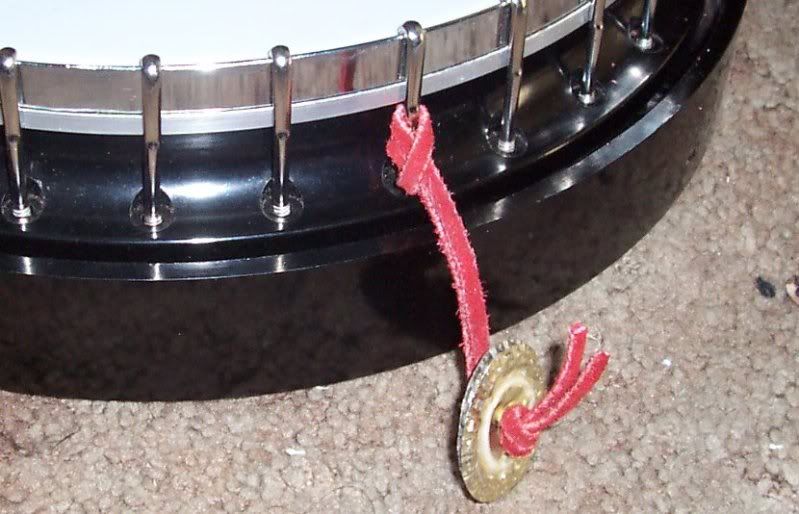 Some red leather cord was knotted at one end, fed through the cap eyelet, looped through the rim bolt and over the caps to secure the whole thing nicely. It's quite easy to remove and adjust. This was done twice.
Done
 "Button" the caps through both ends of the belt, throw that baby over the shoulder and frail some Cripple Creek on the front porch!
It is really weird to play standing up, as I am so accustomed to easily seeing the strings and frets when sitting.
Now quit reading, and go parse the following with lilypond:
\version "2.12.2"
\header {
  title =   "~$ sudo modprobe"
  composer =  "Fabian Scherschel & Dan Lynch"
  copyright = "Creative Commons Attribution-Share-Alike 3.0"
}
melody = \relative c' {
  \key e \minor
  \time 4/4
  \numericTimeSignature
  e4 d8 e4 d8 e[ fis] | % 1
  g2. b4 | % 2
  a2. r8 b8 ~ | % 3
  b8 a g a g a g fis | % 4
  e4 d8 e4 d8 e[ fis] | % 5
  g2. ~ g8 fis | % 6
  d1 ~ | % 7
  d2 r | % 8
  \bar "|."
}
\score {
  \transpose c' c
  \context TabStaff = "banjer" <<
    \set TabStaff.stringTunings = #banjo-open-g-tuning
    \set Staff.instrumentName = #"Banjo"
    \context TabVoice = "banjer" { \melody }
  >>
  \layout {}
}
...and thank you Dr. Kulp
ha, nice idea for a strap, jez. how come i get the feeling, if left to your own devices, in a few years you will be living in a house made of choice recyclables and duct tape?
;)
Sorry it took so long to respond...had a hard time figuring out the math problem to prove my humanness.
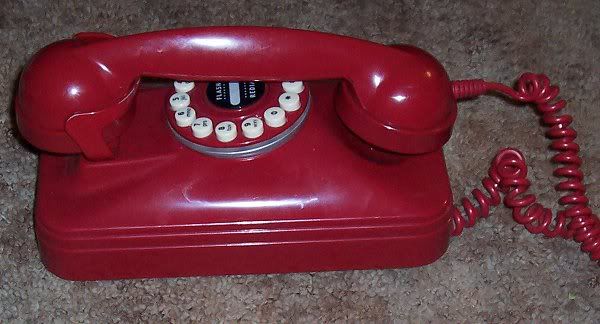 Wow look at that! It appears to be a fully working cheap plastic faux rotary wall-mount phone that someone gave me as a gift!
Wait, faux rotary? What's the point? I know; I'll fix the phone!
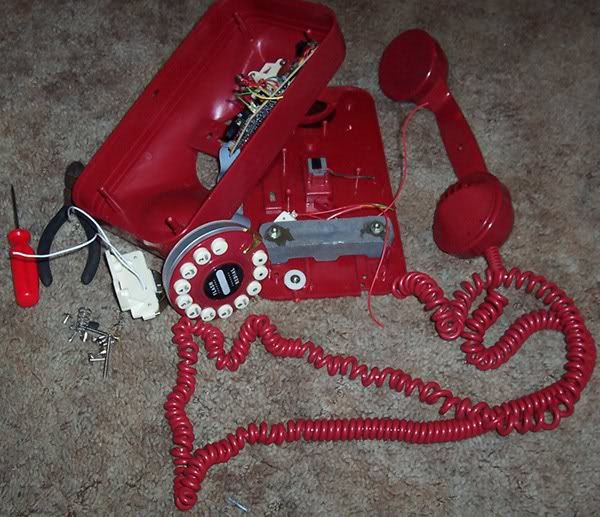 Here is the same phone again in exploded view, and by "exploded", I mean I took it apart looking for usable components for other projects. The ringer might be useful, and there is a switch that can probably be used for something.
In reality, I just want the receiver.
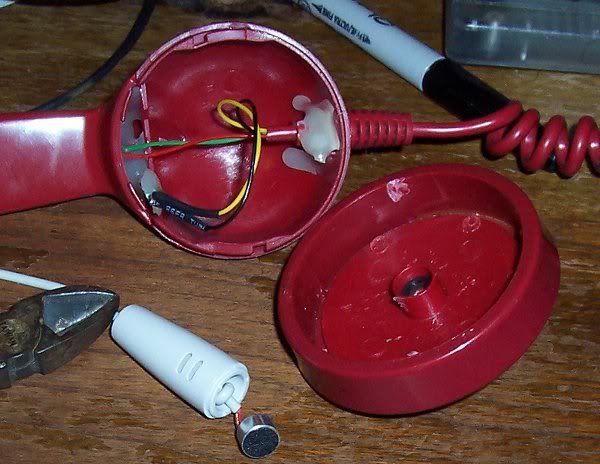 Because the phone is so new, the speaker and microphone have very little power requirements and can easily be used with a computer. I thought there was a problem with the mic, so I broke the phone open and replaced the mic with a cheap computer mic.
why everything was glued together in a phone that was designed to be taken apart is beyond me.
 After a little solder/hot glue/electrical tape magic, I had the receiver wired up for standard microphone and headphone jacks. It may not be pretty, but it is pretty functional and that's what counts.
 Hey, not bad.
Now all I need to do is plug this thing into my computer and I can start making internet phone calls to um... uh.... someone on the internet?
Now quit reading, and take a perfectly good "something" and repurpose it.
If I've learned anything from spending a month focusing on writing a 100 page movie script, it is that time is precious and it should be spent doing things that one loves. That being said, I *don't* like cleaning my apartment; if I have the time to clean, then I have time to do something fun or at least something more interesting than pushing a vacuum cleaner.
Well eventually it was time to clean, and during the cleaning quite a bit of loose change was found. To keep the change in one place, I put it all into the cylinder that previously housed the scotch that my buddy gave me for helping him with his photography projects. Do you notice how there is no link to his photography blog? That's because he doesn't have one.
When I put change into the cylinder, I waste a lot of time taking the lid off, depositing the change, and then returning the lid. There must be an easier way......
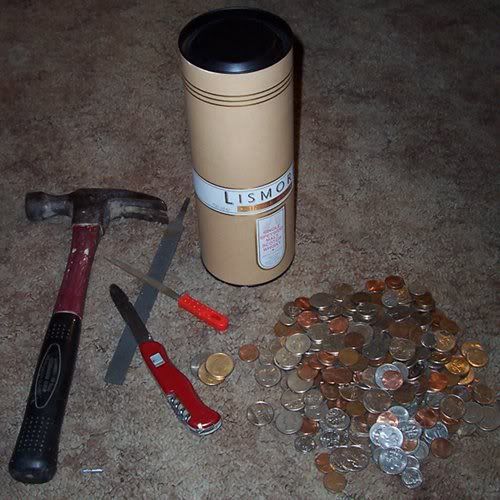 I had big dreams of using my rotary-tool to cut a nice slot in the lid of cylinder, but that wouldn't be a good use of time. A pocket knife, hammer, and some files should do the trick.
In case you were wondering, that is $44.12 in change.
 First things first, hammer the knife blade through the lid. Kids, don't try this at home.
Click the image and look at the big picture. See that notch on the knife edge? My buddy Caleb did that while hotwiring my 68 Plymouth.
 The newly created slot in the lid was widened and the edges were folded and hammered flat to reduce the exposure of sharp edges.
Can't touch this. do do de do Can't touch this. Stop. Hammertime!
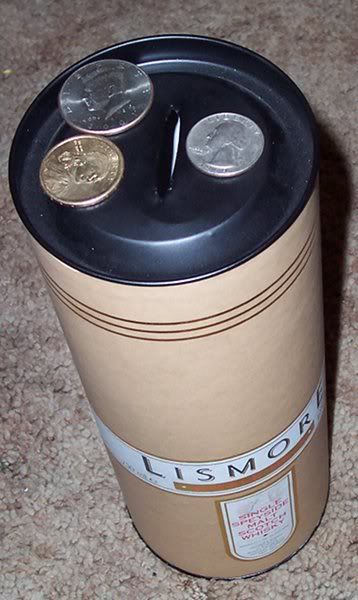 Done, done, and done.
The lid was put back on the cylinder and the project was finished.
For perspective, I have included a ¢50 piece, a dollar coin, and a quarter.
Now what the hell am I going to do with the change that I collect? Actually, I have somewhat of an idea, but I'll save that for a future post.
Now quit reading, and go spend your time wisely unless you *want* to spend your time reading, which I find to be a very worthwhile endeavor.
The previous video I created to show off a switch interface was edited using kino, which is a nice video editor with great support for capturing digital video off of a camera attached via a firewire cable. This time around, I used kdenlive to edit my video because kdenlive has a few different features that will help speed up my editing time. ( I still used kino to grab the video off of my camera)
With the video edited, It was time to upload to a host. Typically, I would use youtube for this sort of thing ( just because I use a tripod, it doesn't mean I can't use youtube) , but since I wanted to see if I could integrate the HTML5 Video tag into a web page, the video was uploaded to youtube and tinyvid.tv: a host for theora video. By getting creative with the "video" tag, I should be able to show the Theora video to those using browsers that support the Video tag, and everyone else will see the flash video.
If your feed reader isn't displaying the video, it can be viewed directly on tinyvid as well as on youtube.
In hind sight, I probably should have shown the phone doing more visual stuff on the computer screen. When the system is set up to play and control audio, it makes for a very boring video experience.
now go make something.
 About a year ago, while walking through a large parking garage downtown, I spied a brass table lamp in a trash can. Knowing that most lamp problems are caused by a faulty bulb or a loose connection in the wiring, I decided to take the lamp home and fix it up. Hey, let's face it, nothing says "captain fancy pants" like a brass table lamp. Actually, being a captain and wearing some fancy pants would also be a captain fancy pants indicator.
Anyway, about 2 months ago I finally decided it was time to fix the lamp so I performed the first step in debugging a broken lamp: I plugged the lamp in and flipped the switch. Oh, well what do you know? The lamp was working perfectly... or was it? The 60 watt T-10 bulb in the lamp did seem a little too dim for my tastes and um... if the lamp is going to be on my computer desk, shouldn't it get it's power from the USB port on my computer? OK so I was just looking for an excuse to convert the lamp to LEDs powered by USB. Lets get on with it, shall we?
 Step 1: buy supplies (more on that later)
Step 2: take the lamp apart
Now I've been taking things apart since I was able to pick up a screwdriver and let me tell you, lamps are easy to take apart. For the most part, a lamp is a hollow tube with some do-dads and space filler-uppers all held together with a few bolts. A twist here and twist there....and bam, you have a pile of junk. Taking the lamp apart allowed me to replace the old heavy gauge lamp wires with narrower colored wires. Since LEDs only let electricity flow in one direction, using colored wires is a good way to keep track of positive and negative electron flow. I used red for positive and black for negative.
 The nice twisty switch for the lamp was a part of the bulb socket, and since I didn't want to get a new switch, I decided to just mangle the socket and make it work. I had previously purchased a bunch of 5mm white LEDs from the Hack-N-Mod Store for wicked cheap and I took a trip to my local bulk electronics supplier for some 91 Ohm resistors. the LEDs had a fairly tight light spread so I gently filed the entire surface of the LED, which I find helps diffuse the spread the light quite a bit.
 Slicing and hot-gluing a Dr. Bronner's soap container gave me a nice platform onto which I could adhere my LEDs and resistors.
Keep it clean! use Dr Bronner's Magic "All-One" soap. I prefer the peppermint.
 Here is the finished circuit of LEDs and resistors glued to the Bronner platform. Since my digital camera was "Top of the Line" 10 years ago, it doesn't exactly take the best pictures. Well, actually, it is my fault for not putting the camera on the macro setting. Anyway, the circuit was designed using the LED calculator at the LED center. I could have used a lower Ohm resistor and my lamp would have been brighter... maybe next time. Basically, the circuit is 5 LEDs in parallel, each with it's own 91 Ohm resistor.
 This is the wiring at the base of the lamp. The positive wire from the USB cable is connected to my red replacement lamp wire and the USB ground is connected to my black replacement lamp wire. Fancy that.
There is a cover that screws on over these wires but I decided not to include a picture of it because I already have enough crappy pictures in this post.
 My heart sank when I plugged in the lamp, turned the switch and nothing happened. sigh. It took about 15 seconds with a voltmeter to find the loose connection near the switch.
 CLICK
Let there be light; the lamp in it's natural environment.
 My keyboard, in the dark, in all of it's USB powered LED illuminated glory. Oh scary. Not bad for 5 volts.
When the lamp was finally completed, I celebrated by cleaning my computer desk and then sticking a bunch of glow in the dark stars and planets to my wall.
- Tubular Music Thingy Part 2
- Beaglebone console output and a faster boot
- Tubular Music Thingy (part 1)
- get and speak the weather
- Getreel youtube-dl wrapper
- Two hours with the Archos 43
- HTML5 for a specific platform? I prefer to develop native apps
- a bit of dev talk about MuttonChop media player
- case for my status server
- my tiny todo list and some ruby
- The Camp Mug (almost) Test
- 2012 Tizen Developers Conference in San Francisco
- Freedom Jar is Full
- Web UI speed up using HTML5 Server Sent Events
- LEDs, BeagleBone, and my ToDo List
- a case for the BeagleBone
- fixing the car mirror
- Basic HTTP server in Vala using GIO Sockets
- sewing up a bling thing
- Trip to Austin
- convert hexadecimal string to an integer with Vala
- Training for 2012: Wuggling
- ABC tune grabber/converter
- A trip to Lancaster
- a new media playing machine
- Don't turn Tizen into WebOS
- making some chili sauce
- grumpy kid
- beer network improvement
- Ripping my DVD collection
- ruby script to search files in a directory for a string
- Pacific Pinball Museum Mission
- A Tale of Two Mugs
- shishi odoshi prototype
- file downloader in Node.js that handles redirects
- Travelling Far Part II
- python shell-fm web interface
- not quite a letter to cherrypal
- Audio playing class in Ruby with Gstreamer
- A quick fix
- my resized images using Ruby and Imagemagick
- one pound of coffee
- noise-canceling headphones that actually work
- updating my dynamic IP DNS information with Ruby
- Hello World in Ruby
- Bacon Apple Cider
- clawhammer sudo modprobe
- a web.py introduction
- The Skillet
- banjer strap on the cheap
- The Letter to Dell
- Linux Outlaws episode 170
- Not the 2010 Petaluma Whiskerino
- Monte Rio
- a new power switch
- the coffee cup review
- seriously, that thing is garbage
- keeping a GTK TextView cursor in view
- A tale of three sticker
- minimize/close to system tray in Python GTK
- A markdown editor/viewer in Python
- Red Phone Mumble Test
- Saturday Sassafrass
- A Friday Frolic
- Toshiba laptop review
- Google no longer uses Microsoft
- regarding Heybuddy and python stuff
- I'm calling you!
- heybuddy identi.ca client
- making a change holder thing
- Did I win? Yes and No.
- photograph sticker
- share this on facebook
- the damn computer died
- kilt alteration
- audcast streamer in vala with gstreamer, gtk and webkit
- The Mullet Adventure
- A Letter to the California State Legislature
- will dogfooding the frenzy leave me bitter?
- basic sitemap file maker in Python
- rock and rolling down the street
- Time to Celebrate
- game of life : Vala, SDL
- game of life : python, clutter
- networked timed text-to-speech goodness
- battery status in a screen session
- Bright Bike
- turning gears
- incremental screenshot namer wrapper
- a nice little feature/bug
- drawing circles
- broken VHS fixed
- cloudy phone number finder
- network quitter fixer
- the hot sauce experiment
- non-delivered emails sent to AOL domains
- GIMP mathmap experiment results
- tri-force tuna gift
- leave early, take your time, enjoy the solitude
- N37°49'8 W122°28'48
- rotary phone computer interface in action
- python script to play the latest version of an audio broadcast
- rotary phone computer input device
- server log spam from Microsoft?
- creating a CAPTCHA
- hello HTML 5! a simple audio player
- How does that increase security?
- getting familiar with GWT, a porting experiment.
- You're Not Carnival Personnel!
- "disable" a web app's buttons using javascript and css
- litterbugs and jaywalkers
- a basic web-app with pyjamas
- shell script to aid in compiling Vala projects
- Banjo part 4: she's finished
- Accent Characters in Linux with Xorg
- Terminal emulator part deux!
- Community
- Terminal Emulator in Vala using GTK and VTE
- Where is the MPAA on this one?
- pyclutter stage fullscreen hack
- Banjo part 3
- from necessity comes something
- If you build it, they will spam
- writing blogging software ( using data from blogspot )
- From WBEZ Chicago......
- Simple Switch Input to Enter a Command
- perplexing ponderence, pertaining penguin presents
- baby steps: the evolution my feature-free PHP framework
- ruining a perfectly good lamp?
- thank you bazaar
- quick not-so-little bikey bag
- Vala musings : int to string, packages, and starting with main
- my motor vehicle warranty is about to expire? really?
- Bike Trailer Part 2
- getting dandy with a hair pretty
- a not so elegant fixer up
- use python and gstreamer to get the tags of an audio file
- trials with gstreamer, pygst, and goom visualization
- Gaarrrrrrrrr!
- more pyclutter: get a move on - behaviourpath
- scrollwheel css div Internet Explorer 7 problem fixed
- Hello World using pyclutter - a half assed tutorial