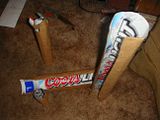
For the last few days, I've been gathering resources for making a prototype of a shishi odoshi(a type of fountain) out of PVC tubing.
The story goes something like this: A few years back I sprouted a fig tree from a clipping of fig tree root, and when the new fig tree was about a foot tall, I gave it to my mother. Fast forward to the present and mom is complaining about deer eating the fig tree. She wants a "deer chaser" fountain to scare the deer away.
Mom: I need a fountain
Jezra: can't you just shoot the deer? mmm venison
Mom: NO! I just need a fountain to scare them away
Jezra: Fine, I'll see what I can do
Start with some cardboard
A few tubes of rolled beer box gave me a basic idea of the sizes of tubing I would need for the prototype.
Cut some PVC
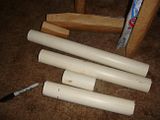 I started with a 4' x 1.5" PVC pipe that I measured once and cut into the pieces that I needed.
- 18" spout brace
- 11" opposing brace
- 4" arm stop
- 11" arm yea, I made up all of those name
Making the Arm
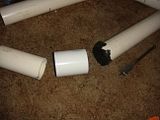 The arm was cut at the 4" mark and the remainder of the arm was covered with gorilla tape. A coupler was added to bind the two arm pieces back together. Combined with the tape, this configuration emulates the partitioning that is found in bamboo
Almost ready
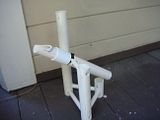 Boring holes in PVC is a pain.
Brace stays were cut form .5" PVC. (that's a measurement of the inside diameter) Check out that sweet arm.... it looks just like bamboo!
It's alive!
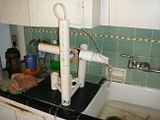 A piece of .5" PVC was use as the spout on the spout brace. Some leftover tubing from the homebrew setup was connected to a little sump pump that moves about a gallon of water a minute.
This is the test in my kitchen.
Now I need to find some bamboo and make the real thing. In hind sight, I probably could have just made this thing out of bamboo from the get-go. Oh well, I suppose I paint it to look like bamboo.
OK, that's enough, go make stuff.
I've considered updating the code to work with the more modern Clutter, but that wouldn't really be fun would it? Besides, someone has already updated the code. Thanks Ryan. Why don't I write another example? Don't mind if I do.
There is nothing new Clutter-wise in this example to differentiate it from the hello world example except that this code will run with the latest Clutter.
What we have here, is John Conway's Game of Life where each cell is a Clutter Rectangle.
#!/usr/bin/env python
# copyright 2009 jezra lickter
#this software is licensed under the GPLv3  http://www.gnu.org/licenses/gpl.txt
import clutter
import random

class Game:
    def __init__(self,cell_size):
        self.cells = []
        #create a clutter stage
        self.stage = clutter.Stage()
        #set the stage size in x,y pixels
        self.stage.set_size(500,500)
        self.stage.set_title("The Game of Life")
        self.stage_width, self.stage_height = self.stage.get_size()
        #define some clutter colors in rgbo (red,green,blue,opacity)
        self.color_black =clutter.Color(0,0,0,255)
        self.color_green =clutter.Color(0,255,0,255)
        self.color_blue =clutter.Color(0,0,255,255)
        #set the clutter stages bg color to our black
        self.stage.set_color(self.color_black)
        #we will need to check on the key presses from the user
        self.stage.connect('key-press-event', self.parseKeyPress)
        self.stage.connect("destroy", self.quit)
        '''fill the screen with rectangles'''
        num_cols = int(self.stage_width/cell_size)
        num_rows = int(self.stage_height/cell_size)
        cells_to_create = num_cols*num_rows
        y = 0
        for row in range(num_rows):
            x = 0
            self.cells.append( [] )
            print "%i cells to create" % (cells_to_create)
            for column in range(num_cols):
                #set the column index to a rect that is cell_size by cell_size
                self.cells[row].append( clutter.Rectangle() )
                self.cells[row][column].set_size(cell_size,cell_size)
                self.cells[row][column].set_position(x,y)
                #add this cell to the stage
                self.stage.add(self.cells[row][column])
                self.cells[row][column].set_color(self.color_green)
                self.cells[row][column].set_opacity(0)
                x+=cell_size
            cells_to_create-=num_cols

            y+=cell_size
        print "cells created"
        #get some data about the rows
        self.row_count  = len(self.cells)
        self.col_count = len(self.cells[0])
        self.cell_count = self.row_count*self.col_count
        #make a timer to do stuff for us
        self.timeline = clutter.Timeline(duration=500)
        #when the timer finishes running, we want to determine the life
        self.timeline.connect("completed",self.compute_life)
        #increase linearly
        alpha = clutter.Alpha(self.timeline, clutter.LINEAR)
        #make some opacity behaviours that we will apply to the cells
        self.dieBehaviour = clutter.BehaviourOpacity(255,0,alpha)
        self.aliveBehaviour = clutter.BehaviourOpacity(0,255,alpha)

    def parseKeyPress(self,actor,event):
        if event.keyval == clutter.keysyms.q:
            self.quit()
        elif event.keyval == clutter.keysyms.c:
            self.compute_life()
        elif event.keyval == clutter.keysyms.r:
            self.reseed()

    def quit(self,widget=None):
        clutter.main_quit()

    def run(self):
        self.stage.show_all()
        self.seed_life()
        self.compute_life()
        clutter.main()

    def reseed(self):
        for r in range(self.row_count):
            for c in range(self.col_count):
                if self.cells[r][c].get_opacity()>0:
                    self.cells[r][c].set_opacity(0)
        self.seed_life()

    def seed_life(self):
        print "adding random life"
        #loop through the rows
        for r in range(self.row_count):
        #loop through the columns
            for c in range(self.col_count):
                #generate a number
                i = random.randint(0,4)
                if i==0:
                    # x,y is alive
                    self.cells[r][c].set_opacity(255)

    def compute_life(self,asset=None):
        #detach all objects from the behaviors
        self.dieBehaviour.remove_all()
        self.aliveBehaviour.remove_all()
        for r in range(self.row_count):
            for c in range(self.col_count):
                if self.cells[r][c].get_opacity()>0:
                    alive=True
                else:
                    alive=False
                ln = self.living_neighbors(r,c)
                if alive and ( ln<2 or ln>3 ):
                    #this cell will die; boohoo
                    self.dieBehaviour.apply(self.cells[r][c] )
                elif not alive and ln==3:
                    #this cell is now alive; damn zombies
                    self.aliveBehaviour.apply(self.cells[r][c] )

        #start the timeline again
        self.timeline.start()

    def living_neighbors(self,r,c):
        alive = 0
        r_min = r-1
        r_max = r+1
        c_min = c-1
        c_max = c+1
        if r==0 :
            r_min=r
        elif r == self.row_count-1:
            r_max=r
        if c==0 :
            c_min=c
        elif c == self.col_count-1:
            c_max=c

        tr = r_min
        tc = c_min
        cells_computed=0
        while not tr > r_max:
            tc = c_min
            while not tc > c_max:
                if ( tr!=r or tc!=c ):
                    cells_computed+=1
                    if self.cells[tr][tc].get_opacity()>0:
                        alive+=1
                tc+=1
            tr+=1
        return alive

if __name__=="__main__":
    game = Game(5)
    game.run()
When running the code: press "q" to quit, press "r" to reset.
One issue I have with this code is that when creating the rectangles for the cells, creation slows down significantly after creating about 3000 rectangles. The app runs fine when all of the cells are created, but the slow down during creation really irks me. Perhaps I need more RAM or I should write the code in Vala using SDL?
Now stop reading, and go play with colored rectangles.
First, let me show some code that does not work as expected:
#!/usr/bin/env python
import clutter
class test:
    def __init__(self):
        #create a stage
        self.stage = clutter.Stage()
        #set the stage to be fullscreen
        self.stage.fullscreen()
        #show the screen
        self.stage.show_all()
        #get the key presses
        self.stage.connect('key-press-event', self.quit)
        #start the clutter main loop
        clutter.main()

    def quit(self,object,event):
        #quit the main loop
        clutter.main_quit()

if __name__=="__main__":
    #make an instance of the test
    t = test()
After trying different various possible fixes, it appeared that the bug is actually
"the stage fullscreen function behaves like maximize if used before the clutter main loop".
What does that mean? It means that the fullscreen function will work if the function is called after the clutter main() function. But how does one call a function after a mainloop has been initialized? I'm glad you asked.
Check out this code with the fix in place:
#!/usr/bin/env python
import clutter
import gobject
class test:
    def __init__(self):
        #create a stage
        self.stage = clutter.Stage()
        #show the screen
        self.stage.show_all()
        #get the key presses
        self.stage.connect('key-press-event', self.quit)
        #add a fullscreen function to the gobject timeout
        gobject.timeout_add(10,self.go_fullscreen)
        #start the clutter main loop
        clutter.main()

    def go_fullscreen(self):
        self.stage.fullscreen()

    def quit(self,object,event):
        #quit the main loop
        clutter.main_quit()

if __name__=="__main__":
    #make an instance of the test
    t = test()
Since the clutter library uses Gobject objects as base classes for most clutter classes, including the mainloop, one can use gobject.timeout_add() to call a function after a set amount of time. In the fixed code, a function that calls fullscreen was set to run a few milliseconds after the clutter.main() was called.
Now I need to port the code to Vala and make sure the fix works with the Vala Clutter bindings as well.
#!/usr/bin/env python
import sys
import os, os.path
import clutter
import gtk

class imageList:
    def __init__(self,dir):
        # we need an array and a default index of the array
        self.imagelist =[]
        self.imagelist_index = 0
        #go find the images in the directory
        self.find_images(dir)

    def get_index_image(self):
        return self.imagelist[self.imagelist_index]

    def get_left_image(self):
        return self.imagelist[ self.get_next_left_index() ]

    def get_right_image(self):
        return self.imagelist[ self.get_next_right_index() ]

    def get_index(self):
        return self.imagelist_index

    def get_next_left_index(self):
        left = self.imagelist_index-1
        if left<0:
            left = self.get_image_count()-1
        return left

    def get_next_right_index(self):
        right = self.imagelist_index+1
        if right>=self.get_image_count():
            right = 0
        return right

    def decrement_index(self):
        self.imagelist_index = self.get_next_left_index()

    def increment_index(self):
        self.imagelist_index  = self.get_next_right_index()

    def get_image_count(self):
        return len(self.imagelist)

    def find_images(self,dir):
        #loop through the files in the folder
        print "searching "+dir+" for images...."
        assets = os.listdir(dir)
        for i in range(len(assets) ):
            asset_path = os.path.join(dir,assets[i] )
            if os.path.isdir(asset_path):
                #if the asset is a directory, recurse
                self.find_images(asset_path)
                pass
            else:
                #how do we know if this is a usable image?
                #try to get a pixbuf from the image
                try:
                    """TODO: assume the majority of files are images and delete
                    the bad files from the array when they are displayed to the
                    user, this should vastly improve start up time"""
                    pixbuf = gtk.gdk.pixbuf_new_from_file(asset_path)
                    #add this asset to the imagelist
                    print "Found: "+asset_path
                    self.imagelist.append(asset_path)
                except:
                    #fail this isn't a usable image
                    pass

class imageViewer:
    def __init__(self):
        #is there a sys.argv?
        if len(sys.argv)>1:
            self.create_image_list(sys.argv[1])
        else:
            self.print_help("No image directory selected")
        #if we made it this far, we can start making the clutter interface
        self.stage = clutter.Stage()
        #make the stage full screen
        self.stage.fullscreen()
        #hide the mousey
        self.stage.hide_cursor()
        #we need to record the stage size
        #NOTE: I should try to use the CLUTTER_STAGE_WIDTH, but it may only be part of the c library
        (self.stage_w,self.stage_h) = self.stage.get_size()
        #define a clutter color in rgbo (red,green,blue,opacity)
        color_black =clutter.Color(0,0,0,255)
        #set the clutter stages bg color to our black
        self.stage.set_color(color_black)
        #we will need to check on the key presses from the user
        self.stage.connect('key-press-event', self.parseKeyPress)
        #make three textures: left,right,and center
        self.l_image=clutter.Texture()
        self.r_image=clutter.Texture()
        self.c_image=clutter.Texture()
        #add the textures to the stage
        self.stage.add(self.l_image)
        self.stage.add(self.r_image)
        self.stage.add(self.c_image)
        #hide all of the images
        self.l_image.set_opacity(0)
        self.c_image.set_opacity(0)
        self.r_image.set_opacity(0)
        #creae a timeline for the texture animations
        self.texture_timeline = clutter.Timeline(fps=25,duration=1000)
        #create an alpha to describe the movement for behaviours
        self.texture_alpha = clutter.Alpha(self.texture_timeline, clutter.ramp_inc_func)
        '''we will need a behaviour to handle animation between the left and center(lc),
        and between the center and right(cr) '''
        self.lc_behaviour = clutter.BehaviourPath(self.texture_alpha)
        self.cr_behaviour = clutter.BehaviourPath(self.texture_alpha)
        #show all stage items and enter the clutter main loop
        self.stage.show_all()
        self.set_center_image()
        clutter.main()

    #we will need to scale the textures to fill the screen
    def scale_texture(self,texture):
        #NOTE: texture.get_size is not working properly, use the size of the pixbuf
        #(twidth,theight) = texture.get_size()
        buf = texture.get_pixbuf()
        twidth = buf.get_width()
        theight = buf.get_height()
        if twidth>theight:
            scale = ((self.stage_w+0.0)/twidth)
        else:
            scale = ((self.stage_h+0.0)/theight)
        #perform the scaling
        print scale
        texture.set_property("width",twidth*scale)
        texture.set_property("height",theight*scale)

    def set_center_image(self):
        #hide the texture
        self.c_image.set_opacity(0)
        #center is the current index
        buf = gtk.gdk.pixbuf_new_from_file( self.imagelist.get_index_image() )
        self.c_image.set_pixbuf( buf )
        #scale the images
        self.scale_texture(self.c_image)
        #center the center image
        (tex_width,tex_height) = self.c_image.get_size()
        xloc = self.stage_w/2 - tex_width/2
        yloc = self.stage_h/2 - tex_height/2
        self.c_image.set_position(xloc,yloc)
        #make the center image visible
        self.c_image.set_opacity(255)

    def set_right_image(self):
        #right is right image
        buf=gtk.gdk.pixbuf_new_from_file( self.imagelist.get_right_image() )
        self.r_image.set_pixbuf( buf )
        #scale the image
        self.scale_texture(self.r_image)
        #move the right image off of the screen and center vertically
        (tex_width,tex_height) = self.r_image.get_size()
        yloc = self.stage_h/2 - tex_height/2
        self.r_image.set_position(self.stage_w,yloc )
        self.r_image.set_opacity(255)
    def set_left_image(self):
        #l_image is left image
        buf = gtk.gdk.pixbuf_new_from_file( self.imagelist.get_left_image() )
        self.l_image.set_pixbuf( buf )
        #scale the texture
        self.scale_texture(self.l_image)
        #move the left image off of the screen and center vertically
        (tex_width,tex_height) = self.l_image.get_size()
        yloc = self.stage_h/2 - tex_height/2
        self.l_image.set_position(0-tex_width,yloc )
        #make the center image visible
        self.l_image.set_opacity(255)

    def parseKeyPress(self,actor, event):
        #do stuff when the user presses a key
        #it would be awesome if I could find some documentation regarding clutter.keysyms
        if event.keyval == clutter.keysyms.q:
            #if the user pressed "q" quit the test
            clutter.main_quit()
        elif event.keyval == clutter.keysyms.Right:
            self.next_image(0)
        elif event.keyval == clutter.keysyms.Left:
            self.next_image(1)

    #direction of 0 means move right, direction 1 means move from right to left
    def next_image(self,direction=0):
        #clear the behaviour paths
        self.lc_behaviour.clear()
        self.cr_behaviour.clear()
        self.lc_behaviour.remove_all()
        self.cr_behaviour.remove_all()
        #update the center texture
        self.set_center_image()
        if direction:
            #we need to set the right image
            self.set_right_image()
            #hide the left image
            self.l_image.set_opacity(0)
            #adjust the image list index
            self.imagelist.increment_index()
            #center image moves to the left
            (x,y) = self.c_image.get_position()
            lc_knot0 = clutter.Knot(x,y)
            #what is the destination knot?
            lc_knot1 = clutter.Knot(-self.c_image.get_width(),y )
            #which texture is moving in the lc?
            lc_texture = self.c_image
            #right image moves to the left
            (x,y) = self.r_image.get_position()
            cr_knot0 = clutter.Knot(x,y)
            xcenter = self.stage_w/2-self.r_image.get_width()/2
            cr_knot1 = clutter.Knot(xcenter,y )
            #which texture is moving in the cr?
            cr_texture = self.r_image

        else:
            #we need to set the left image
            self.set_left_image()
            #hide the right image
            self.r_image.set_opacity(0)
            #adjust the image list index
            self.imagelist.decrement_index()
            #left image moves to the center
            (x,y) = self.l_image.get_position()
            lc_knot0 = clutter.Knot(x,y)
            xcenter = self.stage_w/2-self.l_image.get_width()/2
            lc_knot1 = clutter.Knot(xcenter,y )
            #which texture is moving in the lc?
            lc_texture = self.l_image
            #center image moves to the right
            (x,y) = self.c_image.get_position()
            cr_knot0 = clutter.Knot(x,y)
            endx = self.stage_w
            cr_knot1 = clutter.Knot(endx,y )
            #which texture is moving in the cr?
            cr_texture = self.c_image

        #add the knots to the lc behaviour
        self.lc_behaviour.insert_knot(0,lc_knot0)
        self.lc_behaviour.insert_knot(1,lc_knot1)
        self.lc_behaviour.apply(lc_texture)
        #add the knots to the cr behaviour
        self.cr_behaviour.insert_knot(0,cr_knot0)
        self.cr_behaviour.insert_knot(1,cr_knot1)
        self.cr_behaviour.apply(cr_texture)
        #start the timeline associated with the behaviours
        self.texture_timeline.start()

    def create_image_list(self,image_folder):
        cwd = os.getcwd()
        path_to_image_folder = os.path.join(cwd,image_folder)
        #does the folder exist?
        if os.path.isdir(path_to_image_folder):
            print "image folder: "+path_to_image_folder
            self.imagelist = imageList(path_to_image_folder)
            #did we find images?
            img_count = self.imagelist.get_image_count()
            print "Found "+str(img_count)+" images"
            if img_count ==0:
                self.print_help(image_folder+" does not contain usable images")
        else:
            self.print_help(image_folder+" is not a directory")

    def print_help(self,errormessage=""):
        if(errormessage):
            print "Error: "+errormessage
        print "Usage: "+sys.argv[0]+" /path/to/directory/containing/images"
        print "Navigation: use the left and right arrows to view the images"
        print ""
        sys.exit()
if __name__=="__main__":
    #make an imageViewer
    imageViewer = imageViewer()
Problems:
1. I was hoping to automatically change a clutter textures height and width by making sure that the texture's "sync-size" property was true and then changing the textures pixbuf. Unfortunately, this didn't work, so I grabbed the height and width the pixbuf itself and adjusted the size of the texture accordingly.
2. Althought it was a minor problem, I spend too much time trying to figure out how to use gstreamer to get the data from my images files and pass the data to a gstvideotexture. As you can see, I ended up using gtk.gdk for image handling.
3. segfaulting on behaviourPath.append_knots(knot1,knot2)
Nifty Clutter:
behaviourPath knots - a knot is an X,Y coordinate that make a path for an object to follow when the object animates. For example, suppose I have a texture at 0,0 and I want to move the texture to 200,100 and then to 50,400. I would make a knot for each coordinate and add the knot to a behaviourPath using append_knots(list of knots) or insert_knot(knot index, knot).
myBehaviourPath.append_knots(knot1,knot2,knot3)
then apply the behavor to the texture and start the timeline associated with the behaviours alpha
myBehaviourPath.append(myTexture)
myTimeline.start()
Booyah! The texture will move from knot1 to knot2 to knot3
Awesome:
Pydoc. I can't believe it took me so long to learn about pydoc: a python documentation tool. Which I found indispensable for figuring out what methods are available in various python modules.
buf = gtk.gdk.pixbuf_new_from_file( self.imagelist.get_index_image() )
self.c_image.set_pixbuf( buf )
to:
self.c_image.set_from_file( self.imagelist.get_index_image() )
===================================
But self.stage.fullscreen() can only maximize the window.
Do you know how to setup a real fullscreen (borderless) window?
OK, so this isn't really a tutorial because I'm not going to go through each line of code and explain what it does. However, there are certain parts of the code that I will give a bit more info about, because I had some problems figuring it out and I'm hoping my experience will help other.
This is not a static "hello world". I know, I broke the rules; but I think this is a good thing. Upon running the script, there will be a "hello" on the screen. Pressing "s" on the keyboard will initiate a switching toggle between "hello" and "world" by animating a change in their opacities. Pressing "q" will quit the app. Check it out
 #!/usr/bin/env python
print "Hello World!"
Ha ha, just kidding.....
#!/usr/bin/env python

import clutter

class clutterTest:
    def __init__(self):
        #create a clutter stage
        self.stage = clutter.Stage()
        #set the stage size in x,y pixels
        self.stage.set_size(500,200)
        #define some clutter colors in rgbo (red,green,blue,opacity)
        color_black =clutter.Color(0,0,0,255)
        color_green =clutter.Color(0,255,0,255)
        color_blue =clutter.Color(0,0,255,255)
        #set the clutter stages bg color to our black
        self.stage.set_color(color_black)
        #we will need to check on the key presses from the user
        self.stage.connect('key-press-event', self.parseKeyPress)
        #create a clutter label, is there documentation for creating a clutterlabel?
        self.label = clutter.Label()
        #set the labels font
        self.label.set_font_name('Mono 32')
        #add some text to the label
        self.label.set_text("Hello")
        #make the label green
        self.label.set_color(color_green )
        #put the label in the center of the stage
        (label_width, label_height) = self.label.get_size()
        label_x = (self.stage.get_width()/2) - label_width/2
        label_y = (self.stage.get_height()/2) - label_height/2
        self.label.set_position(label_x, label_y)
        #make a second label similar to the first label
        self.label2 = clutter.Label()
        self.label2.set_font_name('Mono 32')
        self.label2.set_text("World!")
        self.label2.set_color(color_blue )
        (label2_width, label2_height) = self.label2.get_size()
        label2_x = (self.stage.get_width()/2) - label2_width/2
        label2_y = (self.stage.get_height()/2) - label2_height/2
        self.label2.set_position(label2_x, label2_y)
        #hide the label2
        self.label2.set_opacity(0)
        #create a timeline for the animations that are going to happen
        self.timeline = clutter.Timeline(fps=20,duration=500)
        #how will the animation flow? ease in? ease out? or steady?
        #ramp_inc_func will make the animation steady
        labelalpha = clutter.Alpha(self.timeline, clutter.ramp_inc_func)
        #make some opacity behaviours that we will apply to the labels
        self.hideBehaviour = clutter.BehaviourOpacity(255,0x00,labelalpha)
        self.showBehaviour = clutter.BehaviourOpacity(0x00,255,labelalpha)
        #add the items to the stage
        self.stage.add(self.label2)
        self.stage.add(self.label)
        #show all stage items and enter the clutter main loop
        self.stage.show_all()
        clutter.main()

    def parseKeyPress(self,actor, event):
        #do stuff when the user presses a key
        #it would be awesome if I could find some documentation regarding clutter.keysyms
        if event.keyval == clutter.keysyms.q:
            #if the user pressed "q" quit the test
            clutter.main_quit()
        elif event.keyval == clutter.keysyms.s:
            #if the user pressed "s" swap the labels
            self.swapLabels()


    def swapLabels(self):
        #which label is at full opacity?, like the highlander, there can be only one
        if(self.label.get_opacity()>1 ):
            showing = self.label
            hidden = self.label2
        else:
            showing = self.label2
            hidden = self.label
        #detach all objects from the behaviors
        self.hideBehaviour.remove_all()
        self.showBehaviour.remove_all()
        #apply the behaviors to the labels
        self.hideBehaviour.apply(showing)
        self.showBehaviour.apply(hidden)
        #behaviours do nothing if their timelines are not running
        self.timeline.start()


if __name__=="__main__":
    test = clutterTest()
Copy the code and drop it into your favorite text editor.
things I got hung up on....
1. Labels:the pyclutter documentation doesn't reference labels. Fortunately, the pyclutter examples that are included with the pyclutter source code, have a sample of a label
2. Alpha: clutter.alpha is a representation of a value based on a clutter.timeline and a function to determine the value at a given time on the time line. The first function that I used was a sine function that would peak at the midway point and then return to the starting point. So my opacity behavior would go from 0 to 255 and then back to 0, when what I really wanted was to go from 0 to 255.
3. behaviourOpacity: When the behavior transitions the opacity from 255 to 0, the ending opacity is 1, or at least is was the last time I checked. Odd.
4. Determining which key is pressed: I don't know enough about python to be able to print out all of the data in the event object that is sent when there is a "key-press-event". I was trying to print the keys from the event objects dict but nothing was working. Luckily, I stumbles upon the clutter.keysyms doohicky but I haven't found all of the documentation for the keysyms yet. For now, I just use clutter.keysyms.[what key am I looking for] to determine if a specific key is pressed.
That's it for now...

