
While looking for treasure at my local ReStore, I happened upon a stained glass lamp that "needs some love". $19 later, I was heading home with a lamp that most certainly needed some love.
The Lamp
 The lamp had been dropped and was broken in a few places. Fortunately I have a box full of adhesives and at least one of them should do the trick.
Unfortunately, the previous lamp owner tried to fix the lamp, and my first order of business was to remove the packaging tape that was holding the lamp together, as well as remove the bits of adhesive the previous owner had tried to use to fix the lamp. rookie.
Break #1
 Fixing break number 1 was a fairly simple process of bending some metal, applying a healthy dose of J-B Weld, and holding everything in place with some masking tape.
Break #2
 The second broken part of the lamp was a bit more serious. Shattered glass was involved, and lamentably, half of one of the red flower pieces was shattered to such an extent that I didn't want to put all of the pieces back together. It took a while, but eventually all of the pieces were put together with J-B Weld and tape.
Amazingly, I didn't cut myself on any of the broken glass. :)
Just Like My Truck
 Creating a replacement for the missing flower piece was fairly easy. Having recently repaired a broken tail light on my truck, I had some "cut and peel" repair tape sitting around that would be perfect for this lamp.
Good as New!
 After the J-B Weld had cured over night, I removed the masking tape and applied the "cut and peel" tail light repair tape.
Hot damn, that is looking good!
Let There Be Light
 The final test of any lamp is "plug it in". Not only do I have a wonderful stained glass lamp, I can now put "Stained Glass Lamp" on my ever growing list of broken things that I have repaired. Now I just need to actually make a list. :)
In total, it probably took a little under an hour to fix this lamp. Now quite reading, and go fix something.
Apparently, it is fairly common for the USB charging port on a Nokia N900 to detach from the motherboard. Sadly, this was to be fate of my beloved n900, affectionately named "Clicky". Before you ask, the answer is "yes, I do anthropomorphise all of my computers".
Although the USB port was no longer available, I did have a battery charger and a few batteries that I carried with me. It was definitely time to start looking for a replacement for Clicky.
Just prior to the USB port failure, I purchased a FirefoxOS based ZTE 'Open' on EBay. After about 3 weeks of using Firefox OS, I was fairly certain that I knew the perfect replacement for my n900..... Another n900! What? Did you think I was going to say "Firefox OS"? pfttttt, I named that thing "Shitty" for a reason.
Anyway, for about $55, I purchased a used n900 on EBay and decided to not have to worry about the USB port on my new n900. It isn't broken, but I'm going to fix it anyways.
Gather Some Supplies

- n900: because it needs fixing
- Tizen swag screwdriver (P.S. it is pronounced shwag)
- 2 part epoxy
- Stay Puft marshmallows: I have no idea why this is necessary
- a can of tuna fish that my brother brought back from Italy
TAKE IT APART!!!!!
 After popping off the battery cover, it is necessary to remove 6 screws, circled in this image, from the device.
The 2 screws with the purple circles are proof that Nokia might have hated you before they hired Elop. Why they decided to use torx screws on a decent device is beyond me.
Take a Lousy Picture of the 'Fix'
 That grey blurry glob on the left side of the motherboard is the USB charging port smothered with epoxy.
I had seen plenty of pictures online of people 'fixing' their n900s with solder, but I definitely didn't want to risk having conductive material adhering the USB port to the motherboard.
Basically, I mixed up some epoxy and made sure that there was no way the USB port was going anywhere!
Say Hello to "Beeper"
 After letting the epoxy cure, the n900 was reassembled. Crazy as it seems, this may be the first time I've taken a device apart and put it back together using all of the original screws.
Then I took a picture of me taking a picture.
It sure is nice to have a GNU Linux device in my pocket again.
With a few minutes on the command-line using scp and rsync, I transferred some useful scripts from my old n900 to the new device. The first scripts to go on the device were the scripts used to resize and upload images to my coffee-a-day project, then it was on to the n900 time updater, and then some applications that let me send commands to various computers on my home network.
Now quite reading, and go curse Nokia for abandoning a phenomenal GNU Linux platform.
https://secure.flickr.com/photos/99725460@N00/sets/72157638941334803/
Yes, I have no shame! But it was fast, cheap and almost exactly the right size.
The story goes something like this:
Me: Mom, this rickety old chair is crap, throw it on the burn pile
Mom: NO!!! I got that chair is '72 and it is part of a set of four
Me: oh, I guess I'll fix it.
Yea, the story went something like that.
Step 1: Gather Some Tools

- two types of wood glue (I use the one that was stronger)
- a box of wood toothpicks (in case I need some fill)
- my sweet Swiss Army knife
- some crappy old twine (the stuff kept breaking so I used some nylon rope instead)
Step 2: TAKE IT APART!
 Make a map of where the screw from the rickety old chair are from and place the screws on the map.
There are 10 crappy flat head screws in the rickety old chair, but I only needed to remove four of the crappy flat head screws. Blech! flat head screws
Step 4: Put Some Glue On It
 After remove a few of the screws, the rickety old chair sort of fell apart and there were legs and supports all over the place.
A bit of glue here, and a bit of glue there, and the rickety old chair was shaped like a chair again... but how was I going to hold all of the components firmly together?
Step 5: The Vice
 I don't recall from whom I learned this, or when I first used this, but when dealing with odd shaped things needing to be held together in a vice, my favorite 'vice' to use is the tourniquet vice.
Some nylon rope was loosely woven through the legs and tied off. Then a small stick was inserted into a loop in the loose rope. Spinning the stick around pulled the rope tight against the legs of the rickety old chair.
Step 6: Clean Up the Excess Glue
 When the rope vice was nice and snug, excess glue was squeezed out of the holes in the chair legs where the supports are inserted.
A wet rag did a great job of cleaning up the excess glue. The chair was then set aside to let the glue dry.
Finished
 um.... that's not a step, that is a chair. bwahaha! Oh man, I crack me up.
The screws were replaced and tightened, and now the rickety old chair is a far less rickety old chair that is not destined for the burn pile. sweet!
Quitter
Talk about a quitter! The rear view mirror in my car is a quitter. No matter what angle I put the mirror, within a few milliseconds the mirror will quit and slump. The problem is caused by two things:
- The ball and socket joint is over 50 years old and is just too loose
- One of the car's previous owners stuck a new mirror on top of the old mirror and the added weight causes the slippage in the joint
Time to finally fix that crap
Mirror Mirror
 Oh looky looky; a mirror connected to a mirror with some padded foam adhesive.
A few strokes between the mirrors with a utility knife and I had cut enough of the adhesive to separate the two mirrors.
I Don't See Anything
 Holy Crap-a-lam-a-ding-dong! This is the original mirror. Most of the silvering on the back of the mirror glass has fallen away.
Fortunately, the mirror that was glued to the original mirror is the same size as the old mirror. Time for a swap.
Hey, it's the Ball Socket
 The metal frame holding the mirror is a rather soft metal, and with a bit of gentle prying, I was able to remove the old mirror.
Underneath the old mirror, is a metal plate that puts tension on the ball socket.
Two things were done to increase the friction/tension on the ball and socket joint. First, a small bit of spirit gum was applied to the ball and socket joint to make it slightly more sticky. Afterwards, I had the pleasure of smacking the metal tension plate with hammer to make it snug.
Once the ball and socket joint was nice and tight, I put the newer mirror in the mirror frame and then began tapping the soft metal frame, with the rubber handle of my hammer, to bend the metal frame around the mirror so that the mirror won't fall out.
Installed
 Shazaam! The mirror is installed and working like a champ.
As you can see, there is no nighttime flippy dippy thing on my mirror and I expect to be blinded when I drive at night. Damn, that was the only advantage of the quitter mirror. Oh well, I'll figure something out.
Well That's No Good
 While driving to the East Bay last week, in the second foulest Bay weather I've ever been in, I noticed water dripping onto my leg from under the dash. A quick inspection revealed quit a bit of water dripping out of my fuse box, and I thought this was a really bad thing. Directly above the fuse box is the post that connects the wiper motor to the windshield wiper arm.
Look at that picture: What you don't see is any sort of rubber washer to keep the damn rain from dripping on my fuse box. Since I found bits of a washer around the post, I presume the washer had simply rotted away during the last 50 years and needed to be replaced. Hey! I can do that.
The Quick Fix
 Without too much time to dilly-dally, I cut a piece of old bicycle tire inner tube to fit over the post and bolded everything back together.
See that bolt holding the wiper arm to the post? That bolt has an 8 millimeter head. Before I even started this little project I knew it was an 8 millimeter head; not because I had measured it, but because the 8mm socket is missing from my damn tool box. grrrrrrrr
Go fix stuff.
dave
Damn that Power button!
 For a few months, the power button on my computer has been sticking. Sometimes, when I power up the machine, the button will stick and the machine will turn off. A bit of smacking the button usually gets the machine to start properly.
Look at that button. I don't like it.
The worst time for the button to stick is when I'm turning the computer off. When the button sticks, the computer powers off and doesn't shutdown properly. This can lead to hard-drive problems that I really don't want.
Fix it!
 After tracing the power switch leads from the motherboard and a bit of soldering, I had my computer power wired to a 1/8 inch mono jack so that I can plug in whatever kind of switch I want.
A bit of testing and ..... crap, it doesn't work. The internals of the cheap jack don't line up properly with the plug on my switches. What a bummer.
Just get it working
 Fortunately I still had a switch left over from an old project that I could just connect directly to the motherboard leads. Throw on a couple of self-tapping screws and the machine is back in business! Booyah!
You can hardly tell that there was any sort of customization at all. /sarcasm
Now quit reading, and solder a big switch onto something.
A bit of Computer Repair
My good buddy Constance has a rather old computer. Actually, it is an original ibook with a speedy 300Mhz processor and a whopping 192M of RAM.
OK, the RAM has obviously been updated, but other than that, the computer is still original.
One day, Constance told me a tale of tripping over her computer cord and then the adapter started sparking. Crap! The machine may be crap, but it is all she has and it has all of her writings on it.
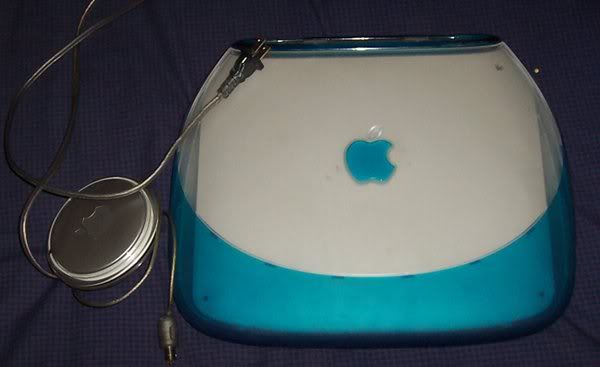 Ah, the slow as dirt machine. See that "yo-yo" power adapter? Aside from always burning out, those things are $80 from Apple. I'll be damned if I let Apple get any of my poor writer friend's money. Let's fix that shit!
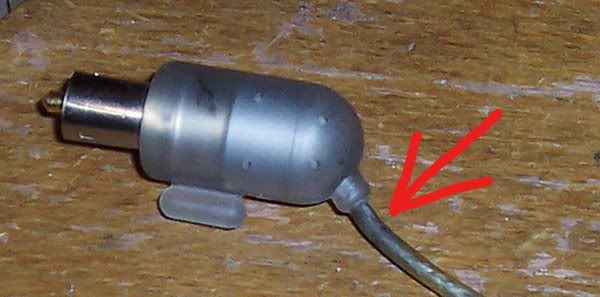 First thing first: find out where the cord is fried. Well, I'll be damned, it just happens to be fried where every other "yo-yo" adapter gets fried.
(That's me being sarcastic)
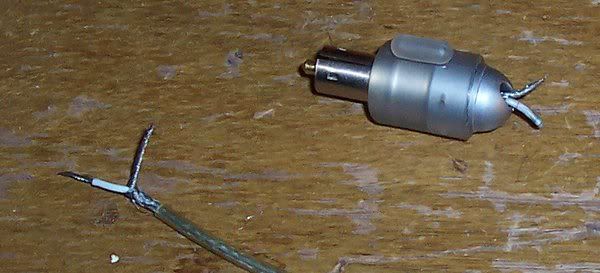 It went like this:
1. cut off part of the plastic housing
2. cut and strip wires
3. determine that the amount of exposed wire is to too short for my pathetic soldering skills
4. cut off all of the plastic housing
5. discard the metal housing under the plastic housing
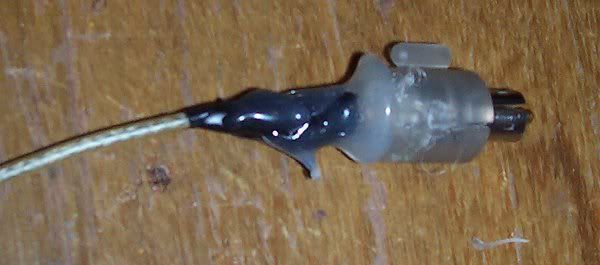 Hit it with some magic!
After soldering the wires, I used hot glue to re-attach part of the plastic housing and then I wrapped the wires with electrical tape. Just to be save, I slather on a crapload of hot glue to keep everything together.
Solder, electrical tape, and hot glue. Shazaam! That's three adhesives in one project!
When the repair was completed, I put the machine in bag and pedaled over to Constance's house, where I was greeted ecstatically. It should be noted however, that there was a serious lack of cookies/coffee/beer/scotch waiting for me when I got there. cough cough, cough cough cough, hint hint.
Now quit reading, and go repair a crappy 11 year old laptop.
P.S. If anyone has an old laptop gathering dust, and the laptop isn't as crappy as Constance's current piece of shit, let me know. (Constance really needs an upgrade)
She will make some cookies when you tell her which kind.
(Are Tacos a cookie? )
seriously
The connector port cracked on the inside of the laptop case, so I took it apart and soldered in some braided wire that exits the chassis. Then I put a phoenix connector on the end. I then snipped off the end of the power adapter cord, and wired it into a phoenix connector also.
Works perfectly now. Common problem due to the stress on that connector or something.
I had to solder it back on, and then tape it in place because the solder points would be the only thing holding it in place otherwise. It sorta works now, but you have to be ginger with it.
As for newer laptops: I don't have anything past the Pentium I era that functions (and most of those don't function, either), but I'll make sure to keep my eyes open.
@windigo, perhaps you should invest in a hot glue gun to help keep things in place.
One can never have too many adhesives
My kids removed the down arrow key and the 'n' key, I think, but it all works fine.
(jamba, put linux on it and give it to him for free. picture it as a donation to the cause. ;) )
@nybill, I think I'm about to install freeBSD on it, but I'll think about it :-)
ah, and now I think my desktop is busted.... I think the north bridge melted or something. dangit.
Step 2: write "n" on the square
Step 3: glue the square to the keyboard
done!
turns out...my north bridge is definitely burned/burning up. when it rains, it pours
- Tubular Music Thingy Part 2
- Beaglebone console output and a faster boot
- Tubular Music Thingy (part 1)
- get and speak the weather
- Getreel youtube-dl wrapper
- Two hours with the Archos 43
- HTML5 for a specific platform? I prefer to develop native apps
- a bit of dev talk about MuttonChop media player
- case for my status server
- my tiny todo list and some ruby
- The Camp Mug (almost) Test
- 2012 Tizen Developers Conference in San Francisco
- Freedom Jar is Full
- Web UI speed up using HTML5 Server Sent Events
- LEDs, BeagleBone, and my ToDo List
- a case for the BeagleBone
- fixing the car mirror
- Basic HTTP server in Vala using GIO Sockets
- sewing up a bling thing
- Trip to Austin
- convert hexadecimal string to an integer with Vala
- Training for 2012: Wuggling
- ABC tune grabber/converter
- A trip to Lancaster
- a new media playing machine
- Don't turn Tizen into WebOS
- making some chili sauce
- grumpy kid
- beer network improvement
- Ripping my DVD collection
- ruby script to search files in a directory for a string
- Pacific Pinball Museum Mission
- A Tale of Two Mugs
- shishi odoshi prototype
- file downloader in Node.js that handles redirects
- Travelling Far Part II
- python shell-fm web interface
- not quite a letter to cherrypal
- Audio playing class in Ruby with Gstreamer
- A quick fix
- my resized images using Ruby and Imagemagick
- one pound of coffee
- noise-canceling headphones that actually work
- updating my dynamic IP DNS information with Ruby
- Hello World in Ruby
- Bacon Apple Cider
- clawhammer sudo modprobe
- a web.py introduction
- The Skillet
- banjer strap on the cheap
- The Letter to Dell
- Linux Outlaws episode 170
- Not the 2010 Petaluma Whiskerino
- Monte Rio
- a new power switch
- the coffee cup review
- seriously, that thing is garbage
- keeping a GTK TextView cursor in view
- A tale of three sticker
- minimize/close to system tray in Python GTK
- A markdown editor/viewer in Python
- Red Phone Mumble Test
- Saturday Sassafrass
- A Friday Frolic
- Toshiba laptop review
- Google no longer uses Microsoft
- regarding Heybuddy and python stuff
- I'm calling you!
- heybuddy identi.ca client
- making a change holder thing
- Did I win? Yes and No.
- photograph sticker
- share this on facebook
- the damn computer died
- kilt alteration
- audcast streamer in vala with gstreamer, gtk and webkit
- The Mullet Adventure
- A Letter to the California State Legislature
- will dogfooding the frenzy leave me bitter?
- basic sitemap file maker in Python
- rock and rolling down the street
- Time to Celebrate
- game of life : Vala, SDL
- game of life : python, clutter
- networked timed text-to-speech goodness
- battery status in a screen session
- Bright Bike
- turning gears
- incremental screenshot namer wrapper
- a nice little feature/bug
- drawing circles
- broken VHS fixed
- cloudy phone number finder
- network quitter fixer
- the hot sauce experiment
- non-delivered emails sent to AOL domains
- GIMP mathmap experiment results
- tri-force tuna gift
- leave early, take your time, enjoy the solitude
- N37°49'8 W122°28'48
- rotary phone computer interface in action
- python script to play the latest version of an audio broadcast
- rotary phone computer input device
- server log spam from Microsoft?
- creating a CAPTCHA
- hello HTML 5! a simple audio player
- How does that increase security?
- getting familiar with GWT, a porting experiment.
- You're Not Carnival Personnel!
- "disable" a web app's buttons using javascript and css
- litterbugs and jaywalkers
- a basic web-app with pyjamas
- shell script to aid in compiling Vala projects
- Banjo part 4: she's finished
- Accent Characters in Linux with Xorg
- Terminal emulator part deux!
- Community
- Terminal Emulator in Vala using GTK and VTE
- Where is the MPAA on this one?
- pyclutter stage fullscreen hack
- Banjo part 3
- from necessity comes something
- If you build it, they will spam
- writing blogging software ( using data from blogspot )
- From WBEZ Chicago......
- Simple Switch Input to Enter a Command
- perplexing ponderence, pertaining penguin presents
- baby steps: the evolution my feature-free PHP framework
- ruining a perfectly good lamp?
- thank you bazaar
- quick not-so-little bikey bag
- Vala musings : int to string, packages, and starting with main
- my motor vehicle warranty is about to expire? really?
- Bike Trailer Part 2
- getting dandy with a hair pretty
- a not so elegant fixer up
- use python and gstreamer to get the tags of an audio file
- trials with gstreamer, pygst, and goom visualization
- Gaarrrrrrrrr!
- more pyclutter: get a move on - behaviourpath
- scrollwheel css div Internet Explorer 7 problem fixed
- Hello World using pyclutter - a half assed tutorial