
After five years of decent service and running 24/7, Wind, my media playing machine started having hardware failure issues as well as lingering problems decoding large video files. For a few years now, I had been hoping to find a SBC that would be able to handle my video decoding needs, as well as be able to fit inside of a phone body.
Say "hello" to Redbar. Unfortunately, I still have issued with decoding video. Hopefully a switch from Debian to Arch will resolve some of my issues.
The Build
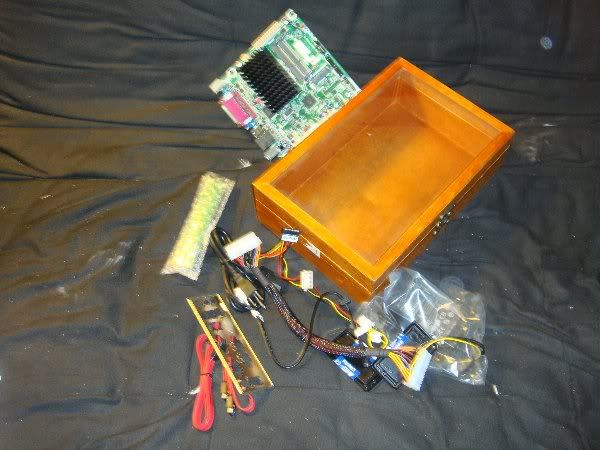
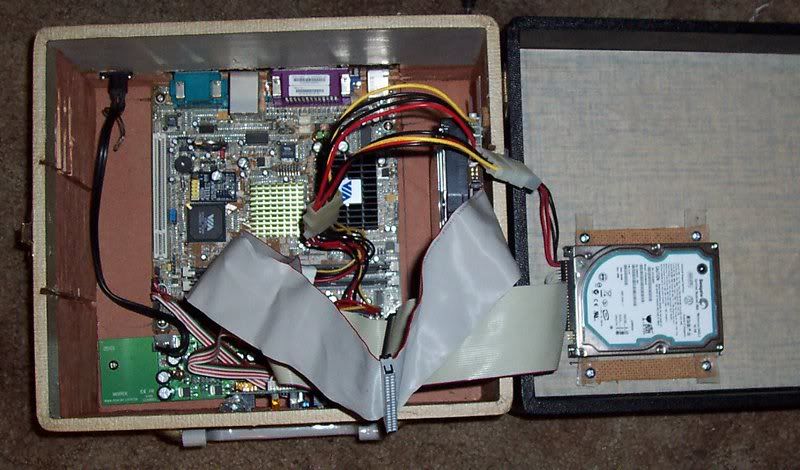
Redbar utilizes a MinnowBoard Turbot with a USB soundcard and a USB wireless network adapter. When the build took place, photos were taken with my mobile phone which I upgraded to cyanogenmod without backing up my pictures. [hella sad face]
Oh well, here are some pictures of the machine.
Redbar
 This is actually the finished product. The phone is a Kellogg Redbar that I gutted.
Storage
 Mounted in the body of the phone is a 2 TB SATA hard-drive. Power for the drive is pulled from the 5V pin on the SBC.
SBC
 Mounted to the base of the phone is the Turbot. The OS (currently Debian Jessie) is running from the MicroSD card.
Power
 A small button was attached to the bottom of the phone so that the device can be turned on and off.
Because the OS is running from a SD card, I should really find a way to run 'sync' before the 'shutdown' command powers off the SBC.
Final Location
 Boring....
The phone, the TV, and there is a stereo amp in there as well.
Boring....
The phone, the TV, and there is a stereo amp in there as well.
Anywho, I'm not too happy with the way the device has been decoding TED Talk videos, and I'm experimenting with making a SD card image of Arch Linux so that I can take advantage of more recent software for my media player.
Also, I'm going to complain about the absurd difficulty that I am having with attempting to downmix all audio to 2 channel stereo. Sheesh, what a pain.
Now quit reading, and go replace a computer with a slightly less problematic computer.
A few days ago, the urge to create an internetted thingy was upon me. Recently, I had been reading documentation regarding machine to machine communication using MQTT as well as BLE, and then I took a quick look at my tinker pile. The amount of neat things that I purchased for use in a project was far too high.... and then it hit me: LESS HOARDING, MORE MAKING!
What I was craving to make, was a network accessible pixel LED, inside an orb light fixture, that could be controlled using MQTT.
For this build, I used:
- an orb light fixture from the ReStore
- an Unwired One single board computer running OpenWRT
- a single ws2801 pixel LED that was left over from the Glimmer build.
The Build
The Fixture
 The orb light fixture appears to be a run of the mill wall or ceiling CFL fixture. If I remember correctly, the orb cost around $5. The cost of computer cases these days is getting out of hand. :)
Take it Apart!
 For some reason, the fixture manufacturer decided to put a bunch of unnecessary crap in my new computer case. Fortunately, it only took a few minutes to get the orb in a usable state.
Test the Circuit
 ws2801 pixel LEDs are controlled using SPI.
On the Unwired One device, there are no GPIO pins that are dedicated to SPI. Instead, the SPI bus is created by loading a kernel module with arguments to determine which GPIO pins will be used for SPI.
ws2801 pixel LEDs are controlled using SPI.
On the Unwired One device, there are no GPIO pins that are dedicated to SPI. Instead, the SPI bus is created by loading a kernel module with arguments to determine which GPIO pins will be used for SPI.
Solder Leads to the LED
 Once the circuit was working, leads were soldered to the LED so that it could be connected directly to the GPIO headers.
After the soldering was complete, the leads were wrapped in electrical tape.
Make a Notch for the Power Cable
 Since the orb is intended to rest on a table, it was necessary to make a notch in the base for the power cord to fit through. Thus ensuring that the orb will be flush on a flat surface. After a bunch of waffling around trying to find my files and metal snips, a grab and twist with some needle nosed pliers did the trick.
Put it Together
 After more waffling while trying to determine the best way to make some fancy standoffs for the computer board, I opted to simply hot glue the board to a piece of cardboard, and then hot glue the cardboard to the underside of the orb base.
Fast
Simple
Effective
... and I'm lazy
The LED was also hot glued to the base, pointing upward into the glass orb. /
Now me has ORB!
Have Some Coffee
 Technically, this picture is for the morning after the Orb Device had been created, but it does a damn fine job of showing what the orb thingy looks like.
The Code
Enable SPI
As previously stated, the SPI on the board needs to be configured by added a kernel module. In order for the kernel module to be loaded each time the device is restarted, the /etc/rc.local file was edited to launch the following script:
#!/bin/sh

#see http://www.unwireddevices.com/wiki/index.php/Working_with_SPI_(C/C%2B%2B)
#BUS : SPI bus number, can be bus0, bus1, bus2, bus3
#ID : SPI device ID (integer number)
#SCK, MOSI, MISO : GPIO numbers for the corresponding SPI signals
#MODE : SPI mode (0, 1, 2 or 3)
#FREQ : max SPI frequency (Hz)
#CS : GPIO number for the CS signal (optional)
# insmod spi-gpio-custom BUS=ID,SCK,MOSI,MISO,MODE,FREQ,CS

bus="bus1"
id=1
sck=20
mosi=23
miso=18
freq=25000000

cmd="insmod spi-gpio-custom $bus=$id,$sck,$mosi,$miso,0,$freq"
echo $cmd
`$cmd`
Honestly, the entire script can be replaced with one line of code: the final command. However, the script was written while reading the documentation of the process and if I ever need to edit the script, there are hella useful comments in there.
Control the Orb
The code for controlling the orb is written in Python and requires the Paho MQTT library.
code is available at https://gitlab.com/jezra/orb
oh... It would be really nice if I could copy the payload parsing documentation from the README.md in the code repository. Sadly, the lazy dev hasn't yet created that file. Well then, I know what I'm doing later!
Now quit reading, and go make an orb thingy.
Cronos!
Not too long ago, I received a Minnowboard Max, the dualcore 1.3Ghz model, and it is a sweet bit of kit.
Hear is my quick review of the hardware.
Good
A power button!
Every time I shutdown an SBC like the Raspberry Pi or Beaglebone by pulling the power connector, I cringe and hope I don't mess up the file system. Thank you Minnowboard Max for the graceful shutdown.intel graphics
A graphics chip with Open Source drivers maintained by the chip manufacturer? yes please!x86 processor
Apparently this makes #2 possible. Well not really, but there don't seem to be any other SBCs that have an Open Source driver for the graphics chip that are not x86 based.SATA connector
at some point, it would be great to add copious amounts of storage to this SBC
Bad
No OS images are available with a kernel that has GPIO enabled. To be fair, this is not the boards fault. On a side note, I tried to compile the 3.16 kernel with GPIO and PWM support but I ended up borking something. No surprise there. /me is horrible at compiling kernels.
UEFI in the firmware. bummer. This isn't as bad as it sounds either, although it is slightly more complicated than "install boot media and power up the device". Personally, I would love to skip UEFI and let the underlying BIOS handle all of my startup needs.
wow. how phenomenally indepth. :)
So what did I do with it? I'm glad you asked....
What I did with it
First, I tried to install Arch, but I couldn't get the /etc/fstab to properly recognize the /boot partition that had the UEFI boot jibberjabber on it. Can I blame this issue on UEFI? Does it have something to do with the UEFI requirement that the boot partition is formatted FAT32? Does that mean I can blame Microsoft as well? Does it matter that I was installing to the Micro SD card?
we may never know. Perhaps I was too hasty to give up, but I was itching to create, and not to debug.
Following the instructions at elinux.org, I installed Debian 8 (jessie) using the AMD64 netinstall image and then began installing the packages that I needed for compiling software and running scripts. A USB soundcard and an 802.11n wireless card were collected for the build. Then I put shit together.
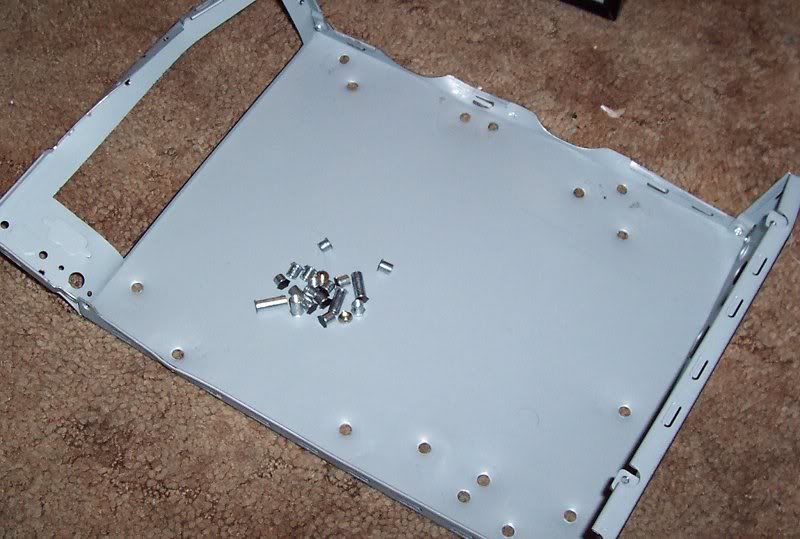
Make A Case
For the most part, I recycled the case from the horrid Odroidx computer.
Suspend the board
 zip ties, yarn, and small eye screws make great stand-offs.
Here is the USB card with small speakers connected to it. A sweet microphone was later added to the mix.
Bend some metal
METAL!!!!!
 This is part of the sheet metal that was donated to me by the recipient of windchime #3. Thanks Buddy!
What you are looking at is a microphone holding bracket screwed to the wall.
Microphone check! one two one two

Oh my, is that a sweet rewired mic that I see there? yes, yes it is.
Did I mention that I reused a lot of projects in this project?
On the wall!
 There she is: Cronos, right next to the "music room".
Recycling projects made this a bit of a breeze. The toughest part was wiring the electrical outlet behind the case so that I wouldn't have to expose any wires. keeping it clean. BOOYAH!
Software
A build is fine and dandy, but what is it running, and what does it do?
Chime the hour
Every hour, on the hour, cron runs a fairly simple Ruby script to play a "chime" for each hour of the hour. The cron code looks like
And the ruby script is:
#where is the chime?
this_dir = File.expand_path(File.dirname(__FILE__))
chime = File.join(this_dir, 'chime.ogg')
vol = 1.0
hour = Time.now.hour
if hour > 22 or hour < 7
vol = 0.1
elsif hour > 21 or hour < 8
vol = 0.4
end
#what command plays the audio?
play_cmd = "gst-launch-1.0 playbin uri=file://#{chime} volume=#{vol} &"
puts play_cmd
hour -=12 if hour > 12
hour.times do |i|
system(play_cmd)
sleep 2
end
And the chime audio is a recording of low note from wind chime number 2 with the pitch shifted. Hey! Where is the video of windchime 2?
Text to speech
Thanks to the USB sound card, the computer has audio out other than through HDMI.
For converting Text to Speech, I am using festival with Arctic voices.
Aside from the system itself using festival for text to speech, I am also running a modified version of my ruby webrick based web server for text to speech that uses festival and allows me to send text to speech commands to the computer from any network connected device.
I should mention that although the Minnowboard Max is a fairly speedy little computer, festival text to speech is quite the resource consumer and there is a delay between when a request for speech happens and when the resulting audio is actually heard. This lead to a feature in Blather.
Damn it computer! Do what I tell you!
Blather handles all of the voice commands for telling devices on my network what to do.
Because I needed some sort of instant feedback for whether Blather accepted my voice command or not, an option was added for running a script when a valid voice command was detected. Similarly, an option was added for running a script when an invalid voice command was detected.
In this implementation, the "valid script" plays an "affirmative beep" and the 'invalid script" plays a "negative beep". Since no one offered to help me with the audio, I busted out my cheapo USB mic and recorded my own files. :) oh man....
Affirmative: bing!
Negative: booduhbooduh
Well there she is. Now if you will excuse me.... "Play Iron Maiden"
Someone once said that I was 'addicted to noise', while I don't necessarily agree with the 'noise' part, I certainly like to listen to music... all the time. With that in mind, you can understand my desire to have a sweet sweet music player in my workshop, and now I have one (sort of). Say hello to Bonechop!
What's in a name?
Bonechop is a Beaglebone Black computer running Debian Linux and using MuttonChop for network controlled audio playing, and the whole system is put in an old AM Radio. Since the Beaglebone Black doesn't have audio out capabilities, I opted to use a hella cheapo USB audio card; and it works wonderfully.
Gather Some Supplies
 Here we have:
- a nice big late 50s or early 60s Montgomery Ward Airline AM radio gifted by a friend (thanks buddy!)
- a screw driver
- some awesome glue
- white gorilla tape
- the beaglebone (and a USB audio card)
- a bunch of little wood screws
- a 1" x 1" piece of poplar to use a stand offs
OK, the Poplar Didn't Work
 aside from having a hell of a time just cutting the poplar into little pieces, every piece I tried to put a screw into would split before the computer was securely fastened. bummer.
Fortunately, there were some pine shims in the workshop that were left over from when my buddy framed in a door. Thanks buddy!
Here we have 3 small pieces of pine secured to the Beaglebone with little wood screws. I would have used 4 pieces, but the 4th hole is located near the micro-SD card slot and my blocky stand-off wouldn't fit properly. That's OK because 3 points make a plane.
A New Adhesive!
 This is the first time I've used Weldbond, and I must say that I'm quite pleased with the results. After tipping the radio onto its side, the 3 stand-offs were glued to the body of the radio.
The next day, I took my coffee picture with the finished product.
How about a video?
As an entry to a contest by Adafruit Industries, I made a video of Bonechop playing some music.
This project is definitely not finished, but it is in a damn fine usable state. Now I need to go find some switches to wire into the GPIO.
It was mounted on the wall of a local thrift store, and whenever I would walk by, it would whisper "destroy me". After a few weeks, I finally succumbed to the siren's call and, $12 later, I was walking home with a cheap crap clock.
I was hoping to turn the clock into a useful computer. sigh....
The Build
Destroy!
 Why don't I have a pre-destruction image of the clock? Damn, I'm slacking.
These are the components of the clock that I wanted.
P.S. Smashing a clock is not the same as killing time.
Amplify
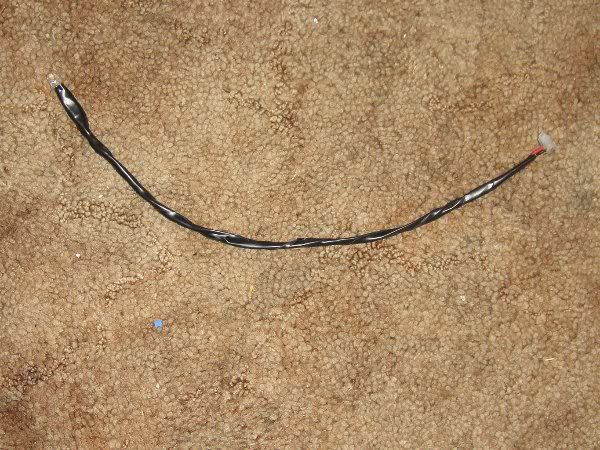
 Much like the toaster, a small amplifier was disassembled and new speakers and plug were soldered on. Two power lines were also soldered on. The idea being that I could use 5 volts from the pins on my motherboard to power the amp (more on that later).
Mount the amp
 Using a paddle bit, holes were drilled on the sides of the case for the speakers to be mounted over.
Here we have all of amplifier bits mounted in place. In the middle is the little amp.
Mount a Laptop hard-drive
 Using some eye-screws, baling wire, and little bits of plastic, a simple system for handing a hard-drive was created.
Mount a crappy Single Board Computer Pt. 1
 For mounting the crappy SBC, I used some more eye-screws and zip ties.
"click click click"==done
This is how the top of the SBC was mounted, although in this case 'top' is quite relative.
Mount a crappy Single Board Computer Pt. 2
 For the bottom mounting holes, again, eye-screws were used, but instead of zip-ties, a short bit of yarn was used to secure the crappy SBC.
This was my first use of yarn in a custom computer case and it saddens me that it was with such a lousy SBC.
Put that crap on the wall!
 All done and on the wall.
Later I added a microphone to the machine so that I could use Blather to control my lights. Unfortunately, the crappy SBC had different ideas.
The Crappy SBC
Quite a while ago, I purchased an Odroid-X, because I read that there was support of Arch Linux. Unfortunately, after I had everything together and Arch was installed, I started running into problems. Audio wasn't working properly, and for a machine that has the main purpose of playing audio and accepting microphone input, this really shit in my oatmeal.
After trying, and failing, to get the machine to boot with any other version of Linux, I gave up on having this machine do what I wanted it to do. sigh
What's in a name?
"pissbox" is now a database backup machine, and I will always do a lot of investigation before purchasing any SBC that isn't designed to run GNU+Linux "out of the box".
There once was a time where I liked to pull my hair out trying to get Linux to install on a computer, but now I just want to install Linux and get cracking on making an odd/interesting/art computer that does what I want it to do.
Now quit reading... and recommend a SBC that I should/could use.
Those old coin-op photobooths are awesome. Sit down, close the drape, put some money in the coin slot, and in a few minutes you will have some memories in your pocket. Why can't I have one of those? Oh yea, because they take up a lot of room, use stinky chemicals, and I have no idea how to build one. Fortunately, I have some computer skills.
The Mission
if
Yea, that's a big if. If I had it my way, I'd make an art installation piece that was a digital photobooth with a built in webserver, so that after pictures were taken, one would connect to the photobooth over the internet and download pictures. Unfortunately, I don't have the room or the tools to make a photobooth, but I can get cracking on a much smaller, yet curiously similar project that focuses on the computer and software aspect of a digital photobooth.
The Computer
 The computer for this project is a Rev 2 Raspberry Pi. See that little wood block that the computer is screwed to? Good. The Rev 1 Raspberry Pi didn't have any mounting holes and it made putting the device into a custom enclosure a real pain in the ass. The Rev 2 only has two mounting holes and a small block of wood was used for both holes.
I'm still waiting for a apology for the lack of mounting holes fiasco. Oh yea, this computer's name is 'shitbird' because I couldn't come up with another name
The Case
 A few years back, my buddy gave me two almost fancy Wild Turkey boxes. One box was used for my media machine, the other was used for this project.
A bit of hot glue affixed the wood blocks to the inside of the case.
Notches were cut in the sides of the box to handle cabling.
This case is far too big for this project, but I really wanted to make it and this is what I had kicking around .... so tough!
Big Red Switch
 This switch is identical to the emergency 'play Black Sabbath' button, and it is mounted on my wall near the heater and some sweet rotary phones. For input, the switch is connected to the Raspberry Pi on GPIO pins 5 and 6.
The Camera
 In a few days time, a 5 megapixel camera will be arriving at my home, but for now I'm using this less than ideal 640x480 logitec webcam that has been placed on a shelf next to some sweet rotary phones.
To be honest, everything in my home is "near" a sweet rotary phone (or two).
Nesting in the corner
 Oh hey, is that a Raspberry Pi on your wall? Yes, yes it is.
If my home were a Federation Star Ship, that corner would be the Engineering Department. beep boop.
Aside from a bunch of sweet rotary phones, there is lantern that can be controlled over the network, and there is a toaster with a postcard on it. RAD!
Code
So it is built and all in place. What does it do?
The computer is running Arch Linux and the software for this project is written in the Ruby programming language without any third party libraries. However, in order to take a picture, the code makes a system call to fswebcam which is easily installable from the Arch Linux software repositories.
Pressing the big red button takes a pictures and saves the picture in a local directory. The code also contains a basic webserver that makes accessing the saved images a snap. Included in the webserver is a simple way to make the computer take a picture. This can be accomplished by directing a web browser to http://NAME_OF_COMPUTER:8080/capture
Enter the Ruby
require 'webrick'
require 'thread'
require 'observer'
#we might be testing
@@TESTING = ARGV[0].nil? ? false : true
##define some variables
this_dir = File.dirname(__FILE__)
@@public_dir = File::join(this_dir,"public")
@@captures_dir = File::join(@@public_dir, "captures")
class Switch
include Observable #instances will be watched!
def initialize()
#init the switch GPIO
@io = 3 #this is pin 7 on a Rev 2 Raspberry Pi
@value_file = "/sys/class/gpio/gpio#{@io}/value"
@value
#clean up first
unless @@TESTING
clean_up()
File.open("/sys/class/gpio/export","w") do |f|
f.puts(@io)
end
#set direction to in
File.open("/sys/class/gpio/gpio#{@io}/direction", "w") do |f|
f.puts("in")
end
#record the initial value
@value = get_value()
end
end
def get_value()
unless @@TESTING
value = File.read("/sys/class/gpio/gpio#{@io}/value").chomp()
end
end
def run()
puts "running switch"
running = true
thread = Thread.new() do
while running
#poll the value
value = get_value()
if value != @value
@value = value
#emit the value
changed
notify_observers(self, @value)
end
sleep 0.1
end
end
end
def clean_up()
unless @@TESTING
File.open("/sys/class/gpio/unexport","w") do |f|
f.puts(@io)
end
end
end
end
class PictureTaker
def initialize()
p 'creating picture taker'
end
def switch_changed(switch, value)
if value == "1"
puts "value: #{value}"
take_picture
end
end
def server_wants_capture(server, value)
if value
take_picture
end
end
def take_picture
now = Time.now.strftime("%Y%m%d%H%M%S")
puts now
new_file = File::join(@@captures_dir, now+".png")
cmd = "fswebcam -r 640x480 -S 3 -F 2 --no-banner --png 7 --save "+new_file
#run the command
start = Time.now
IO.popen(cmd) do |f|
output = f.gets
end
return (Time.now - start).to_s
end
end
if __FILE__ == $0
pt = PictureTaker.new
sw = Switch.new
sw.run
#watch for a switch press
sw.add_observer(pt, :switch_changed)
#make a webrick server
server = WEBrick::HTTPServer.new({:Port=>8080,:DocumentRoot=>@@public_dir})
#what server actions do we have?
server.mount_proc('/capture') do |req, resp|
resp['Content-Type'] = 'text/plain'
resp.body = pt.take_picture
end
running = true
trap "SIGINT" do
server.shutdown
end
server.start
sw.clean_up()
end
For easier copy and paste, the code is available at http://hoof.jezra.net/snip/ob
What's next?
Aside from waiting for the 5MP camera...
There are still plenty of unused GPIO pins on the computer and there is a lot of unused space in the computer case. It should be possible to find something else to do with the computer.
- upload captured images to somewhere on the internet
- have the motion detecting toaster tell the picture taker to take (and upload) pictures when motion is detected.
- Always skip step 3
- enjoy a bit of home security
Now quit reading, and go take a picture.
great work!
Karl
A: Yes
B: Yes
let me know what you create.
I use a fairly generic big red button switch, and just about any button/switch would work for this. There are 2 or 3 pins on the RPi that can have a switch directly connected, and in this case, it is pin 7.
I need a programm?
Sorry, i'm noob in this stuff....
Solitude is my muse, and taking things apart keeps me from getting depressed. However, it is still nice to hear other people say nice things so I decided to convert a toaster into an interactive art project that says nice things when something (usually me) walks in front of it.
The Build
TAKE IT APART!
 The first step to any great project seems to begin with a bit of destruction. Good. Nothing really clears my mind like taking something apart. Yea, I laughed when I bought the toaster and I'm still laughing now.
The toaster was soon gutted and a bunch of innards where chucked in the waste bin.
Make some mounting thingies
 For this build, I planned on using the Raspberry Pi from the NaNoBox and since someone is a hobby hardware hacker hater, there are no mounting holes on my Raspberry Pi. sigh. Who's a liar? ME (sort of). I said I wouldn't use the Raspberry Pi for a similar project. Fortunately, this project isn't too similar.
A small wooden block was epoxied to the toast box (at least that is my name for it). Similarly, a piece of thick plastic from VHS case was also epoxied to the toast box.
Circuit from the shell


Surrounding the toast box is the toaster shell, and this is the circuit board that was mounted inside of the toaster shell. On the circuit are 3 buttons and two LEDs.
After a bit of scratching at the circuit board and some soldering, the buttons and LEDs where ready to be wired up.
The circuit back in the shell
 Oh man, look at that rat's nest of wires.
This is the inside of the shell with most of the wiring finished. This includes the PIR thingy. What's a PIR thingy you might ask? good question.
PIR Thingy
 Hey look, kids, it's a PIR thingy! This Passive InfraRed sensor thingy was purchased at https://www.adafruit.com/products/189 for 10 bucks.
A notch was cut in the toaster's lever channel and the PIR was hot glued into place. Damn, I love adhesives.
Sound!
 My buddy gave me a small USB amplifier and speaker combo used for plugging into a mobile phone.
In my haste, I obliterated the amplifier before taking a pictures. What a shame. The wires on the amp were to frail for my needs so I soldered on some heavier wires for audio in, audio out, and the power connector. Since the amp was originally powered over USB I figured I could wire it to the 5v pin on the Raspberry Pi. The speaker is from another portable amplifier.
Buckle up
 Like I've said may times, the designer of the Raspberry Pi hates me and didn't include mounting holes on the board. Because of this, I needed to find a creative way to keep the board in place and my solution was a nice little 'belt'.
To keep the number of cable going to the toaster to a minimum, an old USB 802.11g was connected to the board.
Add some more LEDs
 Aside from the two bright blue LEDs on the toaster shell, I added a green LED to each slot of the toaster box.
All Together
 With much finagling, the toaster box and the copious amount of wires was stuffed into the toaster shell and the end result was put on a desk and pointed at the busiest foot traffic area of my home.
The toaster lever, although no longer in use, was hot glued back where it belongs and helps hide the PIR sensor.
What does it do?
When the sensor detects movement, an audio file is selected at random from a directory of audio files, and played through the speaker. While the audio is playing, the LEDs are flashing.
some of the setup
The code for running the toaster is written in python and utilizes gstreamer-0.10 for audio playing. In order to get gstreamer to default to playing through the 'audio out' on the Raspberry Pi, I had to edit the /etc/asound.conf file to look like the following:
pcm.mmap0 {
  type mmap_emul;
  slave {
    pcm "hw:0,0";
  }
}

pcm.!default {
  type plug;
  slave {
    pcm mmap0;
  }
}
Switches
Due to the lack of GPIO documentation for the Raspberry Pi, most tutorials for the device involved wiring in "pull-up" resistor which means that extra work is involved just to get a simple button press to register. However, pins 3,5,7,24, and 26 have built in pull up resistors which makes these pins ideal for connection switches.
Most (if not all) of the information I needed for programming the pins on the Raspberry Pi came from http://www.panu.it/raspberry/ and not from the Raspberry Pi website. Seriously, this is wrong. The RPi website should have some useful information, but alas, it does not.
What's next?
The power for the amplifier was specifically not taken from the one remaining USB port. It would be fairly trivial to plug a USB camera into the USB and, when the PIR detects motion, have the camera take a picture and then upload the picture to a back up server. Hella cheap home security system. booyah!
Also, I need to figure out what to do the the buttons.
if your browser doesn't play ogg files, you should switch browsers
Why? Because if your browser doesn't play ogg:
- your browser hates freedom
- you won't be able to hear
duh!
The System
Like almost all of my computers, the toaster is running Arch Linux
Now quit reading and go make something...
"Talky's the name, toasting's the game."
In mid-February, I purchased a $25 pink PogoPlug Pro on Amazon that I wanted to use for a Status.net micro-blogging server that I could run from my house. This would allow me to maintain control of my data, while still letting me connect and be social with buddies on the interwebs. While I was happy that the device was working as I wanted it to, my status server setup was little more than and exposed hard-drive plugged into the PogoPlug. A case for the machine was long overdue.
The Box
 Aside from clocks, there are plenty of jewelry boxes at the thrift store that will make a great case for a server.
When I was at the store looking for a new case, the decision was between this $6 jewelry box or an $8 clock. The dark wood of this box matches my Clock Server and Wall Bone Phone quite well.
Cleaning The Slate
 There is always stuff that needs to be removed from the inside of a new computer case. This is fun destruction.
Always remember, when tearing things apart it is necessary to use "controlled destruction" so that useful stuff doesn't get destroyed.
After this picture was taken, I spray painted the inside of the box black.
Put Some Holes In It
 This is the back of the box showing multiple small venting holes at the top, and one large cable access hole in the bottom.
Being to lazy to line everything up properly for external access, I will end up putting the network and power cable through the large access hole and connect them on the inside.
Hooks From Above
 Taking things a step further in "stupid design" land, I decided it would be a good idea to hang the hard-drive and motherboard from the top of the case using some bent baling wire.
These are the hooks for the hard-drive which will hang in front of part of the motherboard.
Hang'em High
 All put together.
The power converter on the bottom is hotglued to some wooden standoffs that are hotglued to the box. This was necessary due to the lack of mounting holes in the power converter board.
Power for the hard-drive comes from the USB adapter that is far too long for this project.
Closed Up
 Done and Done!
Let's talk about LEDs. I love those blinky little bastards, and they make see through cases awesome at night. On the motherboard there is one green and 1 blue LED, that are "on" when the machine is powered up. The Ethernet port has 2 yellow LEDs that light up when there is network traffic. The USB adapter has 1 red LED which lights up when the drive is accessed.
The Hardware
My PogoPlug is the "pro" version: Model number POGO-P01 - Pro
700Mhz Dual core ARMv6 Processor
128MB RAM
4 USB ports
1 SATA port
The machine is currently running Arch Linux which I installed by following the instructions at http://archlinuxarm.org/platforms/armv6/pogoplug-provideov3. Lighttpd is used to serve webpages and MySQL handles the database needs.
The biggest problem I encountered while putting this baby together was figuring out how to mount the power converter. Fortunately, the new Series 4 PogoPlugs have an external power adapter, a similarly sized motherboard, and 2 user controllable LEDs! Oh be still my blinking heart. Unfortunately, they also have the same paltry amount of RAM.
One day, I will find the perfect machine for a freedom box..... one day.
A few weeks ago I purchased a BeagleBone from Amazon. The BeagleBone is a small ARM based computer with programmable Input/Output pins developed by Texas Instruments and is part of their beagleboard line of ARM development boards. After finally deciding what to do with the computer, it was time to build a new computer case.
Where is it Going?
 At the thrift store, I purchased a nice jewelry box with flowers etched in its glass. The small, solid box was $3.00.
The plan (play the A-Team theme), is as follows:
- Connect a rotary phone to the BeagleBone for input
- Do some other sweet shit (more on that later)
Alrighty! time to get crackin
Gutted
 Step 1. Remove the guts.
For some reason, whoever created the box thought it would be a good idea to put a bunch of stuff inside that I don't want or need.
Here is the box with the lid removed and the crap removed.
Making Some Standoffs
 When I made the clock server case, I kept some of the wood bits that I needed to remove from the internals of the clock. A wood saw and some small screws made some sweet standoffs for the beaglebone.
A black marker was eventually used to color the light wood.
Mangle the Box
 Any dreams I had about making an very clean access hole in the case was dashed upon the rocks of my poor power tool using skills.
Oh well, it doesn't get seen, and it works as it should. Why am I complaining?
Wall Hanging Mount
 Some twisted baling wire and two wood screws will make it very easy to hang the box on the wall.
Time to warm up the hot glue gun.
So Far So Good
 Once the glue gun was hot, the standoffs were glued into the box.
Look at all of that empty space! The BeagleBone has a USB port so I will be putting something in the box, but I don't know what it will be. So far, I'm thinking it could be:
- a nice laptop hard-drive for file storage
- a character LCD to display information
- or... I could ditch the case and put the BeagleBone in the phone itself
On The Wall
 All plugged in a running sweet!
Currently, my BeagleBone is running Arch Linux.
Originally, the BeagleBone ships with Ångström Linux, but I couldn't find any documentation for configuring the opkg package manager that ships with Ångström, and since I was looking to eventually run Lighttpd and MySQL on the device, I switched to a distro with an extremely useful wiki.
The Computers in the Corner

The Phone
The Bone
The Router
The Clock Server
The DSL Modem
The Status Server (between the modem and the router)
Now What to Do?
Put some LEDs in the box and write a program to light up the LEDs when something happens. That something is to be decided
But what else?
Options include putting a hard drive in the box and use it as a federated status.net server or put a character LCD in the case and use LCDproc to display various bits of information.
Currently the machine is programmed to:
- Dial 666 : play random Iron Maiden track on my MuttonChop machine
- Dial 75337 (sleep) : shut down computers
- Dial 9253 (wake) : emit wake-on-lan signal to various computers
Now I need to write a bunch of little programs to be run when various numbers are dialed on the phone, and I need to find a way to get the cables out of the way.
Until next time, hack on!
The BeagleBone story continues at http://www.jezra.net/blog/LEDs_BeagleBone_and_my_ToDo_List
When I built my media playing machine, I swapped the motherboard of my previous media playing machine into my home server and added a two terabyte hard-drive. Due to the increased processor heat, I put in a fan which did a great job for quite a few months. Recently, the fan began to fail in a very noisy way and instead of replacing the fan, I decided to just build a new case.
 Lady at thrift store: oh, your buying the nice clock
Jezra: Yea, I wouldn't call it nice.
The clock in question was twenty-five dollars of cheap wood and a fancy yet broken clock mechanism.
Originally, I wanted to put the guts of my little ARM based pogo plug in the clock and have a sweet working clock / status.net server combination.
Fortunately for my "tic-toc" hating self, the clock was broken.
Clean It Out
 First thing first: remove all of that ticky tocky stuff from the clock.
It was during this part of the process that I realized just how poor the quality of the wood used to create this clock was.
The parts that weren't glued together were fastened with small flat-head screws. yuk.
Oh hey! look at that. An empty clock frame and a pile of clock crap.
Yes, I Sometimes Shave
 What is that design called? Art Deco perhaps?
Oh who cares. All I know is that I didn't want the ugly design painted on the glass to ruin the look I was going for.
Using my trusty razor, I shaved all of the crappy paint off of the glass. Let me tell you, it made a noise like fingernails on a chalkboard... and it was worth it.
Drill Some Venting
 For some reason, I decided that as a computer, the clock would be better if it were upside down and I wanted to drill some large vent holes in what would become the top of the computer.
Peek-a-boo, I see you. Oh, that's kinda creepy.
The OS Hard Drive
 The Machine is running Debian Squeeze from a 4 Gigabyte partition on a 60 Gig IDE laptop hard drive; the other 56 Gigs is for file storage.
The OS drive is mounted to the side wall of the clock case. Two smalls strips of plastic were screwed to the bottom of the drive and then screwed to the wall of the clock.
Although the OS is on a 4 Gig partition, only about 1.5 Gigs are used. Not that you care.
More Storage
 The majority of storage on the server is handled by a 2 Terabyte SATA drive.
Using some wood bits that I removed from the inside of the case, and some left over clock gears, I make mounting brackets for the big drive.
Oh how very steam punk of me.
I actually really like this look, and it makes me want to build a nice wood and brass computer case from scratch. Who am I kidding? That would take way more effort than gutting a broken clock.
Small 5Volt Fan
 Seriously, all I really needed to do was put this thing in the old case and everything would have been fine. It wouldn't have been as much fun, but it would have been fine.
This fan caused me a bit of a problem in regards to a power source. The fan is 5 volt, but the CPU and system fan power sources on the motherboard are 12 volt. I ended up getting 5 volts from the S/PDIF connector on the motherboard.
A bit of baling wire, two thumb tacks, and two hair elastics later, the little fan (which came from a busted Sega), was cooling that CPU properly.
Everything in Place
 Alrighty! Everything is in place and running properly.
Did you think I was joking about the thumb tacks and hair elastics? Oh wait, they are sideburn elastics.
A couple of zip ties keep the cables manageable.
On The Wall
 And there she is, miniserver mounted on the wall and looking good.
The system specs are:
- 1 Ghz VIA Processor
- 1 GB RAM
- 2 TB Storage
The motherboard has another free SATA slot and I am tempted to put another drive in the case. If I do, it will have to be a laptop drive due to limited space.
Now quit reading, and go hack some hardware.
Fancy clock + hammer = fun times
After re-purposing a larger case with more storage for the server on my home network and filling the server with my ripped DVDs, I figured it was about time to replace my media playback machine with a machine that was actually capable of decoding my rips without running the CPU at 100%.
Gather Some Components
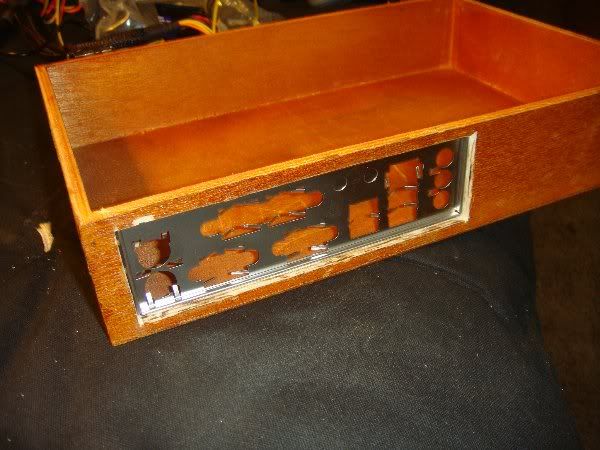
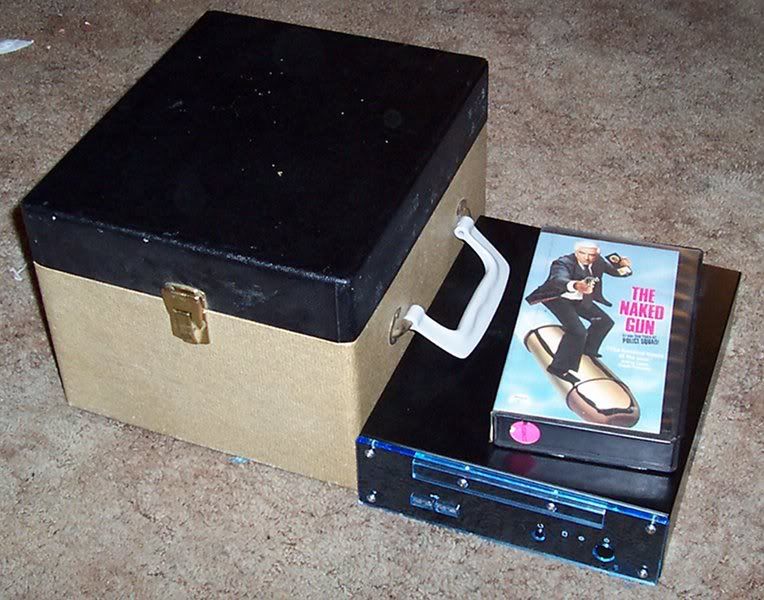
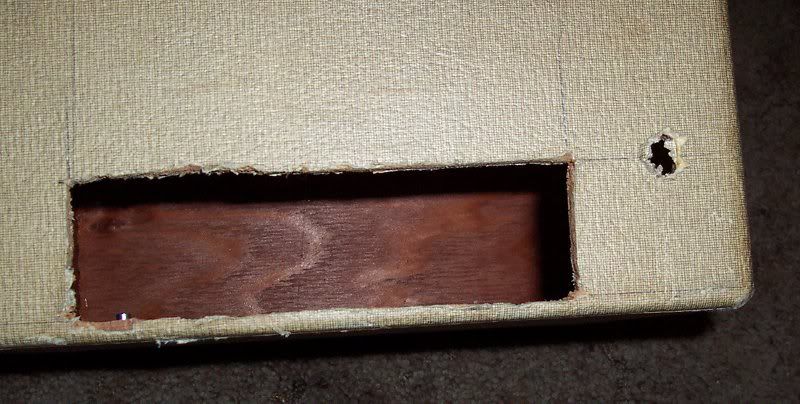
 The case for the new machine is box that was part of a Wild Turkey holiday gift set: a cheaply crafted piece of crap made of low grade wood, with a clear plastic cover.
The Electronics
- Dual core 1.8Ghz Atom processor on a mini-itx motherboard
- 2 x 2Gb RAM
- A far too powerful power supply
- 80Gb SATA laptop hard-drive that I pulled out of a busted laptop
Because this machine is going to be fanless, I decided to layout the components in a way that would maximize convection cooling. What this means, is that the component that generates the most heat needs to be closest to the exhaust and the most temperature sensitive component needs to be located by the air intake.
Cutting, Drilling, Bending, JB-Welding

First things first: the hinged lid needed to be removed so I could muck with the inside of the box more easily.
- After aligning all of the internals, I traced where the metal port plate is supposed to go and then cut... not a bad fit.
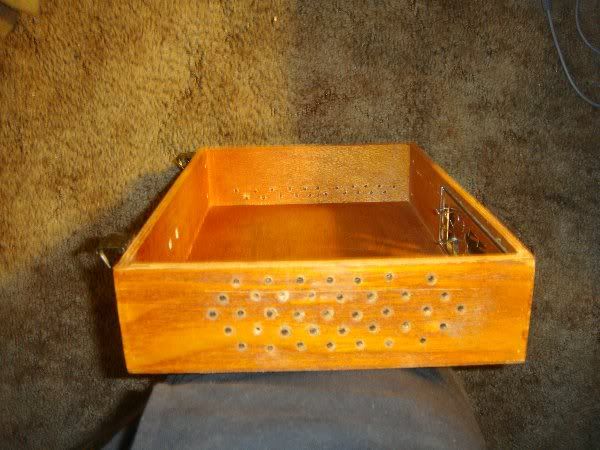
- A lot of small holes where drilled on both sided of the box. Technically, it was the top and bottom that were drilled ( the machine is going to be on end so as to provide the best convection airflow.
- Those metal things with the points are my component stand offs and I bent the points down before using JB-weld to attach them to the inside of the box.
Fire Up the Soldering Iron
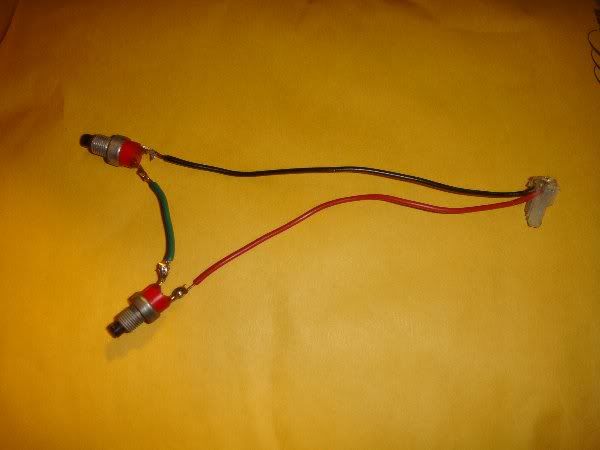
- That two pronged thing-a-ma-bobber is my power switch. Because it consists of two switches in series, both switches must be pressed in order to power the machine on and (most importantly) power off the machine. The last switch I put in/on a machine has a tendency to accidentally get pressed when I least expect it; like when I open my scanner.
- A red LED was soldered to some wire and wrapped with electrical tape. This is the Power On indicator and bit a sandpaper helped diffuse the light coming out of the LED.
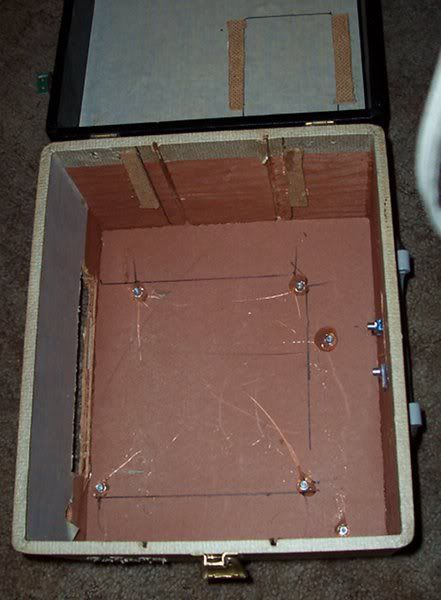
Put It All Together
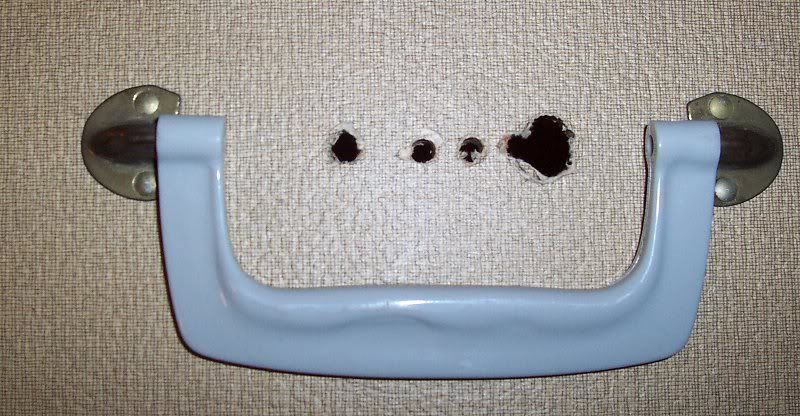
 This is the mostly finished machine with the lid put back on. The locking clasp on the side had to be moved, but it still functions perfectly.
At this point, everything was going extremely well and the computer looked absolutely fantastic, so I figured something was terribly wrong. After connecting everything and pressing the power buttons .... nothing happened. Bummer.
Note to self: when powering up a computer, make sure it is plugged in properly.
After properly plugging in my power converter, the machine booted and I installed Arch Linux.
Installed
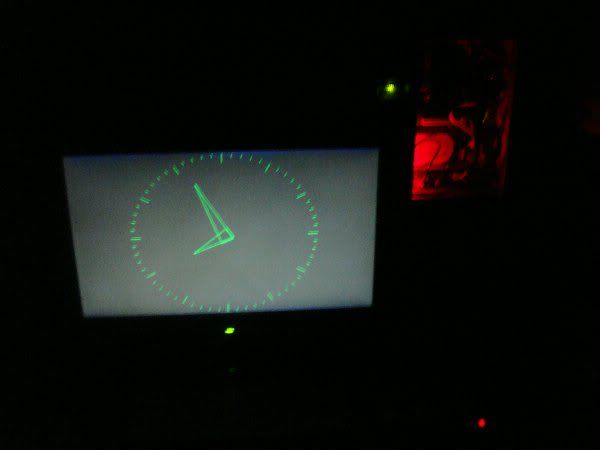
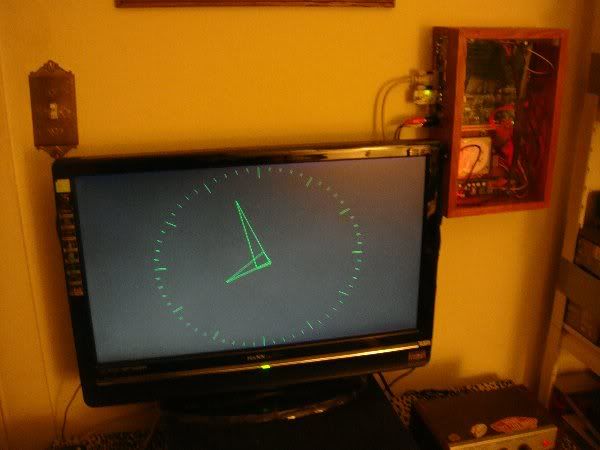

The final resting place for the machine is on the wall next to the TV.
- Don't be afraid of the dark
- Computers are just fancy clocks
- The two power switches are just barely visible on the right side of the machine.
Still to do: The audio out can use a smaller adapter and the current external USB wireless adapter needs to be replaced by an internal PCI-Express mini card. I need to either hack the XMBC to properly handle my NES controller, or I need to write my own software for browsing and playing media from my collection.
Due to the lack of a fan, this computer is silent; therefor, I have named it Wind.
Now quit reading, and think of wind related things.
like:
- What's next? A computer named Earth and a computer named Fire?
- Make 3 more, and Crom will laugh at them.
Also, I'm fairly certain that you can map the keys on your controller with just an edit of a particular file. Which file is it you ask? I can't quite remember but, it seems I seen it on the XBMC forums.
The Problem
My little home server, affectionately named miniserver is a mini-itx machine with a 400Mhz processor, 512MB of RAM and a 60G harddrive; all in a nice little case that sits on top of my bookshelf. Unfortunately, 60G isn't enough room for my purposes and the extra 250G drive I have won't fit within the slim case.
Fortunately, a new computer case is just $5 at the thrift store; which means I spent 5 bucks for a box that I was going to turn into a new computer case.
Get Hacking
 In hindsight, I should have taken some measurements of the motherboard before I dropped my fiver on a box I thought I could stuff a computer into. Oh well, it all worked out.
Here is the new box next to the old case. Yea, that's a VHS tape for size comparison.
pull the guts out
 After pulling all of the parts out of the original case, I had a decent collection of old slow gear on my floor.
smash!
 All of the stand-offs from the original case were removed. This was the "point of no return" because I smashed them out with a hammer.
If you've never hit a computer component with a hammer, I highly suggest giving it a go. pure joy.
chop it up
 With surgical precision, I cut a hole in the box so that the various ports of the motherboard can be accessed from the outside.
By "surgical precision" I mean that I drew some hasty lines and used a drill and the saw on my pocket knife to create the access hole.
drill baby drill (that's bad)
 A couple of holes were drilled for the power switch, reset switch, and some status LEDs. So far, so good.
getting close
 The interior of the box with the stand-offs hot glued into place and pairs of shims hot glued to the lid and wall of the box. The shims will be used for mounting the hard-drives.
mounting the hard-drives
 Remember those cumbersome plastic cases that Video Rental stores kept their VHS tapes in? Well I chopped one up to get a few lengths of flexible durable plastic. The hard-drives were bolted to the plastic and the plastic was screwed to the shims. It's easier than bolting the drives directly to the case, and it leave a but of room for airflow.
all set and ready to go
 Well looky looky; it's all of the components (minus two USB ports) in place and ready to be fired up.
Amazingly, everything worked just fine. It is also quite amazing that I didn't burn my fingers with the hot glue gun, or smash my fingers with the hammer, or cut my fingers with the saw, or damage myself in any way, shape, or form. weird.
sitting pretty
 All closed up and sitting on the bookshelf next to the linksys router and DSL modem thingy.
what does it do?
It runs Ubuntu server edition and :
- it serves files via NFS and SSHFS, so I can access my music, movies, and pictures from any machine on my network
- it runs Apache webserver and MySQL database, which allow me to develop and test websites at home
- it is a backup for my various coding projects and has a centralized Bazaar repository
What the machine doesn't do is process a lot of data, so the 400Mhz processor is just fine (and quite energy efficient). Actually, this entire box could be replaced by a nice little plug computer.
Note to self: write a letter to the manufacturer of a plug computer.
Alright, quit reading, and go spend 5 dollars at the thrift store.
- Tubular Music Thingy Part 2
- Beaglebone console output and a faster boot
- Tubular Music Thingy (part 1)
- get and speak the weather
- Getreel youtube-dl wrapper
- Two hours with the Archos 43
- HTML5 for a specific platform? I prefer to develop native apps
- a bit of dev talk about MuttonChop media player
- case for my status server
- my tiny todo list and some ruby
- The Camp Mug (almost) Test
- 2012 Tizen Developers Conference in San Francisco
- Freedom Jar is Full
- Web UI speed up using HTML5 Server Sent Events
- LEDs, BeagleBone, and my ToDo List
- a case for the BeagleBone
- fixing the car mirror
- Basic HTTP server in Vala using GIO Sockets
- sewing up a bling thing
- Trip to Austin
- convert hexadecimal string to an integer with Vala
- Training for 2012: Wuggling
- ABC tune grabber/converter
- A trip to Lancaster
- a new media playing machine
- Don't turn Tizen into WebOS
- making some chili sauce
- grumpy kid
- beer network improvement
- Ripping my DVD collection
- ruby script to search files in a directory for a string
- Pacific Pinball Museum Mission
- A Tale of Two Mugs
- shishi odoshi prototype
- file downloader in Node.js that handles redirects
- Travelling Far Part II
- python shell-fm web interface
- not quite a letter to cherrypal
- Audio playing class in Ruby with Gstreamer
- A quick fix
- my resized images using Ruby and Imagemagick
- one pound of coffee
- noise-canceling headphones that actually work
- updating my dynamic IP DNS information with Ruby
- Hello World in Ruby
- Bacon Apple Cider
- clawhammer sudo modprobe
- a web.py introduction
- The Skillet
- banjer strap on the cheap
- The Letter to Dell
- Linux Outlaws episode 170
- Not the 2010 Petaluma Whiskerino
- Monte Rio
- a new power switch
- the coffee cup review
- seriously, that thing is garbage
- keeping a GTK TextView cursor in view
- A tale of three sticker
- minimize/close to system tray in Python GTK
- A markdown editor/viewer in Python
- Red Phone Mumble Test
- Saturday Sassafrass
- A Friday Frolic
- Toshiba laptop review
- Google no longer uses Microsoft
- regarding Heybuddy and python stuff
- I'm calling you!
- heybuddy identi.ca client
- making a change holder thing
- Did I win? Yes and No.
- photograph sticker
- share this on facebook
- the damn computer died
- kilt alteration
- audcast streamer in vala with gstreamer, gtk and webkit
- The Mullet Adventure
- A Letter to the California State Legislature
- will dogfooding the frenzy leave me bitter?
- basic sitemap file maker in Python
- rock and rolling down the street
- Time to Celebrate
- game of life : Vala, SDL
- game of life : python, clutter
- networked timed text-to-speech goodness
- battery status in a screen session
- Bright Bike
- turning gears
- incremental screenshot namer wrapper
- a nice little feature/bug
- drawing circles
- broken VHS fixed
- cloudy phone number finder
- network quitter fixer
- the hot sauce experiment
- non-delivered emails sent to AOL domains
- GIMP mathmap experiment results
- tri-force tuna gift
- leave early, take your time, enjoy the solitude
- N37°49'8 W122°28'48
- rotary phone computer interface in action
- python script to play the latest version of an audio broadcast
- rotary phone computer input device
- server log spam from Microsoft?
- creating a CAPTCHA
- hello HTML 5! a simple audio player
- How does that increase security?
- getting familiar with GWT, a porting experiment.
- You're Not Carnival Personnel!
- "disable" a web app's buttons using javascript and css
- litterbugs and jaywalkers
- a basic web-app with pyjamas
- shell script to aid in compiling Vala projects
- Banjo part 4: she's finished
- Accent Characters in Linux with Xorg
- Terminal emulator part deux!
- Community
- Terminal Emulator in Vala using GTK and VTE
- Where is the MPAA on this one?
- pyclutter stage fullscreen hack
- Banjo part 3
- from necessity comes something
- If you build it, they will spam
- writing blogging software ( using data from blogspot )
- From WBEZ Chicago......
- Simple Switch Input to Enter a Command
- perplexing ponderence, pertaining penguin presents
- baby steps: the evolution my feature-free PHP framework
- ruining a perfectly good lamp?
- thank you bazaar
- quick not-so-little bikey bag
- Vala musings : int to string, packages, and starting with main
- my motor vehicle warranty is about to expire? really?
- Bike Trailer Part 2
- getting dandy with a hair pretty
- a not so elegant fixer up
- use python and gstreamer to get the tags of an audio file
- trials with gstreamer, pygst, and goom visualization
- Gaarrrrrrrrr!
- more pyclutter: get a move on - behaviourpath
- scrollwheel css div Internet Explorer 7 problem fixed
- Hello World using pyclutter - a half assed tutorial