
Where does one put their bearding flair?
At various bearding events, it's quite common to pick up some sweet pins either as part of the competition, or handed out by the various clubs attending the events. Some people put the pins on their hat, while others might choose to put their collected pins on their jacket or on their competition outfit. So where do I put my collected pins?
Hey! If I put the pins on something I can easily remove from my jacket, I'll be able to rock the pins on just about any outfit I wear. Damn, the "dork" is strong with this one.
To the sewing machine
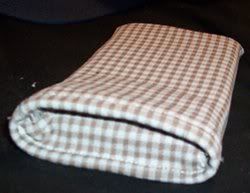
 Digging through my collection of scraps, I found some black fabric that would suit the purpose ideally. After a bit of folding and sewing, I had the start of what I was hoping to make.
Ideally, I'll end up with a sort of vertical epaulet that I can button to my jacket and cover with event pins.
Add some button holes
 At both ends and in the center of my bling holder, I added button holes. This was my first time making button holes and they came out looking like crap. That's fine. It is more important that they work.
This is the second button hole that I made and it is probably the best of the three button holes that I made.
Button it
 All finished. The top button hole on the bling thing goes over the jacket's pocket button and two new buttons were sewn to the jacket to match up with the middle and bottom button holes of the bling thing.
It is purely coincidental that the Austin Facial Hair Club patch is in the armpit of my jacket.
See you at the next comp.
Cue the Dramatic Music
It was Lancaster PA, October something something 2011 and in a stunning turn of events that rocked my world to it's very foundation.... I didn't make the cut. Obviously I need quite a bit more training.
Pffftttt stop being so dramatic; let me spin you a yarn: In mid-August, I suffered some fairly debilitating muscle spasms that rendered my right arm mostly useless. By the end of September (6 weeks later), the pain had subsided to the point where I was finally able to drive a car.
Now, at about 8 weeks later, I can look in the mirror and see a noticeable lack of muscle mass in my right shoulder and arm. Apparently the muscles had atrophied from lack of use. Time to bring those muscles back!
The 3 Point Plan to be Hella Sick Rippin


Oh yea!!!!!!
To put my plan into action, I needed to cut up some ugly old shorts so that I could sort of make cubes of fabric. Once I had my basic pattern, I sewed that crap up into little bags and filled the bags with the filling from some diving weights.
The final product: three soft fabric bags that weight one pound each and are ugly eye-sores.
Put the Plan to Work
 Since I have already typed the word "plan" a few times, you should now have the theme to the A-Team playing in your head. if you don't have the theme playing in your head, something is wrong with you.
The Training
- Put on a sweet wizard cap (any hat with a feather in it: feathers make everything magical)
- Take off your shoes
- juggle while walking around Petaluma
How is this a 3 point plan? I'm glad you asked.
- juggling improves my hand eye coordination
- juggling 3 one pound bags for 10 minutes is quite a nice workout for my shoulder
- walking around barefoot will toughen up my feet (Lancaster gave me blisters)
How exactly is this training for a Beard and Mustache championship? Hey! Just because it isn't related in any way, shape, or form, doesn't mean wuggling (walking and juggling) isn't an important aspect of training for a facial hair contest.... and most importantly, it is fun.
Now quit reading and go do something completely unrelated to anything you should be preparing for.
Bad Craftsmanship and a Terrible Design
My crappy bicycle seat bag had a zipper that stopped closing properly and would pop open on occasion. I blame the terrible design of the bag that puts far too much stress on the zipper. What I found most distasteful about the failing zipper is that I made the bag. To be fair, the bag did work well for two years and it survived at least one hooligan attack. Hopefully, the next bag will last longer...
Time to retire those shorts
 A long ago, I turned my favorite biking pants into a cap and a pair of shorts, and last Fall, those favorite shorts were retired to the scrap fabric pile after tearing in a non-duct-tape-repairable way. bummer.
Hack and Sew
 My plan was to be able to put my biking needs in the bag, roll the bag up tight, and then affix the bag to my bike. After hurting my thumb trying to cut the shorts with some degenerate right-handed scissors, I found some decent scissors and hacked the shorts into a usable bit of fabric which was then sewn into the form of a pocket with a very large flap.
At this time, I had no idea how I was going to keep the bag closed or how I was going to attach the bag to my bike. So I relaxed and did some other crap for the rest of the evening.
Velcro!
 After having my morning coffee, I stitched some velco to the inside of the flap as well as the outside/back of the pocket in order to keep the damn thing closed. More velcro was sewn to side of the pocket and to the base of the flap so that I could have some loopy-doos to keep the bag connected to my bikey.
Really?
 For some reason, when I went to put the bag on my bike, it attached quite easily with the velcro loopy-doos and I thought something must be wrong. Nope, it was all good. weird
Inside of the bag:
- an adjustable wrench
- two patch kits
- two tire irons
- a pair of plastic chopsticks
 Since I had the sewing machine out, I figured i should throw that Löwenbräu and sweet California Republic patch on my patch jacket.
Testing the Bag
The best way to test the bag, at least in my opinion, is to take a ride to the beautiful Shollenberger Park, which is a 7 to 10 mile ride depending upon the route one takes. However, while trying to adjust my speedometer the other day, I accidentally reset the device, erasing my recorded miles. At the same time, I broke the adjusting button and the speedometer now records in kilometers. That's cool, the metric system is better anyway.


On my 16 kilometer trip, I saw various birds(including a White Tailed Kite) and two snakes. It had been about 3 years since I have seen a California Kingsnake and I unfortunately only managed to take a picture of it's tail as the snake slithered into a burrow on the side of the path. The other snake was a Gopher snake that was hogging the path. Get out of the way bub!
All things considered, I'd say the bag test was a complete success.
Now quit reading, and go recycle some old clothing
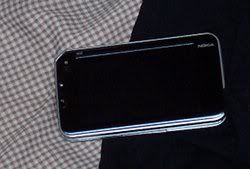 Why Yes; that is the Nokia N810 that I purchased on Ebay. Again, yes; the nokia is resting upon a torn black t-shirt and some ugly old shorts that no longer fit me.
The N810 has a wonderful screen that I fear will get scratched to hell if it stays in my pocket for too long. For portability reasons, I'm going to need a screen protector or, even better, a Nokia Coozie.
 First things first, cut out a large strip of fabric from the t-shirt. Follow this by cutting a large strip of that ghastly fabric from the shorts.
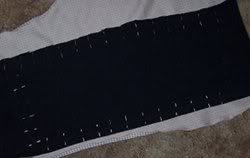
Pin the pieces of fabric together and then sew the fabric together. This will make it easier to handle.
That's a lot of pins. Hopefully the screen will respond to bloodied fingers.
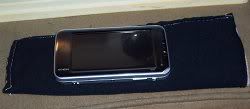 After wrapping the fabric around the N810, it is possible to determine where to sew the fabric in order to make the beginning shape of the coozie. After sewing and cutting off the excess fabric, things are starting to really take shape.
I left plenty of extra fabric on the length-wise measurement so that I would have some slack to make hemming easier.
Putting the N810 in the almost coozie, I marked where I needed to fold and hem the opening, and like Riker does after Picard says "Make it so", I made is sew.
Yes, I made a Star Trek sewing joke. Engage!
 After hemming the coozie, half of the extra fabric was removed and the other half was shaped and sewn to make a flap that I could tuck into the coozie after the device.
Originally, I wanted to use velcro to hold the opening shut, but I would have had to either sew the velcro on very early in the process or sew it on by hand, which I am too lazy to do.
 Finally.
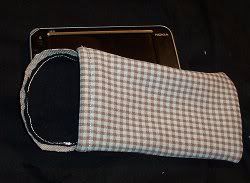
Here is the coozie with the N810 inside and the flap tucked in. It may not be pretty but it is pretty damn useful and pretty damn ugly.
Sweet, I've got Linux in my pocket.
Now quit reading, and go make something ugly and useful.
Oh well, I don't embroider, it takes a bit too long and doesn't really add to the functionality. Besides, I don't really *want* it to look nice.
Now that I had an odd penguin, I needed to decide to whom I should bestow said wonky penguin. Fortunately, my nephew has not yet reached the age where he will be able to discern good sewing from bad sewing, and since this will be his first holiday season and he can't read this; a penguin will be heading his way shortly.
How wonky is the penguin? pictures don't do it justice.


- Tubular Music Thingy Part 2
- Beaglebone console output and a faster boot
- Tubular Music Thingy (part 1)
- get and speak the weather
- Getreel youtube-dl wrapper
- Two hours with the Archos 43
- HTML5 for a specific platform? I prefer to develop native apps
- a bit of dev talk about MuttonChop media player
- case for my status server
- my tiny todo list and some ruby
- The Camp Mug (almost) Test
- 2012 Tizen Developers Conference in San Francisco
- Freedom Jar is Full
- Web UI speed up using HTML5 Server Sent Events
- LEDs, BeagleBone, and my ToDo List
- a case for the BeagleBone
- fixing the car mirror
- Basic HTTP server in Vala using GIO Sockets
- sewing up a bling thing
- Trip to Austin
- convert hexadecimal string to an integer with Vala
- Training for 2012: Wuggling
- ABC tune grabber/converter
- A trip to Lancaster
- a new media playing machine
- Don't turn Tizen into WebOS
- making some chili sauce
- grumpy kid
- beer network improvement
- Ripping my DVD collection
- ruby script to search files in a directory for a string
- Pacific Pinball Museum Mission
- A Tale of Two Mugs
- shishi odoshi prototype
- file downloader in Node.js that handles redirects
- Travelling Far Part II
- python shell-fm web interface
- not quite a letter to cherrypal
- Audio playing class in Ruby with Gstreamer
- A quick fix
- my resized images using Ruby and Imagemagick
- one pound of coffee
- noise-canceling headphones that actually work
- updating my dynamic IP DNS information with Ruby
- Hello World in Ruby
- Bacon Apple Cider
- clawhammer sudo modprobe
- a web.py introduction
- The Skillet
- banjer strap on the cheap
- The Letter to Dell
- Linux Outlaws episode 170
- Not the 2010 Petaluma Whiskerino
- Monte Rio
- a new power switch
- the coffee cup review
- seriously, that thing is garbage
- keeping a GTK TextView cursor in view
- A tale of three sticker
- minimize/close to system tray in Python GTK
- A markdown editor/viewer in Python
- Red Phone Mumble Test
- Saturday Sassafrass
- A Friday Frolic
- Toshiba laptop review
- Google no longer uses Microsoft
- regarding Heybuddy and python stuff
- I'm calling you!
- heybuddy identi.ca client
- making a change holder thing
- Did I win? Yes and No.
- photograph sticker
- share this on facebook
- the damn computer died
- kilt alteration
- audcast streamer in vala with gstreamer, gtk and webkit
- The Mullet Adventure
- A Letter to the California State Legislature
- will dogfooding the frenzy leave me bitter?
- basic sitemap file maker in Python
- rock and rolling down the street
- Time to Celebrate
- game of life : Vala, SDL
- game of life : python, clutter
- networked timed text-to-speech goodness
- battery status in a screen session
- Bright Bike
- turning gears
- incremental screenshot namer wrapper
- a nice little feature/bug
- drawing circles
- broken VHS fixed
- cloudy phone number finder
- network quitter fixer
- the hot sauce experiment
- non-delivered emails sent to AOL domains
- GIMP mathmap experiment results
- tri-force tuna gift
- leave early, take your time, enjoy the solitude
- N37°49'8 W122°28'48
- rotary phone computer interface in action
- python script to play the latest version of an audio broadcast
- rotary phone computer input device
- server log spam from Microsoft?
- creating a CAPTCHA
- hello HTML 5! a simple audio player
- How does that increase security?
- getting familiar with GWT, a porting experiment.
- You're Not Carnival Personnel!
- "disable" a web app's buttons using javascript and css
- litterbugs and jaywalkers
- a basic web-app with pyjamas
- shell script to aid in compiling Vala projects
- Banjo part 4: she's finished
- Accent Characters in Linux with Xorg
- Terminal emulator part deux!
- Community
- Terminal Emulator in Vala using GTK and VTE
- Where is the MPAA on this one?
- pyclutter stage fullscreen hack
- Banjo part 3
- from necessity comes something
- If you build it, they will spam
- writing blogging software ( using data from blogspot )
- From WBEZ Chicago......
- Simple Switch Input to Enter a Command
- perplexing ponderence, pertaining penguin presents
- baby steps: the evolution my feature-free PHP framework
- ruining a perfectly good lamp?
- thank you bazaar
- quick not-so-little bikey bag
- Vala musings : int to string, packages, and starting with main
- my motor vehicle warranty is about to expire? really?
- Bike Trailer Part 2
- getting dandy with a hair pretty
- a not so elegant fixer up
- use python and gstreamer to get the tags of an audio file
- trials with gstreamer, pygst, and goom visualization
- Gaarrrrrrrrr!
- more pyclutter: get a move on - behaviourpath
- scrollwheel css div Internet Explorer 7 problem fixed
- Hello World using pyclutter - a half assed tutorial