
A few days ago, the urge to create an internetted thingy was upon me. Recently, I had been reading documentation regarding machine to machine communication using MQTT as well as BLE, and then I took a quick look at my tinker pile. The amount of neat things that I purchased for use in a project was far too high.... and then it hit me: LESS HOARDING, MORE MAKING!
What I was craving to make, was a network accessible pixel LED, inside an orb light fixture, that could be controlled using MQTT.
For this build, I used:
- an orb light fixture from the ReStore
- an Unwired One single board computer running OpenWRT
- a single ws2801 pixel LED that was left over from the Glimmer build.
The Build
The Fixture
 The orb light fixture appears to be a run of the mill wall or ceiling CFL fixture. If I remember correctly, the orb cost around $5. The cost of computer cases these days is getting out of hand. :)
Take it Apart!
 For some reason, the fixture manufacturer decided to put a bunch of unnecessary crap in my new computer case. Fortunately, it only took a few minutes to get the orb in a usable state.
Test the Circuit
 ws2801 pixel LEDs are controlled using SPI.
On the Unwired One device, there are no GPIO pins that are dedicated to SPI. Instead, the SPI bus is created by loading a kernel module with arguments to determine which GPIO pins will be used for SPI.
ws2801 pixel LEDs are controlled using SPI.
On the Unwired One device, there are no GPIO pins that are dedicated to SPI. Instead, the SPI bus is created by loading a kernel module with arguments to determine which GPIO pins will be used for SPI.
Solder Leads to the LED
 Once the circuit was working, leads were soldered to the LED so that it could be connected directly to the GPIO headers.
After the soldering was complete, the leads were wrapped in electrical tape.
Make a Notch for the Power Cable
 Since the orb is intended to rest on a table, it was necessary to make a notch in the base for the power cord to fit through. Thus ensuring that the orb will be flush on a flat surface. After a bunch of waffling around trying to find my files and metal snips, a grab and twist with some needle nosed pliers did the trick.
Put it Together
 After more waffling while trying to determine the best way to make some fancy standoffs for the computer board, I opted to simply hot glue the board to a piece of cardboard, and then hot glue the cardboard to the underside of the orb base.
Fast
Simple
Effective
... and I'm lazy
The LED was also hot glued to the base, pointing upward into the glass orb. /
Now me has ORB!
Have Some Coffee
 Technically, this picture is for the morning after the Orb Device had been created, but it does a damn fine job of showing what the orb thingy looks like.
The Code
Enable SPI
As previously stated, the SPI on the board needs to be configured by added a kernel module. In order for the kernel module to be loaded each time the device is restarted, the /etc/rc.local file was edited to launch the following script:
#!/bin/sh

#see http://www.unwireddevices.com/wiki/index.php/Working_with_SPI_(C/C%2B%2B)
#BUS : SPI bus number, can be bus0, bus1, bus2, bus3
#ID : SPI device ID (integer number)
#SCK, MOSI, MISO : GPIO numbers for the corresponding SPI signals
#MODE : SPI mode (0, 1, 2 or 3)
#FREQ : max SPI frequency (Hz)
#CS : GPIO number for the CS signal (optional)
# insmod spi-gpio-custom BUS=ID,SCK,MOSI,MISO,MODE,FREQ,CS

bus="bus1"
id=1
sck=20
mosi=23
miso=18
freq=25000000

cmd="insmod spi-gpio-custom $bus=$id,$sck,$mosi,$miso,0,$freq"
echo $cmd
`$cmd`
Honestly, the entire script can be replaced with one line of code: the final command. However, the script was written while reading the documentation of the process and if I ever need to edit the script, there are hella useful comments in there.
Control the Orb
The code for controlling the orb is written in Python and requires the Paho MQTT library.
code is available at https://gitlab.com/jezra/orb
oh... It would be really nice if I could copy the payload parsing documentation from the README.md in the code repository. Sadly, the lazy dev hasn't yet created that file. Well then, I know what I'm doing later!
Now quit reading, and go make an orb thingy.
The Magic starts at 3:30AM... because at 3:30AM every day, a cron task runs on the chicken coop computer to determine when the coop door should open and close later that day. For most of my weather needs I had been using the http://wunderground.com API, but for some reason, they don't offer access to twilight data through the API and I didn't want to write a webpage scraper to harvest the data from their website.
Fortunately for me, hamweather.com has a wonderful API accessible weather service with great documentation, all at a very reasonable price (free, if making less than 750 API calls per day).
For this piece of the project, I decided to use civil twilight as the opening and closing times. Then it was just a matter of reading the hamweather API documentation for sun and moon data and then hacking together some code. Since the majority of the code is written in Python, I opted to use python for this script.
Enter the Python
import urllib
import json
import os.path
import subprocess
import time
client_id = "MY_CLIENT_ID"
client_secret = "MY_CLIENT_SECRET"
url="http://api.aerisapi.com/sunmoon/MY_CLOSEST_TOWN?client_id=%s&client_secret=%s" % (client_id, client_secret)
print url
script_dir = os.path.dirname( os.path.realpath(__file__) )
data_file = os.path.join(script_dir, 'sunmoon.json')
open_script = os.path.join(script_dir,"open_door.sh")
close_script = os.path.join(script_dir,"close_door.sh")
try:
#read the data from the url and write it to a file
response = urllib.urlopen(url)
data = response.read()
f = open(data_file, "w")
f.write(data)
f.close()
except:
#something failed, open the old data file
f = open(data_file,'r')
data = f.read()
#load the json into an object
json_object = json.loads(data)
#get the twilight from the json object
twilight = json_object['response'][0]['sun']['twilight']
#get the twilight start and end
civilbegin = twilight['civilBegin']
civilend = twilight['civilEnd']
#format the start and end times in Hour:Minute format
twilight_start = time.strftime("%H:%M", time.localtime(civilbegin))
twilight_end = time.strftime("%H:%M",time.localtime(civilend))
#create commands based on the times
open_cmd = "at -f "+open_script +' '+twilight_start
close_cmd = "at -f "+close_script +' '+ twilight_end
#run the commands as a subprocess
subprocess.call(open_cmd, shell=True)
subprocess.call(close_cmd, shell=True)
During the event loop of my door controller, a file is checked to see if the door should open or close, and the door behaves accordingly. This twilight fetching script will determine when to open and close the door, and submits a command to at, which then handles the timing for running the open or close script.
The chickens will be going into their new home next weekend, and the close time will probably need to be adjusted, but that just means I need to hang out in the hammock at sunset/twilight and see if all the chickens go in the coop before the door closes.
Now quit reading, and go make something that can only be tested by relaxing in a hammock at sunset. :)
- Tags:

Not too long about I built a tubular music thingy, and while it is nice and fun to play, I really wanted to automate the playing of some tunes as well as giving myself the ability to play certain tunes at certain times.
To be fair, this was the plan all along and I'm calling this thing "Spiel", which I guess is short for glockenspiel.
Before the tubular music thingy was built, I came up with a fairly plain-text music notation format that I call SMN: the Spiel Music Notation format. In a nutshell, SMN files start with "tNUMBER" where NUMBER is the number of beats per second, and then there will be a series of notes: G a b c d e f g, and rests: r. Both notes are rests will be considered whole notes unless followed by a number.
For example, Sudo Modprobe in SMN would be:
t30
a4 G8 a4 G8 a8
b8 c2 e4 d2 r8
e4 d8 c8 d8 c8
d8 c8 b8 a4 G8
a4 G8 a8 b8
c2-8 b8 G1-2
On To the Build
For the automation, I used the following:
- BeagleBone Black - for running the code, network access, etc
- 8 12V 1A solenoids with a 10mm stroke - for striking the tubular bells
- 12V 6A power adapter - for powering the solonoids
- 8 channel 5V Relay - for sending power to individual solonoids
- Cheapo USB wireless adapter
Stand Offs
 What are these things called? I don't know.
What I do know, is that once the spiky bits are bent down, these things make amazing stand offs for just about any computer build.
Mount the computer and relay board
 After the stand offs were put on the Beaglebone Black and the 8 channel relay, the stand offs were hot glued to the frame of the Tubular Music Thingy.
Place the solenoids
 More hot glue was used to place the solenoid bell hammers.
When the solenoids are energized, they produce heat, and if they stay energized long enough, they get hot enough to melt the glue.
This led me to write a script called 'heat' that will heat up a solenoid so that I can realign the hammer for a better sound.
Wire it up!
 The Beaglebone was wired to the relay (I later changed the beaglebone to relay wiring).
The relay is wired to the solenoids, and the 12V power adapter was spliced into the relay and common ground of the solenoids.
Plug it in and run some code
 Here is the finished product, ready to be played, or automated over the network.
What about some code?
The code for controlling Spiel is available at https://gitorious.org/spiel/spiel The documentation is non-existent, but there are a few .smn files in the SMN directory. If you have any questions about the code, send me an email and I'll help as I can.
My last Linux Outlaws related script
The final episode of the Linux Outlaws is nearly upon us, and I needed a script that will check if the last episode has been released, and if so, trigger the Spiel device to play the Sudo Modprobe melody.
Basically, this is a Final Episode Alarm
import urllib, time
from xml.dom.minidom import parseString
url = "http://feeds.feedburner.com/linuxoutlaws-ogg?format=xml"
#we need to loop for a while
looping = True
while looping:
#read the URL
f = urllib.urlopen(url)
xml = f.read()
#parse the XML
obj = parseString(xml)
#get the first item
item = obj.getElementsByTagName("item")[0]
#get the title
title = item.getElementsByTagName("title")[0]
ttext = title.firstChild.nodeValue.encode('utf8')
#does the title contain 370?
if "370" in ttext:
f = open('play_smn','w')
f.write("sudo_modprobe.smn")
f.close()
looping = False
print time.strftime("%Y-%m-%d %H:%M:%S", time.localtime())
#sleep for 5 minutes
time.sleep(300)
So now, within 5 minutes of the final episode being released, my Spiel device will play:
- Tags:
- Hardware
- beaglebone
After setting up my BeagleBone with a phone so that I can run scripts when certain numbers are dialed, it became apparent that I should have other ways of running scripts on the BeagleBone, and most importantly, it should be possible to run scripts at a given time. Time for a new project!
A bit of Background
For a while, I had been using SSH to connect to the BeagleBone and using the at command to schedule the running of a script at a specific time. For example to run my "maiden_fade" script at 8:10 AM, I would use the following:
While that is fine and dandy, I really really did not want to open a terminal, ssh to the BeagleBone, and then type a command in order to do what I want. To make everything nice and easy, I started the Ruby Web Alarm Project. Originally, I had wanted to hack this thing together during a "code sprint" at the NBLUG, but there wasn't enough time. Oh well.
What is Ruby Web Alarm?
Ruby Web Alarm is a small Ruby based webserver with an HTML and JavaScript based UI that allows one to schedule scripts to be run within 24 hours. (This should really be changed to allow a user to set a script to run farther in the future)
Screen Shots!


Some Blather About the Code
As stated previously, the server for Ruby Web Alarm is written in Ruby (hey, fancy that!), and does not use any 3rd party gems. All of the included libraries are part of the Ruby Standard Library.
For the UI, jQuery handles async calls to the server and I'm using a slightly modified stylesheet from the MuttonChop Mobile UI.
What it Needs
While the project mosty does what I need it to do, it still needs some feature improvements such as:
- Better time input (I'd like to use the HTML5 Range element, but none of the modern webkit based mobile browsers have a working Range element)
- Daily, weekly, monthly repeating
Maiden Fade?
In case you were wondering what the "maiden_fade" script looks like...
curl http://wind:2876/player/volume/0
/opt/mc_random_iron_maiden.py
for i in {1..35}; do
curl http://wind:2876/player/volume/$i
sleep 1
done
It sets the volume to zero, starts playing a random Iron Maiden track, and then, each second of the next 35 seconds it increases the volume by 1. Is there a better way to wake up than to fade into some Maiden?
And if you were wondering about the Random Iron Maiden script...
import urllib
import json
import random
f = urllib.urlopen("http://wind:2876/audio/search/iron%20maiden")
fjson = f.read()
search_result = json.loads( fjson )
files = search_result['files']
random_file = random.choice( files )
url = "http://wind:2876/audio/play/%d" % (random_file['id'])
urllib.urlopen(url)
UP THE IRONS!
net from PHP. I have always disliked the idea because of the expenses.
But he's tryiong none the less. I've been using WordPress on a variety of websites for about a year and am worried about switching to another platform.
I have heard very good things about blogengine.net.
Is there a way I can transfer all my wordpress content into it?
Any help would be really appreciated!
- Tags:
- Ruby
Earlier this month, I received a 3V Voltmeter that I purchased on Amazon. The reason for the purchase was so that I could write some code to control the voltmeter from my beaglebone. Well hey! Guess what I finally got around to doing?
Before I get to the code, let me explain how this works, and I'd like to give a big shout out to gigamegablog for being such a great resource.
Controlling the voltmeter with the beaglebone requires a bit of understanding of Pulse-Width Modulation (PWM). The pins on the beaglebone are capable of outputting 3.3V of power. By using PWM we can send the 3.3V of power in pulses, and when these pulses are spaced apart properly, we give the illusion of a lower voltage.
The Pin Layout
According to the beaglebone documentation, pins 14 and 16 of pin header P9 on the beaglebone are PWM pins. It should be possible to use other pins as PWM pins by "muxing" the pins, but for my needs, pin 14 will do just fine.
The positive probe of the voltmeter was connected to pin 14 on P9 and the ground was connected to pin 2 on P9.
The First Test
Since I am runnin Arch Linux on my beaglebone, PWM is not only supported in the kernel, it is also enabled. Rad, that is one less step to take. Thank you Arch Linux!
The test went like this :
- su to become root
- mux pin 14, just to be sure:
echo 6 > /sys/kernel/debug/omap_mux/gpmc_a2 - set the duty_percent to 0 (this is the percent of the 3.3V that we want to emit):
echo 0 > /sys/class/pwm/ehrpwm.1:0/duty_percent - set the period frequency to 100 (this is the 'pulse' ins Hz):
echo 100 > /sys/class/pwm/ehrpwm.1:0/period_freq - start the PWM pin running:
echo 1 > /sys/class/pwm/ehrpwm.1:0/run - start increasing the duty_percent until the voltmeter is at 3V. For me, this was when the duty_percent was 92
Sweet!
Getting Data To Process
Since I didn't want to do any web server configuration in order to get data, I decided to write a very small WSGI app in python and serve it up using the wsgiref.simple_server class.
Enter the Python
from wsgiref.simple_server import make_server
#define some stuff
max_val = 92
pin_path = "/sys/class/pwm/ehrpwm.1:0"
run = pin_path+"/run"
duty_percent = pin_path+"/duty_percent"
period_freq = pin_path+"/period_freq"
#mux the pin
try:
f = open("/sys/kernel/debug/omap_mux/gpmc_a2","w")
f.write("6")
f.close()
except Exception, e:
print e.message
def set_run( val ):
try:
f = open(run,"w")
f.write( str(val) )
f.close()
except Exception, e:
print e.message
def set_duty_percent(val):
try:
f = open(duty_percent,"w")
f.write( str(val) )
f.close()
except Exception, e:
print e.message
def set_period_frequency(val):
try:
f = open(period_freq,"w")
f.write( str(val) )
f.close()
except Exception, e:
print e.message
#set some PWM values
set_run(0)
set_duty_percent(0)
set_period_frequency(100)
set_run(1)
def got_value(val):
val = val.strip("/")
val = int(val,10)
percent = (max_val * val/100)
set_duty_percent(percent)
class my_wsgi_app:
def process_request(self,text):
got_value(text)
status = '200 OK' # HTTP Status
headers = [('Content-type', 'text/html')] # HTTP Headers
return status, headers, text
def run(self, environ, start_response):
path = environ['PATH_INFO']
status, headers, content = self.process_request( path )
#begin the response
start_response(status, headers)
#return the content
return content
app = my_wsgi_app()
httpd = make_server('', 8080, app.run)
print "Serving on port 8080..."
# Serve until process is killed
httpd.serve_forever()
For ease of copy, the code is also available at http://hoof.jezra.net/snip/o3
The code starts serving on port 8080 and sets the percent of the PWM based on the URL used to access the server. For example, to set the voltmeter to 25%, one would need to point a browser at http://NAME_BEAGLEBONE:8080/25. My beaglebone is mounted on the wall and is named "wallbone", yea original. Anyway, if I want to set the voltmeter to 77%, I would access http://wallbone:8080/77
Face to Face
It's a shame that the voltmeter as a big "V" on it, as well as 0, 1, 2, 3, and some useless text.


One would think that I could just take apart the voltmeter, make a compass from a pin and a twist-tie, draw a new face, and re-assemble the meter. Oh, don't mind if I do!
How about some video?
Well... it was far too dark and the pin isn't really visible. What a shame.
http://www.youtube.com/watch?v=ldcwMYj5AIc
http://www.youtube.com/watch?v=SdbBgiZn1UM
Now What?
There are plenty of uses for this meter.
- analog progress or volume meter for muttonchop
- add a few more meters and create a neat clock
With the pulse-width modulation, I could connect and control a fan from the beaglebone.
The possibilities are only limited by my imagination.
Now quit reading, and go send me some ideas.
- Tags:
- hack
- beaglebone
In the movies, when it is time to detonate the explosives, the person setting off the KABOOM has a sweet remote control with either a two part switch or with two separate switches. Damn, I love a good movie explosion.
The two part switch allows the user to:
- activate the explosive
- blow shit up
Because the switch has two components, activate and detonate, it is uncommon for there to be accidental explosions. This is a damn fine safety measure and when adding the ability to block an identi.ca user with heybuddy, I wanted a similar safety precaution; blocking someone by accident should not be possible. So that is what I did.
To accomplish this, it was necessary to do the following
- create a disabled button that brings the hammer down!
- create a checkbox that will activate the button
In GTK parlance, to disable a button, one needs to set the button sensitivity to false. Since I am using Python, this is accomplished thusly
To show this idea as a small working bit of code, I wrote a quick Python-GTK app that almost does the bare minimum.
Enter the Python
import gtk
class application:
def __init__(self):
#I want to keep track of click counts
self.click_count=0
'''build the UI'''
#make the window
winder = gtk.Window(gtk.WINDOW_TOPLEVEL)
winder.connect("destroy",self.quit)
#winder.set_default_size(300,300)
winder.set_title("Super Trigger")
#make some boxes
vbox = gtk.VBox()
hbox = gtk.HBox()
#make some buttons
self.button = gtk.Button("Click Me")
self.checkbutton = gtk.CheckButton(label="Enable Button")
#add the buttons to the hbox
hbox.pack_start(self.button,False,False)
hbox.pack_start(self.checkbutton,False,False)
#add the hbox to the vbox
vbox.pack_start(hbox,False,False)
#create a Label
self.label = gtk.Label()
#add the label to the vbox
vbox.pack_start(self.label)
#add the vbox to the window
winder.add(vbox)
#disable the button
self.button.set_sensitive(False)
#connect the buttons
self.checkbutton.connect('toggled', self.toggle_clicked )
self.button.connect('clicked', self.button_clicked)
#show it all!
winder.show_all()
def toggle_clicked(self, widget):
#is the checkbutton active?
active = widget.get_active()
self.button.set_sensitive(active)
def button_clicked(self,widget):
#increment the click count
self.click_count+=1
#make a string
string = "clicks: %d" %(self.click_count)
#set the label to the string
self.label.set_text(string)
def run(self):
gtk.main()
def quit(self,widget=None):
gtk.main_quit()
if __name__=="__main__":
a = application()
a.run()
It may not be the best solution, but it is a solution and it works.
Well that's it for now. Quit reading, and go write some code.
- Tags:
- GTK
My N810 died
When I went to the MeeGo conference I discovered that my N810 would no longer boot. The device would simply blink the Nokia logo when I tried to turn it on, and all of my attempts to flash a new image to the device failed. So long buddy. [sadface]
How Am I Supposed to Test Software?
 Since I need an Maemo device for testing Heybuddy I wrote a postcard to Nokia and requested a new device. Quite surprisingly, I have not yet received a response.
Really? Didn't they see the awesome picture of a coffee cup that drew on the postcard? Maybe they were just waiting until they announced the N9 before they send one my way. Yeaaaaa, that's the ticket!
Fortunately for me (and for !Heybuddy ), there are some kick ass users and testers out there that help me with Maemo problems. However......
Terrible Timing
On June 16th, there was a bug report for heybuddy regarding a security vulnerability due to the use of Python's urllib2 module for HTTPS communication. A nice fix for the problem was found at stackoverflow, and it utilizes the SSL module. However.....
There is No Python SSL Module on Maemo!
One more time, in case you missed it: There is no Python SSL Module on Maemo! Maemo uses Python 2.5 and the 2.5 release did not include an SSL module. Fortunately, there is an SSL module available for Python 2.5 that can be downloaded from http://pypi.python.org/pypi/ssl. Unfortunately, I can't properly test this SSL module with Heybuddy on a Maemo device because my device is broken. Oh, now we've come full circle.....
If you are using Heybuddy, I highly suggest that you update to the latest version, and if you are on an Maemo device, update to the latest Heybuddy release and install the SSL module.
Now quit reading, update your software, and send someone a postcard.
- Tags:
- Letter
The Need
I really wanted a web accessible interface to control streaming music on my media playing computer that is connected to my home stereo. With a mix of Last.fm, shell-fm, pyjamas, web.py, and a few hundred lines of python code, I succeeded adequately and thought I'd share my experience.
The Why
When I wanted to stream music on my media machine, I would to get on the command line, ssh to the machine with X11 forwarding, and run the last.fm linux client on the machine. This would display a sluggish last.fm client on whichever computer I was using to connect to the media machine.
But what if I'm switching computers or I want to use my Nokia N810 or Neo Freerunner to control the music? A web interface solves these issues.
NOTE: this "how to" assumes that you are familiar with compiling software from source on a Linux system.
Step 1
Sign up for a Last.fm account. It is a fairly straight forward process.
Step 2
Install shell-fm (follow the directions on the shell-fm webpage). Shell-fm may be in your repos, but the version may not be new enough for this to work.
edit your ~/.shell-fm/shell-fm.rc file to look like the following:
password = YOUR_LASTFM_PASSWORD
default-radio = lastfm://user/YOUR_LASTFM_USERNAME
unix = /home/YOUR_USER/.shell-fm/unix_file
daemon = true
What the configuration does:
- username and password should be self explanatory
- default-radio is used to set what starts streaming when shell-fm is started
- unix creates a unix file socket that allows for communication with shell-fm. My file is /home/jezra/.shell-fm/unix_file. we need to use this later
- daemon runs shell-fm as a daemon in the background
OK, that takes care of the player. Now onto the web server
Step 3
In order to get a web interface, I need some sort of webserver. There are many many different ways to create a webserver and for this example I chose to use web.py which is a damn simple web app framework for Python. If web.py isn't in your repos, you should switch distributions (or download the source).
My Layout of Files and directories
/testing_directory
--index.py #the webserver
--interface.py # the pyjamas interface for the web app
--templates/ #a directory containing one template that the webserver will use
--static/ #a directory of static content served by the web app
----styles/ #a directory of css styles used by the web app
----pyjamas/ #a directory containing the compiled output of the interface.py file
Lets move on to the files
index.py
import web
import socket
#define some variable
#define our url mapping
urls = (
'/', 'index',
'/track_info','get_track_info',
'/skip','skip',
'/love','love',
'/pause','pause',
'/station/(.*)/(.*)','station',
'/volume/(.*)','volume',
'/ban','ban'
)
#create a renderer
template_dir = 'templates'
render = web.template.render(template_dir)
#create the app
app = web.application(urls, globals(),False)
def process_socket(command,get_return=False):
sock = socket.socket(socket.AF_UNIX, socket.SOCK_STREAM)
sock.settimeout(3)
#connect to the socket
try:
sock.connect('/home/YOUR_NAME/.shell-fm/unix_file')
#format and send data
sock.sendall( command )
except:
#probably no socket, behave accordingly
return "could not connect to socket"
#get some data back
if get_return:
try:
(string, address)=sock.recvfrom(512)
sock.close()
return string
except:
return "error"
#we need to send commands to
class index:
def GET(self):
return render.index()
class get_track_info:
def GET(self):
command ="info %a::%t::%l::%d::%R::%s::%v::%r\n"
data = process_socket(command,True)
return data
class skip:
def GET(self):
process_socket("skip\n")
return "OK"
class love:
def GET(self):
process_socket("love\n")
class ban:
def GET(self):
process_socket("ban\n")
class pause:
def GET(self):
process_socket("pause\n")
class volume:
def GET(self,direction):
for i in range(3):
process_socket("volume-%s\n" % (direction) )
class station:
def GET(self,type,text):
command = "play lastfm://%s/%s\n" % (type,text)
data = process_socket(command)
return data
if __name__ == "__main__":
app.run()
else:
application = app.wsgifunc()
Go to line 28 and change sock.connect('/home/YOUR_NAME/.shell-fm/unix_file') to point to your unix file that you set up in the shell-fm.rc file.
Almost there, now we just need to create an AJAXy interface.....
Step 4
Creating a web app with pyjamas is quite a bit like creating a Python application with any graphical toolkit, except the code needs to be compiled by Pyjamas and the finished product is HTML and JavaScript.
So go get the pyjamas source. You don't really need to install pyjamas, but you will need to "bootstrap" it. cd into the pyjamas directory and run "python bootstrap.py" which will create the pyjamas compilers in the bin directory of the pyjamas source directory.
interface.py
from pyjamas.ui.RootPanel import RootPanel
from pyjamas.ui.SimplePanel import SimplePanel
from pyjamas.ui.HorizontalPanel import HorizontalPanel
from pyjamas.ui.Label import Label
from pyjamas.ui.Button import Button
from pyjamas.ui.VerticalPanel import VerticalPanel
from pyjamas.HTTPRequest import HTTPRequest
from pyjamas.Timer import Timer
from pyjamas.ui.ListBox import ListBox
from pyjamas.ui.TextBox import TextBox
from pyjamas.ui.FlexTable import FlexTable
from pyjamas import DOM
from pyjamas import Window
class InfoHandler:
def __init__(self, panel):
self.panel = panel
def onError(self, text, code):
self.panel.onError(text, code)
def onTimeout(self, text):
self.panel.onTimeout(text)
class NullInfoHandler(InfoHandler):
def __init__(self, panel):
InfoHandler.__init__(panel)
self.panel = panel
def onCompletion(self, text):
pass
class ButtonInfoHandler(InfoHandler):
def __init__(self, panel,button):
InfoHandler.__init__(panel)
self.panel = panel
self.button = button
def onCompletion(self, text):
self.button.setEnabled(True)
class TrackInfoHandler(InfoHandler):
def __init__(self, panel):
InfoHandler.__init__(panel)
self.panel = panel
def onCompletion(self, text):
#return the text to the application for processing
self.panel.process_track_info(text)
class Application:
def __init__(self):
#set some vars
self.title = "PyWebShellFM"
#this is where we build the ui
self.statusPanel = VerticalPanel()
self.statusPanel.setID('status_panel')
#make a few Labels to hold artist, track, album info
self.artistLabel = Label()
self.trackLabel = Label()
self.albumLabel = Label()
self.timeLabel = Label()
self.infoTable = FlexTable()
i=0
self.infoTable.setWidget(i,0,Label("Artist:") )
self.infoTable.setWidget(i,1,self.artistLabel)
i+=1
self.infoTable.setWidget(i,0,Label("Track:") )
self.infoTable.setWidget(i,1,self.trackLabel)
i+=1
self.infoTable.setWidget(i,0,Label("Album:") )
self.infoTable.setWidget(i,1,self.albumLabel)
self.statusPanel.add(self.infoTable)
self.statusPanel.add(self.timeLabel)
#make the time bar
timebarWrapperPanel = SimplePanel()
timebarWrapperPanel.setID("timebar_wrapper")
#timebarWrapperPanel.setStyleName('timebar_wrapper')
self.timebarPanel = SimplePanel()
self.timebarPanel.setID("timebar")
#self.timebarPanel.setStyleName('timebar')
timebarWrapperPanel.add(self.timebarPanel)
self.statusPanel.add(timebarWrapperPanel)
#make some shit for buttons
self.buttonHPanel = HorizontalPanel()
self.skipButton = Button("Skip", self.clicked_skip )
self.buttonHPanel.add(self.skipButton)
loveButton = Button("Love", self.clicked_love )
self.buttonHPanel.add(loveButton)
pauseButton = Button("Pause", self.clicked_pause )
self.buttonHPanel.add(pauseButton)
banButton = Button("Ban", self.clicked_ban )
self.buttonHPanel.add(banButton)
#control the volume
self.volumePanel = VerticalPanel()
self.volumeLabel = Label("Volume:")
self.volumePanel.add(self.volumeLabel)
volupButton = Button("volume +", self.clicked_volume_up, 5)
self.volumePanel.add(volupButton)
voldownButton = Button("volume -", self.clicked_volume_down, 5)
self.volumePanel.add(voldownButton)
#make some stuff for station Identification
self.stationInfoHPanel = HorizontalPanel()
stationText = Label("Station: ")
self.stationLabel = Label()
self.stationInfoHPanel.add(stationText)
self.stationInfoHPanel.add(self.stationLabel)
#make buttons and shit to create a new station
self.setStationHPanel = HorizontalPanel()
self.setStationTypeListBox = ListBox()
self.setStationTypeListBox.setVisibleItemCount(0)
self.setStationTypeListBox.addItem("Artist","artist")
self.setStationTypeListBox.addItem("Tags","globaltags")
self.setStationHPanel.add(self.setStationTypeListBox)
self.setStationTextBox = TextBox()
self.setStationTextBox.setVisibleLength(10)
self.setStationTextBox.setMaxLength(50)
self.setStationHPanel.add(self.setStationTextBox)
self.setStationButton = Button("Play", self.clicked_set_station)
self.setStationHPanel.add(self.setStationButton)
#make an error place to display data
self.infoHTML = HTML()
RootPanel().add(self.statusPanel)
RootPanel().add(self.buttonHPanel)
RootPanel().add(self.volumePanel)
RootPanel().add(self.stationInfoHPanel)
RootPanel().add(self.setStationHPanel)
RootPanel().add(self.infoHTML)
def run(self):
self.get_track_info()
def get_track_info(self):
HTTPRequest().asyncGet("/track_info", TrackInfoHandler(self))
Timer(5000,self.get_track_info)
def clicked_skip(self):
self.skipButton.setEnabled(False)
HTTPRequest().asyncGet("/skip",ButtonInfoHandler(self,self.skipButton) )
def clicked_volume_down(self):
HTTPRequest().asyncGet("/volume/down",NullInfoHandler(self) )
def clicked_volume_up(self):
HTTPRequest().asyncGet("/volume/up",NullInfoHandler(self) )
def clicked_love(self):
HTTPRequest().asyncGet("/love",NullInfoHandler(self) )
def clicked_ban(self):
result = Window.confirm("Really ban this song?")
if result:
HTTPRequest().asyncGet("/ban",NullInfoHandler(self) )
def clicked_pause(self):
HTTPRequest().asyncGet("/pause",NullInfoHandler(self) )
def clicked_set_station(self):
type = self.setStationTypeListBox.getSelectedValues()[0]
text = self.setStationTextBox.getText().strip()
if len(text) > 0 :
#clear the text
self.setStationTextBox.setText("")
HTTPRequest().asyncGet("/station/%s/%s"% (type,text),NullInfoHandler(self) )
def set_error(self, content):
self.infoHTML.setHTML("<pre>%s</pre>" % content)
def onTimeout(self,text):
self.infoHTML.setHTML("timeout: "+text)
def onError(self, text, code):
self.infoHTML.setHTML(text + "<br />" + str(code))
def process_track_info(self,text):
#explode the text at ::
#%a::%t::%l::%d::%R::%s::%v::%r
data = text.split("::")
artist = data[0]
track = data[1]
album = data[2]
duration = data[3]
played = int(duration)-int(data[4])
percent = int( played/int(duration)*100 )
self.artistLabel.setText( artist )
self.trackLabel.setText( track )
self.albumLabel.setText( album )
#format time
t = "%s : %d %d" % (duration,played,percent)
self.timeLabel.setText(data[7])
#update the timebarwidth
self.timebarPanel.setWidth("%d%" % (percent) )
#set the station
self.stationLabel.setText(data[5])
#display the volume
self.volumeLabel.setText("Volume: "+data[6])
Window.setTitle(self.title+": "+artist+" - "+track)
if __name__ == '__main__':
app = Application()
app.run()
Compile this code using "/PATH/TO/PYJAMAS/SOURCE/bin/pyjsbuild interface.py". Compiling will create a directory named "output". Copy the contents of "output" into "static/pyjamas"
Now create a style sheet for the progress bar in our interface
static/style/style.css
border: 2px solid #ddd;
width:200px;
height:12px;
}
#timebar{
background-color:black;
height:12px;
}
finally, create the index template
templates/index.html
<head>
<meta name="pygwt:module" content="/static/pyjamas/interface">
<link REL=STYLESHEET type='text/css' href="/static/styles/style.css">
<title>PyWebShellFM</title>
</head>
<body bgcolor="white">
<script language="javascript" src="/static/pyjamas/bootstrap.js"></script>
<iframe id='__pygwt_historyFrame' style='width:0;height:0;border:0'></iframe>
</body>
</html>
Now if everything went according to plan.....
run "shell-fm" to start the shell-fm player
run "python index.py" to start the server
Point your web browser to http://localhost:8080 and enjoy the ugly web interface that is nowhere near "feature complete", but it is a start.
Now quit reading, and go listen to Basil Poledouris
All of these files can be downloaded from http://www.jezra.net/downloads/blogcode/pywebshellfm.tgz
EDIT: What does it look like?
How about a screenshot of the UI, and a picture of the UI in the N810 and the Freerunner.


http://jrobb.org/xfer/code/pywebshellfm/
I'm no jez and I also know zip about python, and wasn't sure of how to get the username in there, so i just made a variable up at the top.
;-)
works alright tho
- Tags:
Recently, I've been playing around with web.py, a simple yet very powerful web framework for writing web applications using python, and I thought I would share my first test of web.py that goes beyond "hello world". I discussed this briefly on Episode 13 of Frostcast
what it do
In a nutshell, the code will produce a browseable list of directories and audio files.
When run, the code will start a web server on port 8080 that dynamically displays the list of directories and files. Clicking on a link to an audio file will cause the audio file to be played on the server machine using sap. One could easily use any command line audio player of their choice in place of sap; such as mplayer.
Enter the Python
import web
import subprocess
import os
import urllib
#show the errors as a lot of debug info
web.internalerror = web.debugerror
#what URL do we need to handle?
urls = ("/","list",
"/list/(.*)","list",
"/play/(.*)","play",
"/stop","stop",
)
#what extensions do my audio files have?
good_extensions = (".mp3",".ogg")
#create the app
app = web.application(urls, globals(),True)
#where is the music?
music_dir = "/storage/music/"
class stop:
def GET(self):
#kill sap
subprocess.call("killall sap",shell=True)
#redirect to list
raise web.seeother("/")
class play:
def GET(self,asset):
#kill sap
subprocess.call("killall sap",shell=True)
#launch the sap
f = music_dir+asset
#return f
command = "sap \"%s\"" % (f)
print command
subprocess.Popen(command,shell=True )
#recdirect to list
raise web.seeother("/")
class list:
def GET(self,dir=None):
body=""
dir_list=""
file_list=""
short_path_prefix=""
#determine which directory we should look in
if dir!=None:
short_path_prefix=dir+"/"
parse_dir = music_dir+short_path_prefix
#if this directory exists, we need to show some shit
if os.path.exists(parse_dir):
body+="<b>%s</b> <a href='/stop'>stop</a><br>" % (parse_dir)
#get the dir contents
dirlist = os.listdir( parse_dir )
#I like things in alphabetical order
dirlist.sort()
for asset in dirlist:
asset_full_path = parse_dir+"/"+asset
asset_short_path= short_path_prefix+asset
if os.path.isdir( asset_full_path ):
encoded_path = urllib.pathname2url(asset_short_path);
dir_list+="<a href='/list/%s'>%s</a><br>" % (encoded_path,asset)
else:
#check the extension
(f,e) = os.path.splitext(asset)
#TODO: make this case insensitive
if e in good_extensions:
encoded_path = urllib.pathname2url(asset_short_path);
file_list+="<a href='/play/%s'>%s</a><br>" % (encoded_path,asset)
else:
body+="%s doesn't exist" % (parse_dir)
#add the links to directories and files
body+=dir_list
body+=file_list
return "<html><title>Music Browser</title><body>%s</body></html>" % body
if __name__ == "__main__":
app.run()
Give it a go
- save the code http://www.jezra.net/downloads/blogcode/audio_browser.tgz
- edit line 19 to point to a directory of audio files
- run the code with python
- point your browser to http://localhost:8080
- email me to let me know what went wrong
- ?
- Did you remember to install web.py?
Moving Forward
Welcome to "Shot of Code", this is only the start of the code. So where can this go? AKA, what would I like this to do. Well I can think of a few things.
- a web interface for playing videos on my media machine. This will require some some way to send commands to Mplayer for play, pause, fast-forward, etc.
- a web front end to a command line audcatcher (sorry, I couldn't resist).
- recreate shnerkel with a web interface.
The reason that all of my code ideas are audio or video related is because I want to be able to control my media machine with a web interface and not have to SSH into the machine to control media playback.
Now quit reading, and go sweeten that sauce!
jezra
I played a bit with mplayer control from bash scripts a few weeks ago and a combination of mplayer's 'slave=yes' and 'input=file=/path/to/fifo' options makes it pretty easy to control mplayer by sending commands like 'echo "play" > /path/to/fifo'
- Tags:
Starting with version 2.18, the GTK library allowed for adding links to Labels, and this is exactly how I handled adding clickable URLs and names in heybuddy. Unfortunately, the version of GTK on Maemo devices is too old to use links in Labels.
Another unfortunate problem with links in Labels is that no GTK theme seems to have set a custom link color and all themes are stuck with the default bright blue link color. Egads! It sure would be nice if the user could set the color of links in heybuddy.
After searching and searching, I couldn't find an example of how to set a custom color for links in a GTK Label so I first needed to write some code to experiment with. The end result was a very simple example of exactly what I needed: a custom link color in a GTK Label.
Enter the Python
import gtk
w = gtk.Window()
l = gtk.Label()
m = "go to <a href='http://www.jezra.net'>jezra.net</a>"
l.set_markup(m)
style='''
style "label" {
GtkLabel::link-color="#ff6600"
}
widget_class "*GtkLabel" style "label"
'''
gtk.rc_parse_string(style)
w.add(l)
w.show_all()
gtk.main()
shazaam! Custom color, baby!
Now quit reading, and go make things colorful.
- Tags:
- GTK
Recently, while writing code for heybuddy, I needed to:
- display a tray icon
- hide the window when "close window" is selected
- show the window when the tray icon is clicked
Although getting this done was easy enough to do, finding out how to do it was a bit of a pain, so I thought it would be best if I shared my Python/GTK test code and save future developers from some pain.
Enter the Python
#!/usr/bin/env python
import gtk
class Win (gtk.Window):
    def __init__(self):
        gtk.Window.__init__(self)
        self.set_title("Close to tray")
        self.connect("delete-event", self.delete_event)
        #create a virtical box to hold some widgets
        vbox = gtk.VBox(False)
        #make a quit button
        quitbutton = gtk.Button("Quit")
        quitbutton.connect("clicked",self.quit)
        #add the quitbutton to the vbox
        vbox.pack_start(quitbutton)
        #create a label to say *something* and add to the vbox
        label=gtk.Label("This is a test of 'close to tray' functionality")
        vbox.pack_start(label)
        #add the vbox to the Window
        self.add(vbox)
        #show all of the stuff
        self.show_all()
        #make a status icon
        self.statusicon = gtk.status_icon_new_from_stock(gtk.STOCK_GOTO_TOP)
        self.statusicon.connect('activate', self.status_clicked )
        self.statusicon.set_tooltip("the window is visible")
        #start the gtk main loop
        gtk.main()

    def quit(self,button):
        #quit the gtk main loop
        gtk.main_quit()

    def delete_event(self,window,event):
        #don't delete; hide instead
        self.hide_on_delete()
        self.statusicon.set_tooltip("the window is hidden")
        return True

    def status_clicked(self,status):
        #unhide the window
        self.show_all()
        self.statusicon.set_tooltip("the window is visible")

if __name__=="__main__":
    win = Win()
The basics of what needs to be done:
- connect the Window's "delete-event" signal to a function
- in the function, have the window "hide_on_delete()"
- return True ( if True is not returned, the Window's children will be destroyed and everything will go to crap )
So there you have it, an easy way to "close to tray" or whatever you want to call it.
Now quit reading, and go ease a developer's pain.
- Tags:
- GTK
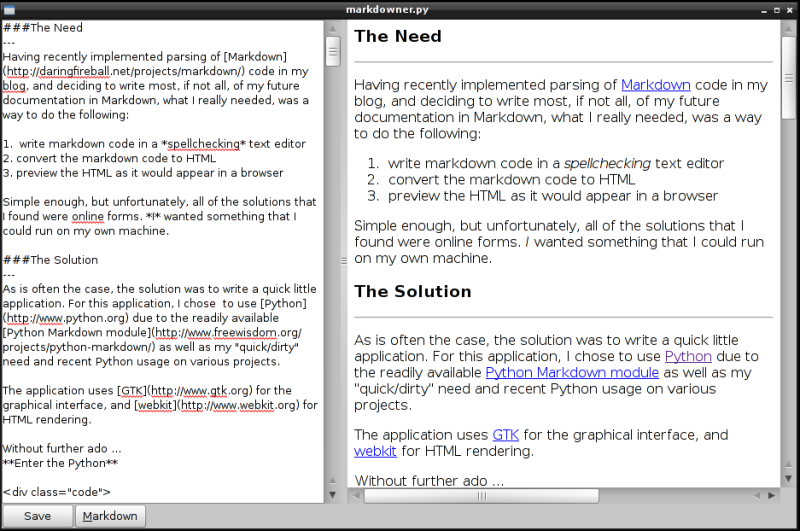
The Need
Having recently implemented parsing of Markdown code in my blog, and deciding to write most, if not all, of my future documentation in Markdown, what I really needed, was a way to do the following:
- write markdown code in a spellchecking text editor
- convert the markdown code to HTML
- preview the HTML as it would appear in a browser
Simple enough, but unfortunately, all of the solutions that I found were online forms. I wanted something that I could run on my own machine.
The Solution
As is often the case, the solution was to write a quick little application. For this application, I chose to use Python due to the readily available Python Markdown module as well as my "quick/dirty" need and recent Python usage on various projects.
The application uses GTK for the graphical interface, and webkit for HTML rendering.
Without further ado ...
Enter the Python
#!/usr/bin/env python
'''
Hey, this is GPLv3 and copyright 2010 Jezra
'''
import gtk
import webkit
import markdown #http://www.freewisdom.org/projects/python-markdown/
global default_file
default_file = "markdown.txt"
try:
    import gtkspell
    has_gtkspell=True
except:
    has_gtkspell=False

class application:
    def `__init__`(self):
        #build the UI
        winder = gtk.Window(gtk.WINDOW_TOPLEVEL)
        winder.connect("destroy",self.quit)
        winder.maximize()
        #add some accellerators
        #create an accellerator group for this window
        accel = gtk.AccelGroup()
        #add the ctrl+q to quit
        accel.connect_group(gtk.keysyms.q, gtk.gdk.CONTROL_MASK, gtk.ACCEL_VISIBLE, self.quit_accel )
        #add ctrl+s to save
        accel.connect_group(gtk.keysyms.s, gtk.gdk.CONTROL_MASK, gtk.ACCEL_VISIBLE, self.save_accel )
        #lock the group
        accel.lock()
        #add the group to the window
        winder.add_accel_group(accel)
        #we need a paned
        pane = gtk.HPaned()
        #and a vbox
        box = gtk.VBox(False)
        #add the pane to the box
        box.pack_start(pane)
        #add the box to the window
        winder.add(box)
        #do the text crap for the first pane
        self.tb = gtk.TextBuffer()
        tv = gtk.TextView(self.tb)
        tv.set_wrap_mode(gtk.WRAP_WORD)
        #try and add spell checking to the textview
        if has_gtkspell:
            #what if there is no aspell library?
            try:
                self.spell = gtkspell.Spell(tv)
                self.has_spell_library=True
            except Exception:
                #bummer
                self.has_spell_library=False
                print Exception.message
        #add the text view to a scrollable window
        input_scroll = gtk.ScrolledWindow()
        input_scroll.add_with_viewport(tv)
        input_scroll.set_policy(gtk.POLICY_AUTOMATIC,gtk.POLICY_AUTOMATIC)
        #add to the pane
        pane.pack1(input_scroll,True)
        #make the HTML viewable area
        self.wv = webkit.WebView()
        #disable the plugins for the webview
        ws = self.wv.get_settings()
        ws.set_property('enable-plugins',False)
        self.wv.set_settings(ws)
        out_scroll = gtk.ScrolledWindow()
        out_scroll.add(self.wv)
        out_scroll.set_policy(gtk.POLICY_AUTOMATIC,gtk.POLICY_AUTOMATIC)
        pane.add2(out_scroll)
        #we will add buttons at the bottom
        bbox = gtk.HButtonBox()
        bbox.set_layout(gtk.BUTTONBOX_START)
        #we need buttons!
        savebutton = gtk.Button("Save")
        savebutton.connect("clicked", self.save)
        markdownbutton = gtk.Button("_Markdown",use_underline=True)
        markdownbutton.connect("clicked", self.markdown)
        #add the buttons to the bbox
        bbox.pack_start(savebutton,False,False,0)
        bbox.pack_start(markdownbutton,False,False,0)
        #add the bbox to the box
        box.pack_start(bbox,False,False,0)
        winder.show_all()
        self.read_default_file()
    def run(self):
        gtk.main()
    def quit(self,widget=None):
        self.save()
        gtk.main_quit()
    def markdown(self,widget):
        text = self.get_buffer_text()
        mdtext = markdown.markdown(text)
        self.wv.load_html_string(mdtext,"file:///")
    def read_default_file(self):
        try:
            f = open(default_file,"r")
            text = f.read()
            self.tb.set_text(text)
            f.close()
        except:
            pass
    def quit_accel(self,accel_group, acceleratable, keyval, modifier):
        self.quit()
    def save_accel(self,accel_group, acceleratable, keyval, modifier):
        self.save()
    def save(self,widget=None):
        #get the text
        text = self.get_buffer_text()
        f = open(default_file,"w")
        f.write(text)
        f.close()
    def get_buffer_text(self):
        start_iter = self.tb.get_start_iter()
        end_iter = self.tb.get_end_iter()
        text=self.tb.get_text(start_iter,end_iter)
        return text
if `__name__`=="`__main__`":
    a = application()
    a.run()
Usage
- Ctrl+q quits the application
- Ctrl+s saves the current document
- Alt+m marks down the text and displays the HTML in the right pane
Note: the 'save' location is hard coded to be "markdown.txt" in the directory where the code is run from.
EDIT:the code for markdowner is now available on launchpad
Now quit reading, and go markdown some text.
GTK is used for creating the graphical interface of the application, and Webkit is used for rendering the HTML that gets produced by the markdown module. Any version of these two libraries released in the last 2 years should be sufficient.
I'd appreciate if you could sort one more thing out for me. The libraries which you mention, GTK and Webkit respectively, are in actuality pyGTK and pywebkitgtk, or are there other modules for Python to use? Did you write this code with these specific modules in mind?
There are various libraries that I could have used to create the interface and display the HTML but I prefer GTK and I use GTK for almost all of my interface needs.
If you have further questions, it would probably be more efficient to email them to me.
###
4a5
> import sys
9c10,11
< default_file = "markdown.txt"
---
> # default to loading a file on the command line: ./markdowner.py file.mkd
> default_file = sys.argv[1]
If I read the documentation correctly, you add a text view to a scrolled window with add() since it has it's own native scrolling
- Tags:
Working on heybuddy, I have learned a few things.
- I probably should have used Vala
- using threads in python isn't hard
- using threads in a python GTK app isn't hard
- Documentation for pygtk is not the greatest
Why Vala Had I written the program using Vala, Heybuddy would have been a compiled native application and would use less system resources. However, using Python certainly has its advantages; the most notable being that it is quite easy to move Heybuddy to a different architecture ( as long as the operating system on the new architecture has Python and GTK).
Heybuddy on x86, x86-64, ARM, PPC? No problem. Just copy the code and run it.
Threads For a few days, I was tearing out my hair trying to figure out how to properly use threads to fix a major bug in heybuddy.
The problem was this: When heybuddy would request data from the identi.ca server, the user interface would freeze until heybuddy was finished reading the data from the server.
The solution: use seperate threads to show the UI and read data from the server
Unfortunately using threads didn't work. Then I learned some stuff.
When using python threading with a GTK application, threads will not work without first calling the function gobject.threads_init() or gtk.gdk.threads_init().
One more time:
When using python threading with a GTK application, threads will not work without first calling the function gobject.threads_init() or gtk.gdk.threads_init().
This however, turned up a new problem. The server data reading thread was emitting signals for the main thread to process and this would sometimes happen when the main thread was updating the GUI and there would be a resulting crash of the application. The work around for this was to use gobject.idle_add( handle_the_signal_stuff ) which will allow the main thread to do the handling of the signal stuff when the main thread isn't busy and thus segfaults are averted. YEA!
links in labels Although it isn't in the pygtk pango reference it is possible to put links in a labels markup. For example:
label=gtk.Label()
markup="Visit <a href='http://www.jezra.net'>Jezra's Website</a>"
label.set_markup(markup)
This will put a clickable link in the text of a GTK label. Sweet!
OK, that's enough for me. I have some bugs to fix.
Now quit reading, and go write something.
question: why do they have two? is one going to be deprecated in later versions? I know I got a depreciated warning, not on the init.threads, but when trying to force the UI into a separate thread (not the way to go).
- Tags:

 For the past few months, I've been using indenti.ca to micro-blog and while there are plenty of applications available to access the identi.ca data from my laptop or desktop, I couldn't find anything that would run well on my Nokia N810 pocket computer.
Originally, I had planned to write a client in Vala, but since there is already a wonderful Vala denting client named Pino and since I hadn't written anything in Python for a while, I decided to use Python and develop a client in such a way that it might be easy to port to other languages: specifically Vala and possibly Java.
A couple of hours here and there with Geany and I had a pretty decent denting client in need of a name. Luckily I have a buddy who, aside from needing to blog about his photos, needs a denting client named after him.
Hey Buddy! I wrote an identi.ca client and named it after you. Well, sort of.... it's called heybuddy
In the wild
 Jake Hume (http://blog.fragdev.com/) took this picture of heybuddy running on his N810. Sweet!
Although I don't have any plans for making packages of heybuddy for various Linux distributions, fellow Linux Outlaw and heybuddy user timttmy has created a heybuddy AUR package for Arch Linux
What I've learned
- simple little projects are rarely simple or little
- I still can't get threading to work in a python app
- there is a correct way to authenticate an identi.ca user via the urllib2 python module, the short cut I tried to take showed me the error of my ways
- the documentation for gtk.keysyms seems to be non-existent
- The majority of heybuddy user's live in apple growing country
- I ♥ scrumpy
Now quit reading, and go say "hey buddy" to your buddy!
clean. a little... gray. but clean.
- Tags:
- Yammer
Since the application is basically a site crawler, I might as well add some feature bloat by checking for link errors and gathering some fairly useless information about the crawled site. To make this possible I utilized the OptionParser class from the optparse library so that I could pass in various command-line arguments to affect the way the app outputs data and to choose which URL to parse.
Without further ado... enter the Python:
#!/usr/bin/env python
import sys,urllib,re,os
from optparse import OptionParser
from HTMLParser import HTMLParser

class Parser(HTMLParser):
  def __init__(self,verbose=False):
    HTMLParser.__init__(self)
    self.clear()
    self.verbose = verbose
  def handle_starttag(self, tag, attrs):
    # we only care about 'a' tags
    if tag=="a":
      href = self.get_value_from_tuple_list("href",attrs)
      if href!=None:
        if self.verbose:
          print "found href: "+href
        if not href in self.hrefs:
          self.hrefs.append( href )

    elif tag=="base":
      href = self.get_value_from_tuple_list("href",attrs)
      if self.verbose:
          print "found base href: "+href

      if href!=None:
        self.base_href=href

  def get_hrefs(self):
    return self.hrefs

  def get_base_href(self):
    return self.base_href

  def get_value_from_tuple_list(self,target_key,list):
    for (key,value) in list:
      if key==target_key:
        return value
    return None

  def clear(self):
      self.hrefs=[]
      self.base_href=""

class JayWalker():
  browsable_files =[]
  valid_links = {}
  errors = {}
  processed_urls =[]
  depth = 0
  file_links = {}
  current_file_identifier=""

  webpage_extensions = ["htm","html","php","asp","jsp","py",""]
  def __init__(self,options):
    self.options=options

  def get_extension(self,str):
    #remove the start_url from the string
    s_string = str.replace(self.options.start_url,"")
    splits = s_string.split(".")
    if len(splits)>1:
      return splits[-1]
    else:
      return ""

  def walk(self):
    #process the start_url
    self.process_url(self.options.start_url)

    '''we are done, what sort of output should there be?'''
    #does the user want sitmap data?
    if self.options.sitemap:
      sm_text="<?xml version=\"1.0\" encoding=\"UTF-8\"?>"
      sm_text+="<urlset xmlns=\"http://www.sitemaps.org/schemas/sitemap/0.9\">\n"
      if len(self.browsable_files)>0:
        for f in self.browsable_files:
          sm_text+="\t<url>\n"
          sm_text+="\t\t<loc>%s</loc>\n" % (f)
          sm_text+="\t</url>\n"
        sm_text+="</urlset>\n"
    if self.options.outdir !=None:
      dir = self.options.outdir
      if not os.path.exists(dir):
        os.makedirs(dir)
      #make the errors
      errors_path = os.path.join(dir,"errors.txt")
      file = open(errors_path,"w")
      if len(self.errors)>0:
        for key in self.errors.keys():
          file.write( key +"\n")
          for page in self.errors[key]:
            file.write( "\t%s\n" % ( page ) )
      else:
        file.write("no errors")
      file.close()
      #make the errors
      links_path = os.path.join(dir,"links.txt")
      file = open(links_path,"w")
      if len(self.valid_links)>0:
        for key in self.valid_links.keys():
          file.write( key +"\n")
          for page in self.valid_links[key]:
            file.write( "\t%s\n" % ( page ) )
      else:
        file.write("no links")
      file.close()
      #make the browsable files
      browsables_path = os.path.join(dir,"browsables.txt")
      file = open(browsables_path,"w")
      if len(self.browsable_files)>0:
        for f in self.browsable_files:
          file.write("\t%s\n" % (f) )
      else:
        file.write("no browsables")
      file.close()
      #are we making a sitemap?
      if self.options.sitemap:
        sitemap_path = os.path.join(dir,"sitemap.xml")
        file = open(sitemap_path,"w")
        file.write(sm_text)
        file.close()
    else:
      print "--ERRORS--"
      if len(self.errors)>0:
        for key in self.errors.keys():
          print key
          for page in self.errors[key]:
            print "    %s" % ( page )
      else:
        print "no errors"

      print "--VALID LINKS--"
      if len(self.valid_links)>0:
        for key in self.valid_links.keys():
          print key
          for page in self.valid_links[key]:
            print "    %s" % ( page )
      else:
        print "no valid links"

      print "--BROWSABLE FILES--"
      for f in self.browsable_files:
        print "    "+f

      if self.options.sitemap:
        print "--SITEMAP--"
        print sm_text

  def process_url(self,url,parent="root",depth=0):

    #add the url to our processed list
    self.processed_urls.append(url)

    self.file_links[url]=[]
    if self.options.be_verbose:
      print "processing "+url

    #is this a mailto?
    if url.startswith("mailto:") or url.startswith("MAILTO:"):
      if self.options.be_verbose:
        print "found mailto "+url
      #todo: record the mailto
      return

    #is this a link to an anchor?
    if url.startswith("#"):
      if self.options.be_verbose:
        print "found anchor link "+url
      #todo: record the mailto
      return

    #get a handle for the opened url file
    try:
      fh = urllib.urlopen(url)
      #what code did we get?
      code = int( fh.getcode() )
      if code>400:
        #record this error
        if not self.errors.has_key( parent ):
          self.errors[parent] = []
        self.errors[parent].append(url)

        if self.options.be_verbose:
          print "error %d" % ( code )
        return
      else:
        #record this good link
        if not self.valid_links.has_key( parent ):
          self.valid_links[parent] = []
        self.valid_links[parent].append(url)
        if self.options.be_verbose:
          print code

      #check the file extension
      ext = self.get_extension(url)
      if not ext in self.webpage_extensions and ext!="":
        if self.options.be_verbose:
          print "based on extension, we won't parse this file"
        return

      #check the content type, we only want html
      file_info = fh.info()
      content_type = file_info.getheader("Content-type")
      if content_type.endswith("html"):
        #this is good
        pass
      else:
        if self.options.be_verbose:
          print "bad content type: "+content_type
        return
      #this is a browsable file
      self.browsable_files.append(url)
      #read the text from the file
      file_text = ""
      readfile = True
      while(readfile):
        temptext = fh.read(1028)
        file_text+=temptext
        if temptext==None or temptext =="":
          readfile = False
      fh.close()
      if self.options.be_verbose:
        print "reading "+url

      p = Parser(self.options.be_verbose)
      p.feed(file_text)

      self.file_links[url] = p.get_hrefs()
      base_href=p.get_base_href()

    except Exception as inst:
      print type(inst)     # the exception instance
      print inst.args      # arguments stored in .args
      print inst           # __str__ allows args to printed directly

      if self.options.be_verbose:
        print url+" is not a valid file"
      if not self.errors.has_key(parent):
        self.errors[parent] = []
      self.errors[parent].append(url)
      return

    if self.options.be_verbose:
      if len(self.file_links[url])>0:
        print "--unique links--"
        for link in self.file_links[url]:
          print "  "+link
      print "processed "+url

    #loop through the links
    for link in self.file_links[url]:
      parse_link=None;
      # if the url isn't absolute
      #TODO: find a better way to process anchored links
      if re.match( "^[A-Za-z]+:",link)==None and not link.startswith("#"):
        # is there a base href?
        if base_href!=None and base_href!="":
          parse_link = self.get_absolute_url(link,base_href,True)
        else:
          parse_link = self.get_absolute_url(link,url)

      else:
        #todo: check if this is an Absolute path on the site
        pass

      if parse_link!=None:
        if not parse_link in self.processed_urls:
          print parse_link
          self.process_url(parse_link,url)

  def get_absolute_url(self,url,parent,parent_is_base_href=False):
    #determine the parent's directory
    bits = parent.split("/")
    if not parent_is_base_href and parent.count("/")>2:
      del(bits[-1])
    #how may ../ are in the url?
    up_count = url.count("../")
    #remove that many dirs from the parent bits
    for x in range(up_count):
      print x
      sys.exit()
      del(bits[-1])
    #remove the ../ from the url
    url.replace("../","")
    parent_root = "/".join(bits)

    if url.startswith("/") :
      return_url = parent_root+url
    else:
      return_url = parent_root+"/"+url
    return return_url


class Application:
  def __init__(self):
    #we need an option parser
    self.opt_parser = OptionParser()
    #what do we need from the user?
    self.opt_parser.add_option("-u", "--url", dest="start_url",
      help="The URL to start processing", metavar="URL")
    self.opt_parser.add_option("-o", "--out", dest="outdir",
      help="save output to a specific directory", metavar="dir")
    self.opt_parser.add_option("-s", "--sitemap",
                  action="store_true", dest="sitemap", default=False,
                  help="include generic sitemap data in the output")
    self.opt_parser.add_option("-v", "--verbose",
                  action="store_true", dest="be_verbose", default=False,
                  help="display what is going on")

  def run(self):
    #parse the options
    (options, args) = self.opt_parser.parse_args()
    #if there is no url,we quit
    if options.start_url==None:
      print "ERROR: You did not specify a URL to process"
      print ""
      sys.exit()
    #we need a JayWalker
    jw = JayWalker(options)
    jw.walk()

if __name__=="__main__":
  app = Application()
  app.run()
On my computer this file is named "walk.py", and to make a sitemap for my website I run
The command makes a directory named "output" and creates files with information about my site as well as a sitemap file named "sitemap.xml", which I then upload to my website../walk.py -u http://www.jezra.net -s -o output
Well there you have it. Copy, edit, learn, or ignore.
Now quit reading, and go crawl with Python.
- Tags:
I've considered updating the code to work with the more modern Clutter, but that wouldn't really be fun would it? Besides, someone has already updated the code. Thanks Ryan. Why don't I write another example? Don't mind if I do.
There is nothing new Clutter-wise in this example to differentiate it from the hello world example except that this code will run with the latest Clutter.
What we have here, is John Conway's Game of Life where each cell is a Clutter Rectangle.
#!/usr/bin/env python
# copyright 2009 jezra lickter
#this software is licensed under the GPLv3  http://www.gnu.org/licenses/gpl.txt
import clutter
import random

class Game:
    def __init__(self,cell_size):
        self.cells = []
        #create a clutter stage
        self.stage = clutter.Stage()
        #set the stage size in x,y pixels
        self.stage.set_size(500,500)
        self.stage.set_title("The Game of Life")
        self.stage_width, self.stage_height = self.stage.get_size()
        #define some clutter colors in rgbo (red,green,blue,opacity)
        self.color_black =clutter.Color(0,0,0,255)
        self.color_green =clutter.Color(0,255,0,255)
        self.color_blue =clutter.Color(0,0,255,255)
        #set the clutter stages bg color to our black
        self.stage.set_color(self.color_black)
        #we will need to check on the key presses from the user
        self.stage.connect('key-press-event', self.parseKeyPress)
        self.stage.connect("destroy", self.quit)
        '''fill the screen with rectangles'''
        num_cols = int(self.stage_width/cell_size)
        num_rows = int(self.stage_height/cell_size)
        cells_to_create = num_cols*num_rows
        y = 0
        for row in range(num_rows):
            x = 0
            self.cells.append( [] )
            print "%i cells to create" % (cells_to_create)
            for column in range(num_cols):
                #set the column index to a rect that is cell_size by cell_size
                self.cells[row].append( clutter.Rectangle() )
                self.cells[row][column].set_size(cell_size,cell_size)
                self.cells[row][column].set_position(x,y)
                #add this cell to the stage
                self.stage.add(self.cells[row][column])
                self.cells[row][column].set_color(self.color_green)
                self.cells[row][column].set_opacity(0)
                x+=cell_size
            cells_to_create-=num_cols

            y+=cell_size
        print "cells created"
        #get some data about the rows
        self.row_count  = len(self.cells)
        self.col_count = len(self.cells[0])
        self.cell_count = self.row_count*self.col_count
        #make a timer to do stuff for us
        self.timeline = clutter.Timeline(duration=500)
        #when the timer finishes running, we want to determine the life
        self.timeline.connect("completed",self.compute_life)
        #increase linearly
        alpha = clutter.Alpha(self.timeline, clutter.LINEAR)
        #make some opacity behaviours that we will apply to the cells
        self.dieBehaviour = clutter.BehaviourOpacity(255,0,alpha)
        self.aliveBehaviour = clutter.BehaviourOpacity(0,255,alpha)

    def parseKeyPress(self,actor,event):
        if event.keyval == clutter.keysyms.q:
            self.quit()
        elif event.keyval == clutter.keysyms.c:
            self.compute_life()
        elif event.keyval == clutter.keysyms.r:
            self.reseed()

    def quit(self,widget=None):
        clutter.main_quit()

    def run(self):
        self.stage.show_all()
        self.seed_life()
        self.compute_life()
        clutter.main()

    def reseed(self):
        for r in range(self.row_count):
            for c in range(self.col_count):
                if self.cells[r][c].get_opacity()>0:
                    self.cells[r][c].set_opacity(0)
        self.seed_life()

    def seed_life(self):
        print "adding random life"
        #loop through the rows
        for r in range(self.row_count):
        #loop through the columns
            for c in range(self.col_count):
                #generate a number
                i = random.randint(0,4)
                if i==0:
                    # x,y is alive
                    self.cells[r][c].set_opacity(255)

    def compute_life(self,asset=None):
        #detach all objects from the behaviors
        self.dieBehaviour.remove_all()
        self.aliveBehaviour.remove_all()
        for r in range(self.row_count):
            for c in range(self.col_count):
                if self.cells[r][c].get_opacity()>0:
                    alive=True
                else:
                    alive=False
                ln = self.living_neighbors(r,c)
                if alive and ( ln<2 or ln>3 ):
                    #this cell will die; boohoo
                    self.dieBehaviour.apply(self.cells[r][c] )
                elif not alive and ln==3:
                    #this cell is now alive; damn zombies
                    self.aliveBehaviour.apply(self.cells[r][c] )

        #start the timeline again
        self.timeline.start()

    def living_neighbors(self,r,c):
        alive = 0
        r_min = r-1
        r_max = r+1
        c_min = c-1
        c_max = c+1
        if r==0 :
            r_min=r
        elif r == self.row_count-1:
            r_max=r
        if c==0 :
            c_min=c
        elif c == self.col_count-1:
            c_max=c

        tr = r_min
        tc = c_min
        cells_computed=0
        while not tr > r_max:
            tc = c_min
            while not tc > c_max:
                if ( tr!=r or tc!=c ):
                    cells_computed+=1
                    if self.cells[tr][tc].get_opacity()>0:
                        alive+=1
                tc+=1
            tr+=1
        return alive

if __name__=="__main__":
    game = Game(5)
    game.run()
When running the code: press "q" to quit, press "r" to reset.
One issue I have with this code is that when creating the rectangles for the cells, creation slows down significantly after creating about 3000 rectangles. The app runs fine when all of the cells are created, but the slow down during creation really irks me. Perhaps I need more RAM or I should write the code in Vala using SDL?
Now stop reading, and go play with colored rectangles.
- Tags:
- Clutter
The concept of time is not something I have a great abundance of (anyone that has heard me play music can probably attest to this) and, quite often, I fail to be mindful of the time whilst cooking some delicious steel cut oats for breakfast.
If only there was some way to be reminded to check the stove after a certain amount of time; without having to purchase a Talkie Toaster. Yes, I know all about wind-up egg timers, but mine broke a week or four ago.
The Software Solution
In a nutshell, I needed a timer that will alert me when a set amount of time has expired. The easiest way to do this is to ssh into my (almost) always on media player machine and run
Yea, it works, but what if I don't want to maintain an ssh session? It would be so much nicer if ,on my local machine, I could just run a script to send the time and text to the media player machine. Espeak, by the way, is a nice text to speech application.sleep 240; espeak "Hey Jezra, it is time to check the oatmeal"
Enter the Python
Using Python socket programming I wrote two pieces of software; one to listen and parse commands, and one to send commands from a user.
First is the code for the listener, which is launched at system startup
#!/usr/bin/env python
import socket
import subprocess
import sys

HOST = '' #we don't care about the specific hostname
PORT = 5000 #pick a port
'''define the Server class'''
class Server:
    def __init__(self,host, port):
        #create and bind to a socket
        self.sock = socket.socket(socket.AF_INET, socket.SOCK_STREAM)
        self.sock.bind((HOST, PORT))
        self.sock.listen(1)

    def run(self):
        waiting = True
        data=""
        #get a connection created when the socket accecpts input
        conn, addr = self.sock.accept()
        print "connected"
        while waiting:
            # read a 4K of data from the connection
            data = conn.recv(4096)
            if not data:
                # if there is no data, then we end the loop
                waiting = False
            else:
                print "received %s" % (data)
                #parse the data we have received
                result = self.parse_data(data)
                #send a response to the sending client
                conn.send(result)
        #close the connection
        conn.close()
        #run again to create a new connection
        self.run()

    def parse_data(self,data):
        try:
            #split the data into the seconds to delay, and the string to speak
            seconds,string = data.split(":")
            #what command do we need to perform?
            command = "sleep %s; espeak \"%s\"" % (seconds,string)
            #run the command
            subprocess.Popen(command,shell=True)
            return_string = "OK"
        except:
            return_string = "Error with data: %s" % (data)

        print return_string
        return return_string


if __name__ == "__main__":
    server = Server(HOST,PORT)
    server.run()
On to the sender
The sender script was named ttsend and it resides in my ~/bin directory. Now when I'm cooking my oatmeal, I enter the command#!/usr/bin/env python import socket import sys #what happens where there is an error? def quit( message ): print message sys.exit() #do we have enough args? if len(sys.argv)==2: string = sys.argv[1] seconds = "0" elif len(sys.argv)==3: string = sys.argv[2] seconds = sys.argv[1] else: quit("sender requires 1 or 2 arguments, you passed %i" % (len(sys.argv)-1) ) #if we haven't quit, connect and send the data HOST = 'player' #what is the name/IP of the server we need to connect to PORT = 5000 # what port are we connecting on? #create a socket sock = socket.socket(socket.AF_INET, socket.SOCK_STREAM) #connect to the host:port sock.connect((HOST, PORT)) #format and send data sock.send("%s:%s" % (seconds,string) ) #get some data back data=sock.recv(4096) sock.close() print data
Since I will probably be more interested in timing things by the minute than by the second, an update to take minutes as input seems to be in order.ttsend 240 "It is time to check the oatmeal"
Now stop reading, and CHECK THE OATMEAL!
- Tags:
Off I went to find a screen capture app that does what I need, and after a minute of searching my distribution's software repository, and I had found, installed, and tested scrot (screen shot).
The icing on the cake would be to have a simple way to created incremented screenshots, so that I could end up with a set of images named
screenshot.png, screenshot001.png, screenshot002.png, screenshot003.png, etc.
Enter the python...
#!/usr/bin/env python
import os.path
import subprocess

'''start defining some variables'''
file_name = "screenshot" # the base file name
file_extension = "png" # the image type
save_path = os.path.expanduser("~/") #where are we saving the screen shots
increment = 0 #we may need to increment the file names
save_file = "%s.%s" % (file_name,file_extension) # the default screen shot name

#does the save file exist?
while os.path.isfile( save_file ):
    #the file exists, add and increment to the file name
    increment+=1
    if(increment< 10):
        increment_string = "00%i" % (increment)
    elif(increment<100):
        increment_string = "0%i" % (increment)
    else:
        increment_string = "%i" % (increment)
    save_file = "%s%s.%s" % (file_name,increment_string,file_extension)

path_to_save_file = os.path.join(save_path,save_file)
#what command do we need to run?
command = "scrot -q 100 %s" % ( path_to_save_file )
#run the command
subprocess.call(command,shell=True)
Good and good. The script is named "screenshot", is in my ~/bin folder, and is keybound in my window manager to the "Print" key.
What about screen shots of opened drop-down lists? good question.
Bound to the keyboard combo of "Alt+Print" is the command
which will delay for 2 seconds, which is enough time to open the dropdown, and then run screenshot.sleep 2; screenshot
As an added feature, scrot will beep when it captures the screen, so it is easy to tell when the delay has ended.
- Tags:
The media computer is connected to both my television and stereo, and runs MPD, gpodder, mplayer, and sap. For the most part access to the machine is via SSH.
Every now and then, for reasons I have yet to determine, the wireless network connection of my media player drops, and it is damn frustrating when I can't ssh to my media player.
If only there was a way to test the machines network connection and restart the connection if the network is down....
Time for some Python
#!/usr/bin/env python
import subprocess
'''declare some variables'''
test_ip = "192.168.1.1"
ping_query = "ping -c 1 %s >/dev/null" % ( test_ip )
netup_command = "netcfg -r HomeNetworkConfig"
#try to ping the test ip address
ping_result = subprocess.call(ping_query, shell=True)
#a result of 0 is good, a result of 1 means no network
if ping_result != 0:
    #try to bring up the network
    subprocess.call(netup_command,shell=True)
    subprocess.call("beep",shell=True)
This python script runs every 2 minutes and pings my router. If the network is up, the result of the ping command will return 0. If something other than zero is returned, a command is run that will bring up the network connect.
Now stop reading, and go do whatever is that you do.
- Tags:
The basic functionality that I needed was:
- get the XML text from the URL of the RSS feed
- process the XML text and get the URL of the first audio file in the XML
- play the audio file over the internet; fortunately, I know of a great command-line audio player that can do that. Mplayer will do that as well.
There are some people with powerful command-line foo who could probably write a five line bash script with wget and awk to do this, but I'm not one of those people so I decided to use the Python programming language and the code is as follows:
#!/usr/bin/env python
import sys
#we will need to parse xml
from xml.dom import minidom
#we need to get files from the interpipesnetweb
import urllib
#we want to run a subprocess
import subprocess

#define the parser class
class RSSParser():
    def __init__(self,url):
        self.rssUrl = url

    def getLatest(self):
        try:
            print "checking "+self.rssUrl+"..."
            #read the text from the URL
            rsstext = urllib.urlopen(self.rssUrl)
            print "parsing..."
            #parse the xml from the rss text
            xmlDocElement = minidom.parse(rsstext).documentElement
            #make an array of the enclosure elements
            enclosures = xmlDocElement.getElementsByTagName("enclosure")
            #get the first enclosure
            enclosure = enclosures[0]
            #get the url from the first enclosure
            audio_url = enclosure.attributes['url'].value
            return audio_url
        except:
            return ""

if __name__=="__main__":
    #set a default rss url
    rss_url = "http://feeds.feedburner.com/linuxoutlaws-ogg"
    #what shall we use to play the audio?
    audio_player = "sap"
    # has the user requested a different url?
    if len(sys.argv) > 1:
        rss_url = sys.argv[1]
    #make a parser
    parser = RSSParser(rss_url)
    #get the file we want to play
    file_to_play = parser.getLatest()
    #did a file get returned?
    if len(file_to_play) > 0:
        #launch the player with the file to play
        subprocess.call([audio_player,file_to_play])
Well there you have it. Read it, change it, use it.
- Tags:
With Pyjamas, a developer can write a Python application that contains buttons, labels, and various other common widgets; and then compile the application to a web ready pile of javascipt code. Since the javascript code handles all of the cross-browser crap, the developer can focus on writing a decent app and not have to worry about all of the various browser idiosyncrasies.
As an example, I have created a very basic Pyjamas app that will do the following:
- asyncronously read data from an XML file containing part of the Devil's Dictionary by Ambrose Bierce.
- populate a listbox with the dictionary words
- display the word's definition when a word is selected
The python code is
from pyjamas.ui.RootPanel import RootPanel
from pyjamas.ui.Panel import Panel
from pyjamas.ui.VerticalPanel import VerticalPanel
from pyjamas.ui.HorizontalPanel import HorizontalPanel
from pyjamas.ui.HTML import HTML
from pyjamas.HTTPRequest import HTTPRequest
from pyjamas.ui.Label import Label
from pyjamas.ui.ListBox import ListBox

#what do we need to process returned XML?
#make a XMLHTTPRequest handler to process the dictionary XML
class processDictionaryXMLHandler:
    def __init__(self,caller):
        #who called this class? (AKA parent)
        self.caller = caller

    def onCompletion(self, xml):
        self.caller.set_message("processing data...")
        '''process the text'''
        elements = xml.getElementsByTagName("element")
        for i in range(elements.length ):
            element = elements.item(i)
            word = self.getChildNodeValue(element,"word")
            desc = self.getChildNodeValue(element,"desc")
            self.caller.add_dictionary_item(word,desc)
            self.caller.set_message("Adding "+word)
        self.caller.update_list()
        self.caller.set_message("")

    def onError(self, text, code):
        self.caller.set_message("error %s %s"  % (code,text))

    def onTimeout(self, text):
        self.caller.set_message("timeout %s"  % text)

    #get the value of a nodes child
    def getChildNodeValue(self,node,childname):
        childNode=node.getElementsByTagName(childname).item(0)
        if childNode.firstChild.nodeValue != null:
            value = childNode.firstChild.nodeValue
        else:
            value=""
        return value

    #get the value of a node
    def getNodeValue(self,node):
        value = node.firstChild.nodeValue
        return value

#define devils dictionary application class
class ddApplication:
    def __init__(self):
        '''make some global variables'''
        #we need a dict type to hold key/value pairs for words
        self.words_dict = {}
        #create a vertical panel to hold most of our infoself.vPan = verticalPanel()
        self.vPan = VerticalPanel()
        #make a label for "devils dictionary
        title = Label("The Devil's Dictionary (L through Z)")
        #give credit to the author
        by = Label("by Ambrose Bierce")
        #give titles to the labels so we can style them with a CSS
        title.setStyleName("dd_title")
        by.setStyleName("dd_by")
        #add the labels to the vertical panel
        self.vPan.add(title)
        self.vPan.add(by)
        #create a listbox to display the words
        self.wordsListBox = ListBox()
        #make the wordslistbox a dropdownlist
        self.wordsListBox.setVisibleItemCount(20)
        #hide the wordslistbox
        self.wordsListBox.setVisible(False)
        #what should happen when the wordslistbox changes?
        self.wordsListBox.addChangeListener(getattr(self,"word_list_changed") )
        #add the wordsListBox to the vertical panel
        #self.vPan.add(self.wordsListBox)
        #make an HTML text thingy to hold the definition of the word
        self.definitionHTML = HTML("")
        #hide the definition
        self.definitionHTML.setVisible(False)
        #add the definition to the vert panel
        #self.vPan.add(self.definitionHTML)
        hPan = HorizontalPanel()
        #add some spacing for the hPan elements
        hPan.setSpacing(10)
        hPan.add(self.wordsListBox)
        vPan2 = VerticalPanel()
        self.wordLabel = Label("")
        vPan2.add(self.wordLabel)
        vPan2.add(self.definitionHTML)
        hPan.add(vPan2)
        self.vPan.add(hPan)
        #make a label to pass messages to the user in case of a problem
        self.messageLabel = Label()
        #set the style for the messageLabel
        self.messageLabel.setID("info_label")
        #add the messageLabel to the vert panel
        self.vPan.add(self.messageLabel)
        #add the vertical panel to a specific div of the template
        RootPanel("content").add(self.vPan)

    def word_list_changed(self):
        #get the current index of the wordslistbox
        selected_index = self.wordsListBox.getSelectedIndex()
        word = self.wordsListBox.getValue(selected_index)
        self.display_definition(word)

    def set_message(self,message):
        self.messageLabel.setText(message)

    def display_definition(self,word):
        self.wordLabel.setText(word)
        definition = self.words_dict[word].strip()
        self.definitionHTML.setHTML("<pre>"+definition+"</pre>")
        self.definitionHTML.setVisible(True)

    def add_dictionary_item(self,word,description):
        self.words_dict[word]=description

    def update_list(self):
        for key in self.words_dict.keys():
            self.wordsListBox.addItem(key)
        #display the wordListBox
        self.wordsListBox.setVisible(True)

    def run(self):
        self.get_dictionary_xml()

    def get_dictionary_xml(self):
        self.set_message("retrieving XML data...")
        HTTPRequest().asyncGet(None,None,"dictionary.xml",processDictionaryXMLHandler(self),1);

if __name__ == '__main__':
    app = ddApplication()
    app.run()
Looks like a typical Python app to me!
The compiled web application is viewable at www.jezra.net/code_examples/pyjamas_devil/index.htm
As with most things, there were a few gotcha's that I ran into and I had a devil of a time finding the solutions. The first, and in my mind the most important gotcha is that when making an HTTPRequest().asyncPost(), one needs to add "1" as the last argument if the returned data is XML. If the "1" is omitted, the returned data is treated as plain text and any attempt to process the data as XML will fail.
The second biggest gotcha also deals with XML. Since there is no discernable documentation for processing data from returned XML, one might need to write custom functions, based on the few available Pyjamas examples that deal with HTTPRequests, for retrieving data from a chunk of XML. Although this isn't really that major of an issue, but it would be more efficient to use native XML processing and not have to reinvent the wheel.
All things considered, I certainly plan to use Pyjamas in the future whenever I need to write an asyncronous web-app.
- Tags:
First, let me show some code that does not work as expected:
#!/usr/bin/env python
import clutter
class test:
    def __init__(self):
        #create a stage
        self.stage = clutter.Stage()
        #set the stage to be fullscreen
        self.stage.fullscreen()
        #show the screen
        self.stage.show_all()
        #get the key presses
        self.stage.connect('key-press-event', self.quit)
        #start the clutter main loop
        clutter.main()

    def quit(self,object,event):
        #quit the main loop
        clutter.main_quit()

if __name__=="__main__":
    #make an instance of the test
    t = test()
After trying different various possible fixes, it appeared that the bug is actually
"the stage fullscreen function behaves like maximize if used before the clutter main loop".
What does that mean? It means that the fullscreen function will work if the function is called after the clutter main() function. But how does one call a function after a mainloop has been initialized? I'm glad you asked.
Check out this code with the fix in place:
#!/usr/bin/env python
import clutter
import gobject
class test:
    def __init__(self):
        #create a stage
        self.stage = clutter.Stage()
        #show the screen
        self.stage.show_all()
        #get the key presses
        self.stage.connect('key-press-event', self.quit)
        #add a fullscreen function to the gobject timeout
        gobject.timeout_add(10,self.go_fullscreen)
        #start the clutter main loop
        clutter.main()

    def go_fullscreen(self):
        self.stage.fullscreen()

    def quit(self,object,event):
        #quit the main loop
        clutter.main_quit()

if __name__=="__main__":
    #make an instance of the test
    t = test()
Since the clutter library uses Gobject objects as base classes for most clutter classes, including the mainloop, one can use gobject.timeout_add() to call a function after a set amount of time. In the fixed code, a function that calls fullscreen was set to run a few milliseconds after the clutter.main() was called.
Now I need to port the code to Vala and make sure the fix works with the Vala Clutter bindings as well.
- Tags:
- Clutter
Where is it? I looked all over the inter-tubes and couldn't find what I needed.
A bit of the old "clickity click click" on the keyboard ( a quite a bit on documentation reading ) and I came up with:
'''
Copyright 2009 Jezra Lickter

This software is distributed AS IS. Use at your own risk.
If it borks your system, you have  been forewarned.

This software is licensed under the LGPL Version 3
http://www.gnu.org/licenses/lgpl-3.0.txt


for documentation on Linux Joystick programming please see
http://www.mjmwired.net/kernel/Documentation/input/joystick-api.txt
'''

import gobject #needed for sending signals
import struct #needed for holding chunks of data

class Joystick(gobject.GObject):
    '''The Joystick class is a GObject that sends signals that represent
    Joystick events'''
    EVENT_BUTTON = 0x01 #button pressed/released
    EVENT_AXIS = 0x02  #axis moved
    EVENT_INIT = 0x80  #button/axis initialized
    #see http://docs.python.org/library/struct.html for the format determination
    EVENT_FORMAT = "IhBB"
    EVENT_SIZE = struct.calcsize(EVENT_FORMAT)

    # we need a few signals to send data to the main
    '''signals will return 4 variables as follows:
    1. a string representing if the signal is from an axis or a button
    2. an integer representation of a particular button/axis
    3. an integer representing axis direction or button press/release
    4. an integer representing the "init" of the button/axis
    '''
    __gsignals__ = {
    'axis' :
    (gobject.SIGNAL_RUN_LAST, gobject.TYPE_NONE,
    (gobject.TYPE_INT,gobject.TYPE_INT,gobject.TYPE_INT)),
    'button' :
    (gobject.SIGNAL_RUN_LAST, gobject.TYPE_NONE,
    (gobject.TYPE_INT,gobject.TYPE_INT,gobject.TYPE_INT))
    }


    def __init__(self,dev_num):
        gobject.GObject.__init__(self)
        #define the device
        device = '/dev/input/js%s' % dev_num
        #error check that this can be read
        try:
            #open the joystick device
            self.device = open(device)
            #keep an eye on the device, when there is data to read, execute the read function
            gobject.io_add_watch(self.device,gobject.IO_IN,self.read_buttons)
        except Exception,ex:
            #raise an exception
            raise Exception( ex )

    def read_buttons(self, arg0='', arg1=''):
        ''' read the button and axis press event from the joystick device
        and emit a signal containing the event data
        '''
        #read self.EVENT_SIZE bytes from the joystick
        read_event = self.device.read(self.EVENT_SIZE)
        #get the event structure values from  the read event
        time, value, type, number = struct.unpack(self.EVENT_FORMAT, read_event)
        #get just the button/axis press event from the event type
        event = type & ~self.EVENT_INIT
        #get just the INIT event from the event type
        init = type & ~event
        if event == self.EVENT_AXIS:
            signal = "axis"
        elif event == self.EVENT_BUTTON:
            signal = "button"
        if signal:
            print("%s %s %s %s" % (signal,number,value,init) )
            self.emit(signal,number,value,init)

        return True

if __name__ == "__main__":
    try:
        j = Joystick(0)
        loop = gobject.MainLoop()
        loop.run()
    except Exception,e:
        print(e)
It still needs a bit of work, not all of the button/axis init signals are emitted when the class is started. The remaining init signals are sent on the first button press or axis movement. All in all, it fits my needs wonderfully.
Any suggestions on how I might achieve this as I cannot for the life of me see how !
http://www.pygtk.org/pygtk2reference/gobject-functions.html#function-gobject--timeout-add
- Tags:
On the Linux Outlaws Podcast, there is a feature on the show called the "crap alert"; which is an alarm sound that plays whenever Fabian, one of the show hosts, states that something is crap. There were a few discussions on the show's forums regarding playing the alarm on one's own computer.
"Hey, I have a switch and I want to use it to play a command on my computer!"
But how do I do it?
A bit of research found www.swen.uwaterloo.ca/~drayside/altinput/, which has information regarding making a switch to connect to the serial port of a computer. After a bit of soldering, my serial port switch was complete. All it needed was some sort of driver. Having previously worked with Python to access data from a serial port, I decided to use Python to poll the state of the switch and run a command when the switch is depressed.
Here is the "driver"
#!/usr/bin/env python
import serial
import gobject
import os
import sys
import subprocess

class serial_checker (gobject.GObject):
    def __init__(self):
        self.config = {"port":0,"carrier_detect_pressed":"echo carrier\ detect\ pressed\n"}
        #read the config file
        cfile = os.path.expanduser("~/.serial_switch" )
        file_lines = open(cfile)
        for line in file_lines:
            #trim the white spaces
            line = line.strip()
            #if the line has length and the first char isn't a hash
            if len(line) and line[0]!="#":
                #this is a parsible line
                (key,value) = line.split(":",1)
                self.config[key.strip()] = value.strip()

        self.cd_switch_down = False
        self.cd_switch_action_running = False
        gobject.GObject.__init__(self)
        self.switch_count = 0
        #define our serial
        self.ser = serial.Serial(self.config["port"])
        self.mainloop = gobject.MainLoop()
        gobject.timeout_add(150, self.check_switches )

    def cd_switch_action(self):
        #what is the user requested command?
        command = self.config["carrier_detect_pressed"]
        #print command
        #run the command, this should be in a thread or asynchronous
        subprocess.Popen(command,shell=True)

    def run(self):
        #run the main loop
            self.mainloop.run()

    #check the switches
    def check_switches(self):
        cdval = self.ser.getCD()
        if (cdval):
            if(self.cd_switch_down==False):
                self.cd_switch_down = True
                #try to run the cd switch action
                self.cd_switch_action()
        else:
            self.cd_switch_down = False

        return True

    #when the class is closed, clean up
    def __del__(self):
        self.ser.close()
        self.mainloop.quit()


if (__name__=="__main__"):
    ser_check = serial_checker()
    ser_check.run()
When the python script is first run, it reads a configuration file from my home directory named ".serial_switch", which contains the command that I want to run when the switch is depressed. The config looks like this:
# this is a config file for serial_switch
# all configurations will be in key:value format

# serial port (default /dev/ttyS0 )
#port:/dev/ttyS0

#what happens when the carrier_detect switch is pressed
carrier_detect_pressed: gmrun
Although I played around with various commands that I thought would be fun to run when the switch was depressed, I found that gmrun was more useful than playing an audio file.
TODO
Add more switches to the serial connector.
Physically, the serial connector should be able to hand 3 or 4 switches so I should add the switches and update the software accordingly.
What it looks like
Here is the video I uploaded to youtube.
- Tags:
- Hardware
#!/usr/bin/env python
import os
import sys
import gst
import gobject

class tag_getter:
    def __init__(self):
        #make a dictionary to hold our tag info
        self.file_tags = {}
        #make a playbin to parse the audio file
        self.pbin = gst.element_factory_make("playbin")
        #we need to receive signals from the playbin's bus
        self.bus = self.pbin.get_bus()
        #make sure we are watching the signals on the bus
        self.bus.add_signal_watch()
        #what do we do when a tag is part of the bus signal?
        self.bus.connect("message::tag", self.bus_message_tag)
        #create a loop to control our app
        self.mainloop = gobject.MainLoop()

    def bus_message_tag (self, bus, message):
        #we received a tag message
        taglist = message.parse_tag()
        #put the keys in the dictionary
        for key in taglist.keys():
            self.file_tags[key] = taglist[key]
        #for this test, if we have the artist tag, we can quit
        if self.file_tags['artist']:
            print self.file_tags
            sys.exit()

    def set_file(self,file):
        #set the uri of the playbin to our audio file
        self.pbin.set_property("uri","file://"+file)
        #pause the playbin, we don't really need to play
        self.pbin.set_state(gst.STATE_PAUSED)

    def run(self):
        #start the main loop
        self.mainloop.run()

if __name__=="__main__":
    if len(sys.argv)>1:
        file = sys.argv[1]
        pwd = os.getcwd()
        filepath = os.path.join(pwd,file)
        getter = tag_getter()
        getter.set_file(file)
        getter.run()

    else:
        print "select an audio file"
Useful? Not really, but it certainly is a good building block for a more advanced application.
if key == 'image':
img = open('temp.png', 'w')
img.write(taglist[key])
img.close()
- Tags:

It took me a while to wrangle with the tee requirements for handling queues. I could see how, but I couldn't understand why. So anyway, this is what I came up with:
1. a tee in the pipeline gets a name
2. the end of a queue gets declared as part of the tee, and is given the name of the tee followed by a period
3. add a queue to the gstreamer pipeline
4. the end of the queue thingy gets placed at the end of the queues ( this doesn't seem to be required for the last queue)
My gstreamer pipeline looks like this:
gst-launch
filesrc location=/path/to/audio/file
! decodebin ! audioconvert
! tee name=myT myT.
! queue ! autoaudiosink myT.
! queue ! goom ! ffmpegcolorspace ! autovideosink
sweet! Now on to a my pythonic version using pygst
#!/usr/bin/env python

import sys
import gst
import time
class myPlayer ():
    def __init__(self):
        self.pipeline = gst.Pipeline()
        self.src = gst.element_factory_make("filesrc", "src")
        self.decoder = gst.element_factory_make("decodebin", "decoder")
        self.decoder.connect("new-decoded-pad", self.onNewDecodedPad)
        self.goom = gst.element_factory_make("goom")
        self.colorspace = gst.element_factory_make("ffmpegcolorspace","color")
        self.conv = gst.element_factory_make("audioconvert", "conv")
        self.vidsink = gst.element_factory_make("autovideosink","videosink")
        self.asink = gst.element_factory_make("autoaudiosink", "aoutput")
        self.tee = gst.element_factory_make('tee', "tee")
        self.queuea = gst.element_factory_make("queue", "queuea")
        self.queuev = gst.element_factory_make("queue", "queuev")
        self.pipeline.add(self.src,self.decoder,self.conv,self.tee,self.queuea)
        self.pipeline.add(self.asink,self.queuev,self.goom, self.colorspace, self.vidsink)
        gst.element_link_many(self.src,self.decoder)
        gst.element_link_many(self.conv,self.tee)
        self.tee.link(self.queuea)
        self.queuea.link(self.asink)
        self.tee.link(self.queuev)
        gst.element_link_many(self.queuev, self.goom,self.colorspace, self.vidsink)
    def onNewDecodedPad(self,decodebin, pad, islast):
        #link the pad to the converter
        decodebin.link(self.conv)

    def playfile(self,file):
        self.src.set_property('location', file)
        self.pipeline.set_state(gst.STATE_PLAYING)
        pipelinestate = self.pipeline.get_state()

        while pipelinestate[1] == gst.STATE_PLAYING:
            time.sleep(1)
            pipelinestate = self.pipeline.get_state()
        sys.exit()

if __name__ == '__main__':
    if (len(sys.argv) > 1):
        file = sys.argv[1]
        player = myPlayer()
        player.playfile(file)
    else:
        print "you must select a tune"
The big difference here, at least to me, is that the decodebin isn't really a bin, but it represents a series of possible bins. So if one where to select a vorbis file to play, the decodebin will determine the correct type of bin needed to handle the file and would create an instance of that type of bin, the same is true for wav,flac,aac,mp3, etc; all of which have a specific decoder that I don't want to have to figure out, so I let the decodebin do it for me. This line: self.decoder.connect("new-decoded-pad", self.onNewDecodedPad), will call a function whenever a new bin is created by the decoder bin and it is in the onNewDecodedPad function that the decodebin links to the rest of the pipeline. Does that make sense?
"self.popeline.add" should be "self.pipeline.add"
Now this works on my...drumroll...Nokia N900! Maemo forever :-)
#!/bin/sh
gst-launch
filesrc location=/path/to/audio/file
! decodebin ! audioconvert
! tee name=myT
myT. ! queue ! autoaudiosink
myT. ! queue ! goom ! ffmpegcolorspace ! autovideosink
import sys, os, os.path, time
import pygst
pygst.require("0.1")
import gst
But I don't know how to add new version of GStreamer ... I try above one with change in version as
import gi
gi.require_version('Gst', '1.0')
from gi.repository import GObject, Gst, Gtk
got error as :
import gi
File "/usr/lib/python2.7/dist-packages/gi/__init__.py", line 39, in <module>
raise ImportError(_static_binding_error)
ImportError: When using gi.repository you must not import static modules like "gobject". Please change all occurrences of "import gobject" to "from gi.repository import GObject". See: https://bugzilla.gnome.org/show_bug.cgi?id=709183
Please advise the right way..
thanks
Anes
- Tags:
#!/usr/bin/env python
import sys
import os, os.path
import clutter
import gtk

class imageList:
    def __init__(self,dir):
        # we need an array and a default index of the array
        self.imagelist =[]
        self.imagelist_index = 0
        #go find the images in the directory
        self.find_images(dir)

    def get_index_image(self):
        return self.imagelist[self.imagelist_index]

    def get_left_image(self):
        return self.imagelist[ self.get_next_left_index() ]

    def get_right_image(self):
        return self.imagelist[ self.get_next_right_index() ]

    def get_index(self):
        return self.imagelist_index

    def get_next_left_index(self):
        left = self.imagelist_index-1
        if left<0:
            left = self.get_image_count()-1
        return left

    def get_next_right_index(self):
        right = self.imagelist_index+1
        if right>=self.get_image_count():
            right = 0
        return right

    def decrement_index(self):
        self.imagelist_index = self.get_next_left_index()

    def increment_index(self):
        self.imagelist_index  = self.get_next_right_index()

    def get_image_count(self):
        return len(self.imagelist)

    def find_images(self,dir):
        #loop through the files in the folder
        print "searching "+dir+" for images...."
        assets = os.listdir(dir)
        for i in range(len(assets) ):
            asset_path = os.path.join(dir,assets[i] )
            if os.path.isdir(asset_path):
                #if the asset is a directory, recurse
                self.find_images(asset_path)
                pass
            else:
                #how do we know if this is a usable image?
                #try to get a pixbuf from the image
                try:
                    """TODO: assume the majority of files are images and delete
                    the bad files from the array when they are displayed to the
                    user, this should vastly improve start up time"""
                    pixbuf = gtk.gdk.pixbuf_new_from_file(asset_path)
                    #add this asset to the imagelist
                    print "Found: "+asset_path
                    self.imagelist.append(asset_path)
                except:
                    #fail this isn't a usable image
                    pass

class imageViewer:
    def __init__(self):
        #is there a sys.argv?
        if len(sys.argv)>1:
            self.create_image_list(sys.argv[1])
        else:
            self.print_help("No image directory selected")
        #if we made it this far, we can start making the clutter interface
        self.stage = clutter.Stage()
        #make the stage full screen
        self.stage.fullscreen()
        #hide the mousey
        self.stage.hide_cursor()
        #we need to record the stage size
        #NOTE: I should try to use the CLUTTER_STAGE_WIDTH, but it may only be part of the c library
        (self.stage_w,self.stage_h) = self.stage.get_size()
        #define a clutter color in rgbo (red,green,blue,opacity)
        color_black =clutter.Color(0,0,0,255)
        #set the clutter stages bg color to our black
        self.stage.set_color(color_black)
        #we will need to check on the key presses from the user
        self.stage.connect('key-press-event', self.parseKeyPress)
        #make three textures: left,right,and center
        self.l_image=clutter.Texture()
        self.r_image=clutter.Texture()
        self.c_image=clutter.Texture()
        #add the textures to the stage
        self.stage.add(self.l_image)
        self.stage.add(self.r_image)
        self.stage.add(self.c_image)
        #hide all of the images
        self.l_image.set_opacity(0)
        self.c_image.set_opacity(0)
        self.r_image.set_opacity(0)
        #creae a timeline for the texture animations
        self.texture_timeline = clutter.Timeline(fps=25,duration=1000)
        #create an alpha to describe the movement for behaviours
        self.texture_alpha = clutter.Alpha(self.texture_timeline, clutter.ramp_inc_func)
        '''we will need a behaviour to handle animation between the left and center(lc),
        and between the center and right(cr) '''
        self.lc_behaviour = clutter.BehaviourPath(self.texture_alpha)
        self.cr_behaviour = clutter.BehaviourPath(self.texture_alpha)
        #show all stage items and enter the clutter main loop
        self.stage.show_all()
        self.set_center_image()
        clutter.main()

    #we will need to scale the textures to fill the screen
    def scale_texture(self,texture):
        #NOTE: texture.get_size is not working properly, use the size of the pixbuf
        #(twidth,theight) = texture.get_size()
        buf = texture.get_pixbuf()
        twidth = buf.get_width()
        theight = buf.get_height()
        if twidth>theight:
            scale = ((self.stage_w+0.0)/twidth)
        else:
            scale = ((self.stage_h+0.0)/theight)
        #perform the scaling
        print scale
        texture.set_property("width",twidth*scale)
        texture.set_property("height",theight*scale)

    def set_center_image(self):
        #hide the texture
        self.c_image.set_opacity(0)
        #center is the current index
        buf = gtk.gdk.pixbuf_new_from_file( self.imagelist.get_index_image() )
        self.c_image.set_pixbuf( buf )
        #scale the images
        self.scale_texture(self.c_image)
        #center the center image
        (tex_width,tex_height) = self.c_image.get_size()
        xloc = self.stage_w/2 - tex_width/2
        yloc = self.stage_h/2 - tex_height/2
        self.c_image.set_position(xloc,yloc)
        #make the center image visible
        self.c_image.set_opacity(255)

    def set_right_image(self):
        #right is right image
        buf=gtk.gdk.pixbuf_new_from_file( self.imagelist.get_right_image() )
        self.r_image.set_pixbuf( buf )
        #scale the image
        self.scale_texture(self.r_image)
        #move the right image off of the screen and center vertically
        (tex_width,tex_height) = self.r_image.get_size()
        yloc = self.stage_h/2 - tex_height/2
        self.r_image.set_position(self.stage_w,yloc )
        self.r_image.set_opacity(255)
    def set_left_image(self):
        #l_image is left image
        buf = gtk.gdk.pixbuf_new_from_file( self.imagelist.get_left_image() )
        self.l_image.set_pixbuf( buf )
        #scale the texture
        self.scale_texture(self.l_image)
        #move the left image off of the screen and center vertically
        (tex_width,tex_height) = self.l_image.get_size()
        yloc = self.stage_h/2 - tex_height/2
        self.l_image.set_position(0-tex_width,yloc )
        #make the center image visible
        self.l_image.set_opacity(255)

    def parseKeyPress(self,actor, event):
        #do stuff when the user presses a key
        #it would be awesome if I could find some documentation regarding clutter.keysyms
        if event.keyval == clutter.keysyms.q:
            #if the user pressed "q" quit the test
            clutter.main_quit()
        elif event.keyval == clutter.keysyms.Right:
            self.next_image(0)
        elif event.keyval == clutter.keysyms.Left:
            self.next_image(1)

    #direction of 0 means move right, direction 1 means move from right to left
    def next_image(self,direction=0):
        #clear the behaviour paths
        self.lc_behaviour.clear()
        self.cr_behaviour.clear()
        self.lc_behaviour.remove_all()
        self.cr_behaviour.remove_all()
        #update the center texture
        self.set_center_image()
        if direction:
            #we need to set the right image
            self.set_right_image()
            #hide the left image
            self.l_image.set_opacity(0)
            #adjust the image list index
            self.imagelist.increment_index()
            #center image moves to the left
            (x,y) = self.c_image.get_position()
            lc_knot0 = clutter.Knot(x,y)
            #what is the destination knot?
            lc_knot1 = clutter.Knot(-self.c_image.get_width(),y )
            #which texture is moving in the lc?
            lc_texture = self.c_image
            #right image moves to the left
            (x,y) = self.r_image.get_position()
            cr_knot0 = clutter.Knot(x,y)
            xcenter = self.stage_w/2-self.r_image.get_width()/2
            cr_knot1 = clutter.Knot(xcenter,y )
            #which texture is moving in the cr?
            cr_texture = self.r_image

        else:
            #we need to set the left image
            self.set_left_image()
            #hide the right image
            self.r_image.set_opacity(0)
            #adjust the image list index
            self.imagelist.decrement_index()
            #left image moves to the center
            (x,y) = self.l_image.get_position()
            lc_knot0 = clutter.Knot(x,y)
            xcenter = self.stage_w/2-self.l_image.get_width()/2
            lc_knot1 = clutter.Knot(xcenter,y )
            #which texture is moving in the lc?
            lc_texture = self.l_image
            #center image moves to the right
            (x,y) = self.c_image.get_position()
            cr_knot0 = clutter.Knot(x,y)
            endx = self.stage_w
            cr_knot1 = clutter.Knot(endx,y )
            #which texture is moving in the cr?
            cr_texture = self.c_image

        #add the knots to the lc behaviour
        self.lc_behaviour.insert_knot(0,lc_knot0)
        self.lc_behaviour.insert_knot(1,lc_knot1)
        self.lc_behaviour.apply(lc_texture)
        #add the knots to the cr behaviour
        self.cr_behaviour.insert_knot(0,cr_knot0)
        self.cr_behaviour.insert_knot(1,cr_knot1)
        self.cr_behaviour.apply(cr_texture)
        #start the timeline associated with the behaviours
        self.texture_timeline.start()

    def create_image_list(self,image_folder):
        cwd = os.getcwd()
        path_to_image_folder = os.path.join(cwd,image_folder)
        #does the folder exist?
        if os.path.isdir(path_to_image_folder):
            print "image folder: "+path_to_image_folder
            self.imagelist = imageList(path_to_image_folder)
            #did we find images?
            img_count = self.imagelist.get_image_count()
            print "Found "+str(img_count)+" images"
            if img_count ==0:
                self.print_help(image_folder+" does not contain usable images")
        else:
            self.print_help(image_folder+" is not a directory")

    def print_help(self,errormessage=""):
        if(errormessage):
            print "Error: "+errormessage
        print "Usage: "+sys.argv[0]+" /path/to/directory/containing/images"
        print "Navigation: use the left and right arrows to view the images"
        print ""
        sys.exit()
if __name__=="__main__":
    #make an imageViewer
    imageViewer = imageViewer()
Problems:
1. I was hoping to automatically change a clutter textures height and width by making sure that the texture's "sync-size" property was true and then changing the textures pixbuf. Unfortunately, this didn't work, so I grabbed the height and width the pixbuf itself and adjusted the size of the texture accordingly.
2. Althought it was a minor problem, I spend too much time trying to figure out how to use gstreamer to get the data from my images files and pass the data to a gstvideotexture. As you can see, I ended up using gtk.gdk for image handling.
3. segfaulting on behaviourPath.append_knots(knot1,knot2)
Nifty Clutter:
behaviourPath knots - a knot is an X,Y coordinate that make a path for an object to follow when the object animates. For example, suppose I have a texture at 0,0 and I want to move the texture to 200,100 and then to 50,400. I would make a knot for each coordinate and add the knot to a behaviourPath using append_knots(list of knots) or insert_knot(knot index, knot).
myBehaviourPath.append_knots(knot1,knot2,knot3)
then apply the behavor to the texture and start the timeline associated with the behaviours alpha
myBehaviourPath.append(myTexture)
myTimeline.start()
Booyah! The texture will move from knot1 to knot2 to knot3
Awesome:
Pydoc. I can't believe it took me so long to learn about pydoc: a python documentation tool. Which I found indispensable for figuring out what methods are available in various python modules.
buf = gtk.gdk.pixbuf_new_from_file( self.imagelist.get_index_image() )
self.c_image.set_pixbuf( buf )
to:
self.c_image.set_from_file( self.imagelist.get_index_image() )
===================================
But self.stage.fullscreen() can only maximize the window.
Do you know how to setup a real fullscreen (borderless) window?
- Tags:
- Clutter
OK, so this isn't really a tutorial because I'm not going to go through each line of code and explain what it does. However, there are certain parts of the code that I will give a bit more info about, because I had some problems figuring it out and I'm hoping my experience will help other.
This is not a static "hello world". I know, I broke the rules; but I think this is a good thing. Upon running the script, there will be a "hello" on the screen. Pressing "s" on the keyboard will initiate a switching toggle between "hello" and "world" by animating a change in their opacities. Pressing "q" will quit the app. Check it out
 #!/usr/bin/env python
print "Hello World!"
Ha ha, just kidding.....
#!/usr/bin/env python

import clutter

class clutterTest:
    def __init__(self):
        #create a clutter stage
        self.stage = clutter.Stage()
        #set the stage size in x,y pixels
        self.stage.set_size(500,200)
        #define some clutter colors in rgbo (red,green,blue,opacity)
        color_black =clutter.Color(0,0,0,255)
        color_green =clutter.Color(0,255,0,255)
        color_blue =clutter.Color(0,0,255,255)
        #set the clutter stages bg color to our black
        self.stage.set_color(color_black)
        #we will need to check on the key presses from the user
        self.stage.connect('key-press-event', self.parseKeyPress)
        #create a clutter label, is there documentation for creating a clutterlabel?
        self.label = clutter.Label()
        #set the labels font
        self.label.set_font_name('Mono 32')
        #add some text to the label
        self.label.set_text("Hello")
        #make the label green
        self.label.set_color(color_green )
        #put the label in the center of the stage
        (label_width, label_height) = self.label.get_size()
        label_x = (self.stage.get_width()/2) - label_width/2
        label_y = (self.stage.get_height()/2) - label_height/2
        self.label.set_position(label_x, label_y)
        #make a second label similar to the first label
        self.label2 = clutter.Label()
        self.label2.set_font_name('Mono 32')
        self.label2.set_text("World!")
        self.label2.set_color(color_blue )
        (label2_width, label2_height) = self.label2.get_size()
        label2_x = (self.stage.get_width()/2) - label2_width/2
        label2_y = (self.stage.get_height()/2) - label2_height/2
        self.label2.set_position(label2_x, label2_y)
        #hide the label2
        self.label2.set_opacity(0)
        #create a timeline for the animations that are going to happen
        self.timeline = clutter.Timeline(fps=20,duration=500)
        #how will the animation flow? ease in? ease out? or steady?
        #ramp_inc_func will make the animation steady
        labelalpha = clutter.Alpha(self.timeline, clutter.ramp_inc_func)
        #make some opacity behaviours that we will apply to the labels
        self.hideBehaviour = clutter.BehaviourOpacity(255,0x00,labelalpha)
        self.showBehaviour = clutter.BehaviourOpacity(0x00,255,labelalpha)
        #add the items to the stage
        self.stage.add(self.label2)
        self.stage.add(self.label)
        #show all stage items and enter the clutter main loop
        self.stage.show_all()
        clutter.main()

    def parseKeyPress(self,actor, event):
        #do stuff when the user presses a key
        #it would be awesome if I could find some documentation regarding clutter.keysyms
        if event.keyval == clutter.keysyms.q:
            #if the user pressed "q" quit the test
            clutter.main_quit()
        elif event.keyval == clutter.keysyms.s:
            #if the user pressed "s" swap the labels
            self.swapLabels()


    def swapLabels(self):
        #which label is at full opacity?, like the highlander, there can be only one
        if(self.label.get_opacity()>1 ):
            showing = self.label
            hidden = self.label2
        else:
            showing = self.label2
            hidden = self.label
        #detach all objects from the behaviors
        self.hideBehaviour.remove_all()
        self.showBehaviour.remove_all()
        #apply the behaviors to the labels
        self.hideBehaviour.apply(showing)
        self.showBehaviour.apply(hidden)
        #behaviours do nothing if their timelines are not running
        self.timeline.start()


if __name__=="__main__":
    test = clutterTest()
Copy the code and drop it into your favorite text editor.
things I got hung up on....
1. Labels:the pyclutter documentation doesn't reference labels. Fortunately, the pyclutter examples that are included with the pyclutter source code, have a sample of a label
2. Alpha: clutter.alpha is a representation of a value based on a clutter.timeline and a function to determine the value at a given time on the time line. The first function that I used was a sine function that would peak at the midway point and then return to the starting point. So my opacity behavior would go from 0 to 255 and then back to 0, when what I really wanted was to go from 0 to 255.
3. behaviourOpacity: When the behavior transitions the opacity from 255 to 0, the ending opacity is 1, or at least is was the last time I checked. Odd.
4. Determining which key is pressed: I don't know enough about python to be able to print out all of the data in the event object that is sent when there is a "key-press-event". I was trying to print the keys from the event objects dict but nothing was working. Luckily, I stumbles upon the clutter.keysyms doohicky but I haven't found all of the documentation for the keysyms yet. For now, I just use clutter.keysyms.[what key am I looking for] to determine if a specific key is pressed.
That's it for now...
- Tags:
- Clutter
- Tubular Music Thingy Part 2
- Beaglebone console output and a faster boot
- Tubular Music Thingy (part 1)
- get and speak the weather
- Getreel youtube-dl wrapper
- Two hours with the Archos 43
- HTML5 for a specific platform? I prefer to develop native apps
- a bit of dev talk about MuttonChop media player
- case for my status server
- my tiny todo list and some ruby
- The Camp Mug (almost) Test
- 2012 Tizen Developers Conference in San Francisco
- Freedom Jar is Full
- Web UI speed up using HTML5 Server Sent Events
- LEDs, BeagleBone, and my ToDo List
- a case for the BeagleBone
- fixing the car mirror
- Basic HTTP server in Vala using GIO Sockets
- sewing up a bling thing
- Trip to Austin
- convert hexadecimal string to an integer with Vala
- Training for 2012: Wuggling
- ABC tune grabber/converter
- A trip to Lancaster
- a new media playing machine
- Don't turn Tizen into WebOS
- making some chili sauce
- grumpy kid
- beer network improvement
- Ripping my DVD collection
- ruby script to search files in a directory for a string
- Pacific Pinball Museum Mission
- A Tale of Two Mugs
- shishi odoshi prototype
- file downloader in Node.js that handles redirects
- Travelling Far Part II
- python shell-fm web interface
- not quite a letter to cherrypal
- Audio playing class in Ruby with Gstreamer
- A quick fix
- my resized images using Ruby and Imagemagick
- one pound of coffee
- noise-canceling headphones that actually work
- updating my dynamic IP DNS information with Ruby
- Hello World in Ruby
- Bacon Apple Cider
- clawhammer sudo modprobe
- a web.py introduction
- The Skillet
- banjer strap on the cheap
- The Letter to Dell
- Linux Outlaws episode 170
- Not the 2010 Petaluma Whiskerino
- Monte Rio
- a new power switch
- the coffee cup review
- seriously, that thing is garbage
- keeping a GTK TextView cursor in view
- A tale of three sticker
- minimize/close to system tray in Python GTK
- A markdown editor/viewer in Python
- Red Phone Mumble Test
- Saturday Sassafrass
- A Friday Frolic
- Toshiba laptop review
- Google no longer uses Microsoft
- regarding Heybuddy and python stuff
- I'm calling you!
- heybuddy identi.ca client
- making a change holder thing
- Did I win? Yes and No.
- photograph sticker
- share this on facebook
- the damn computer died
- kilt alteration
- audcast streamer in vala with gstreamer, gtk and webkit
- The Mullet Adventure
- A Letter to the California State Legislature
- will dogfooding the frenzy leave me bitter?
- basic sitemap file maker in Python
- rock and rolling down the street
- Time to Celebrate
- game of life : Vala, SDL
- game of life : python, clutter
- networked timed text-to-speech goodness
- battery status in a screen session
- Bright Bike
- turning gears
- incremental screenshot namer wrapper
- a nice little feature/bug
- drawing circles
- broken VHS fixed
- cloudy phone number finder
- network quitter fixer
- the hot sauce experiment
- non-delivered emails sent to AOL domains
- GIMP mathmap experiment results
- tri-force tuna gift
- leave early, take your time, enjoy the solitude
- N37°49'8 W122°28'48
- rotary phone computer interface in action
- python script to play the latest version of an audio broadcast
- rotary phone computer input device
- server log spam from Microsoft?
- creating a CAPTCHA
- hello HTML 5! a simple audio player
- How does that increase security?
- getting familiar with GWT, a porting experiment.
- You're Not Carnival Personnel!
- "disable" a web app's buttons using javascript and css
- litterbugs and jaywalkers
- a basic web-app with pyjamas
- shell script to aid in compiling Vala projects
- Banjo part 4: she's finished
- Accent Characters in Linux with Xorg
- Terminal emulator part deux!
- Community
- Terminal Emulator in Vala using GTK and VTE
- Where is the MPAA on this one?
- pyclutter stage fullscreen hack
- Banjo part 3
- from necessity comes something
- If you build it, they will spam
- writing blogging software ( using data from blogspot )
- From WBEZ Chicago......
- Simple Switch Input to Enter a Command
- perplexing ponderence, pertaining penguin presents
- baby steps: the evolution my feature-free PHP framework
- ruining a perfectly good lamp?
- thank you bazaar
- quick not-so-little bikey bag
- Vala musings : int to string, packages, and starting with main
- my motor vehicle warranty is about to expire? really?
- Bike Trailer Part 2
- getting dandy with a hair pretty
- a not so elegant fixer up
- use python and gstreamer to get the tags of an audio file
- trials with gstreamer, pygst, and goom visualization
- Gaarrrrrrrrr!
- more pyclutter: get a move on - behaviourpath
- scrollwheel css div Internet Explorer 7 problem fixed
- Hello World using pyclutter - a half assed tutorial