
Quite often I find myself over at http://thesession.org checking out old traditional tunes. The site offers the tunes as sheet music and ABC Notation. While I certainly appreciate having ready access to the tunes, I find that, more often than not, I need to copy the ABC notation into a text file, convert the text file into a [lilypond[(http://lilypond.org) file, transpose the lilypond file to the G Major scale, and then finally add some code that will display the tune as banjo tabs. Oh man, did you catch all of that? There has to be an easier way to do this.....
Oh, there is...
For the most part, the process is just a series of text manipulations which can be accomplished in just about any programming language. Since I am currently on a Ruby kick, I figured I would just hammer out a quick script to automate the process of retrieving ABC notation from a given page and converting the results into something more usable.
Enter the Ruby
require 'optparse'
require 'open-uri'
require 'rexml/document'
require 'iconv'
def sanitize( string )
#replace non alpha-numerics with _
string = string.gsub(/[^A-z0-9_]/,'_')
return string.downcase
end
def error( string )
puts "**** ERROR ****"
puts string
exit
end
option = {}
OptionParser.new do |opts|
opts.banner = "Usage: sessionconvert [options] [thesession.org_URL]"
opts.on("-b", "--banjo", "add banjo tabulature") do |v|
option[:banjo] = v
end
opts.on("-l", "--lilypond", "compile with lilypond") do |v|
option[:lilypond] = v
end
end.parse!
url = ARGV[0]
# was a url supplied?
unless url
error "you must supply a thesession.org url"
end
begin
text = open(url).read
rescue
error "Failed to read #{url}"
end
begin
#watch out for sneaky
ic = Iconv.new('UTF-8//IGNORE', 'UTF-8')
valid_string = ic.iconv(text)
doc = REXML::Document.new valid_string
rescue
error "Failed to parse #{url}"
end
root = doc.root
p = root.elements["body/div[@id='abc']/div[@class='box']/p"].to_s
abc = p.gsub(/<.*>/,'')
#get the title
m = /T: (?<title>.*)/.match( abc )
title = m['title']
#get the key
m = /K: (?<key>.*)/.match( abc )
key = m['key']
#sanitize the title, we will use this a bunch
sanitized_title = sanitize(title)
#what will the filenames be?
filename_abc = sanitized_title+".abc"
f = open(filename_abc,'w')
f.write(abc)
f.close
begin
`abc2ly #{filename_abc}`
rescue
error "abc2ly is not installed"
end
#what will the lilypond file be?
filename_ly = sanitized_title+".ly"
if option[:banjo]
#what is the key we are transposing from
t_key = key[0].downcase
banjer_bit = "\\transpose #{t_key} g,
\\context TabStaff = \"banjer\"{
\\set TabStaff.stringTunings = #banjo-open-g-tuning
\\set Staff.instrumentName = #\"Banjo\"
\\context TabVoice = \"banjer\" { \\tabFullNotation \\stemDown \\voicedefault }
}"
text = File::read(filename_ly)
#substitute the banjer stuff
text = text.gsub(/<<.*>>/m, "<<\n #{banjer_bit}\n\t>>")
#make a new lilypond file
filename_ly = sanitized_title+"-banjo.ly"
#write the new text to file
f = open(filename_ly,'w')
f.write(text)
f.close
end
#did the user request compiling
begin
`lilypond #{filename_ly}` if option[:lilypond]
rescue
error "lilypond is not installed"
end
If you have problems copying the code, please see http://hoof.jezra.net/snip/nQ
Usage
Since I don't always want to convert a tune to banjo tabs (some tunes are better on the concertina), a flag (-b) needs to be included with the arguments to specify that the tune should be converted to banjo tabs. Similarly, including the -l flag with compile the final lilypond file into a pdf of sheet music or tabs.
For example: The tune Rakes of Mallow is found at http://www.thesession.org/tunes/display/85 and to convert the tune to banjo tabs and compile to a PDF the following command would be used.
This is what the final PDF looks like. Damn that's nice!

...and this is me butchering the tune on my banjo. Damn, I need more practice.
Awesome! Now quit reading, and go butcher a tune on the instrument of your choice.
Due to an unfortunate series of events, Shemp ( my homemade banjo ) is out of commission. However, I recently purchased a used Sovereign banjo that needed a bit of work to get into a somewhat decent playing condition. One thing I really wanted for this banjo was a strap. You know, just in case I want to wander around the block while picking a tune.
For my banjo strap, I wanted something fairly easy to remove and very easy on the wallet. For two bucks spent at the thrift store, and bits of stuff lying around my home, I had a pretty sweet banjer strap in no time.
Four Bottle caps
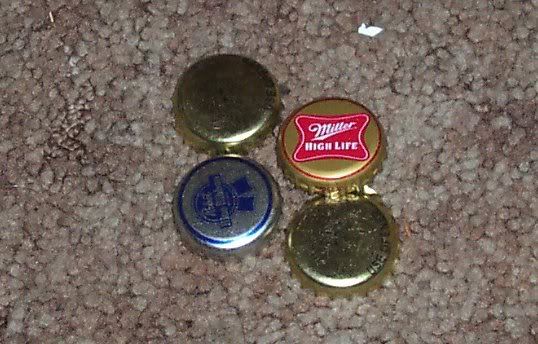 Beer bottle caps, hot glue, and magnets make great bottle cap fridge magnets, but that's not what I'm making right now. From the bottle cap collection, I selected two Red Tails, a PBR, and a Highlife.
Gettin Hammered!
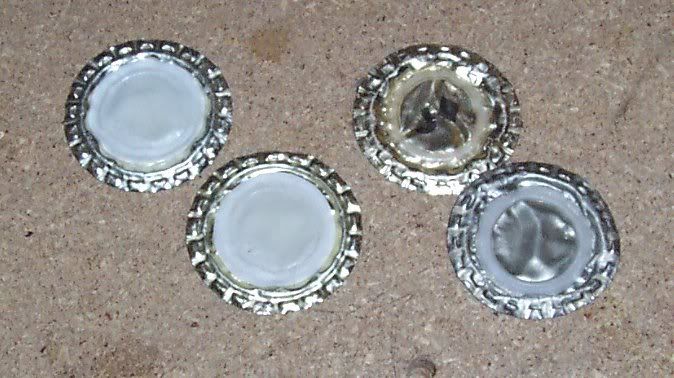 All four of the caps was hammered flat. The Red Tail caps flattened nice and clean, the other two.... well not so much. Notice that the PBR cap is a Jack of Diamonds? That was intentional.
Stuck Together
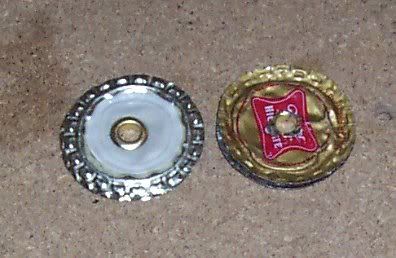 The flat caps where paired up and a hole what punched through their centers. To keep things neat and to cover any sharp edges, an eyelet was popped into the center of the stacked caps.
The actual "strap"
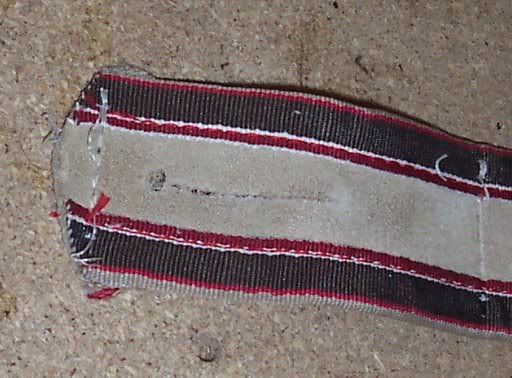 Two dollars at Sack's Thrift Avenue purchased a leather belt. Damn, I'm busting the bank on this one. A slit the length of the flat caps diameter was cut into each end of the belt and a small hole was punched for good measure.
Hold on
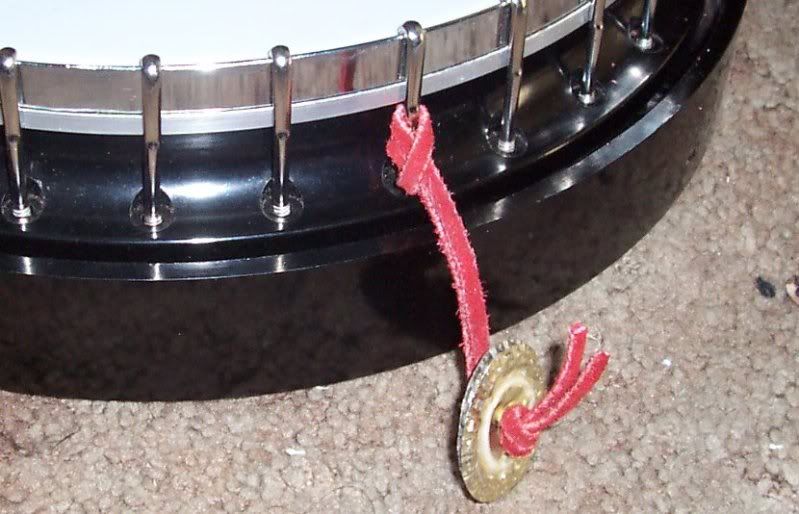 Some red leather cord was knotted at one end, fed through the cap eyelet, looped through the rim bolt and over the caps to secure the whole thing nicely. It's quite easy to remove and adjust. This was done twice.
Done
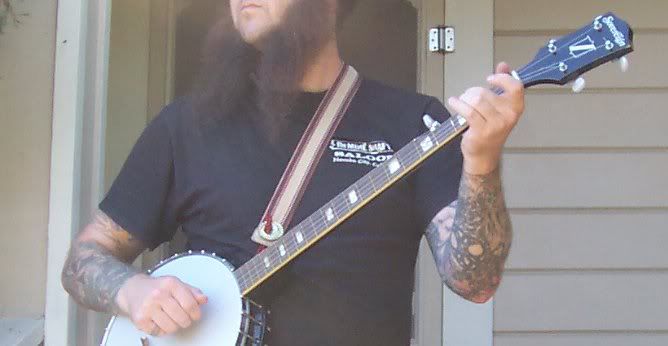 "Button" the caps through both ends of the belt, throw that baby over the shoulder and frail some Cripple Creek on the front porch!
It is really weird to play standing up, as I am so accustomed to easily seeing the strings and frets when sitting.
Now quit reading, and go parse the following with lilypond:
\version "2.12.2"
\header {
  title =   "~$ sudo modprobe"
  composer =  "Fabian Scherschel & Dan Lynch"
  copyright = "Creative Commons Attribution-Share-Alike 3.0"
}
melody = \relative c' {
  \key e \minor
  \time 4/4
  \numericTimeSignature
  e4 d8 e4 d8 e[ fis] | % 1
  g2. b4 | % 2
  a2. r8 b8 ~ | % 3
  b8 a g a g a g fis | % 4
  e4 d8 e4 d8 e[ fis] | % 5
  g2. ~ g8 fis | % 6
  d1 ~ | % 7
  d2 r | % 8
  \bar "|."
}
\score {
  \transpose c' c
  \context TabStaff = "banjer" <<
    \set TabStaff.stringTunings = #banjo-open-g-tuning
    \set Staff.instrumentName = #"Banjo"
    \context TabVoice = "banjer" { \melody }
  >>
  \layout {}
}
...and thank you Dr. Kulp
ha, nice idea for a strap, jez. how come i get the feeling, if left to your own devices, in a few years you will be living in a house made of choice recyclables and duct tape?
;)
Sorry it took so long to respond...had a hard time figuring out the math problem to prove my humanness.
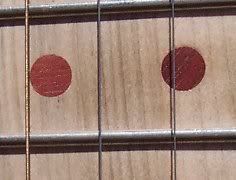 My friend with the wood shop has made a few stringed instruments before and he let me use some spare fret wire. Here is the 12th fret with fret markers. the markers are made from the same piece of bloodwood that I used to make the bridge,tuning pins, string saddle thing, and the pot rod. Speaking of blood, there are a few drops on the 7th fret from when I had to say "oops, that's finger", while hammering in the fret wire.
A forchner bit drilled the hole in the neck and a plug bit cut plugs of blood wood that I gently tapped into place. Well, it might not have been that gentle and two of the pegs broke just below the level of the neck. Hey! it adds personality.
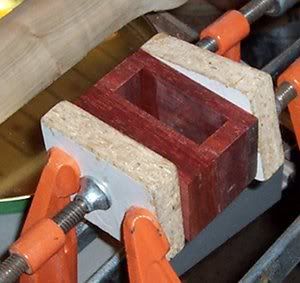 This is the string saddle thing in a vice. After the glue dried, I sanded and smoothed the thing, drilled some pilot holes and attached some brass screws to attach the strings to. The whole thing slips on over the pot rod, so if I ever find a nicer tin or my tin needs to be replaced, I can slide the saddle thing off with little hassle.
 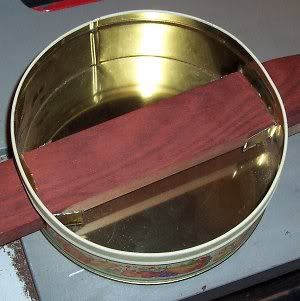 The tin was cut with a dremel tool and the flanges from the cut were folded into the tin to run parallel to the pot rod.
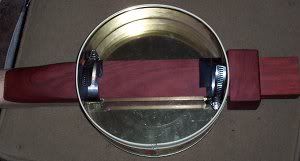 Two hose clamps and a bit of old bicycle innertube keep the tin in place on the potrod. These aren't really needed because string tension on the saddle thing keeps everything quite snug.
 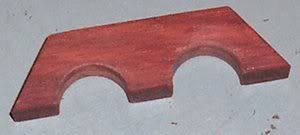 Hey it's the bloodwood bridge!
 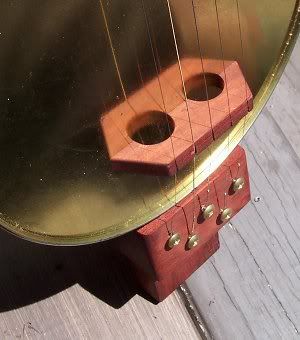 There is something about the reflection of the bridge on the tin that I find quite mesmerizing. Don't forget to look at the string holder thingy with the brass screws.
 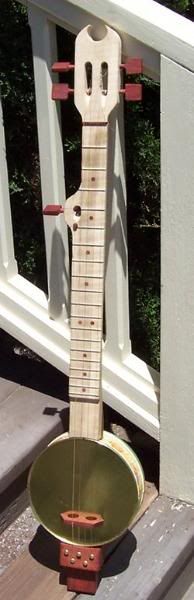 And finally.....the finished product.
For reason's that most people probably wouldn't understand, she has been affectionately named Shemp in honor of Shemp Howard: my favorite of the six Three Stooges.
After sitting down and taking the time to properly tune Shemp, she sounds quite nice and hopefully, in a few weeks, I'll have gained enough skill on the banjer to make a recording to share (it will be 'Banks and Braes'; I love that tune ).
For the next banjo, should I decide to make another, I'll use a dark wood for the fretboard as it is currently hard to see the strings against the light wood; especially with the grain going with the strings. I would also like to make a wooden pot, although I don't think I'll make a proper banjo head. Hmmm, my buddy does have a lathe.......
I'd like to thank my buddy for the use of his shop, Pat and Patrick Costello for inspiring and teaching me through their blog posts, books, and videos. Frail on!
Well that's all for now, time to get back to banjo practice!
 The first thing that needed to be done was the creation of the last tuning peg. Since all of the pegs are quite unique in shape, I decided to etch numbers in the peg face so that it would be easier to keep track of which peg should go where when I taper the tuning pegs holes in the neck.
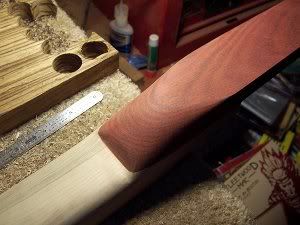 Where the potrod was glued to the neck, I rasped and sanded to get the shape just the way I wanted it. After the neck and potrod was shaped, I sanded with various grits to get the neck as smooth as possible.
 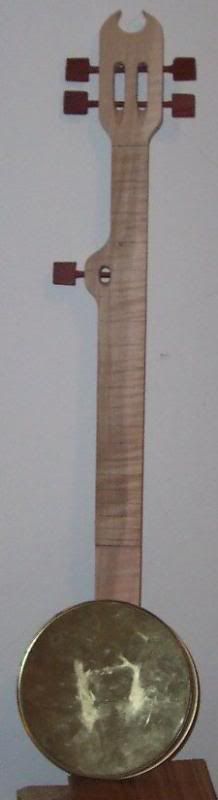 The tails were trimmed off of the tuning pegs and the corners where rounded with a rough grit sand paper. At this point, I simply had to see what the finished banjer would look like with my new cookie tin banjo pot. Since the potrod is quite a bit longer than the diameter of the tin, in the future I will probably make a wooden banjo pot with a drum head. It could be a neverending project.
Next up (in theory): fret dot inlays, cutting the pot to fit the potrod, crafting the nut and bridge, figuring out the tailpiece/saddle.
There is a certain level of "how the crap am I going to do that?" when I get to each step of making pieces of the banjer. Sometimes, the problem is solved with a bit of woodshop instruction from my buddy and the use of a jig that he has made. Other times, well, there is probably a tool to do what I need, but it isn't in the woodshop.
 A 2" by 12" by 1" piece of bloodwood was glued to the base of the neck. The bloodwood piece will pass through the pot and hold the pot in place, as well as being an anchor for the saddle and strap. It is going to take a lot of rasping to round the heel of the potrod.
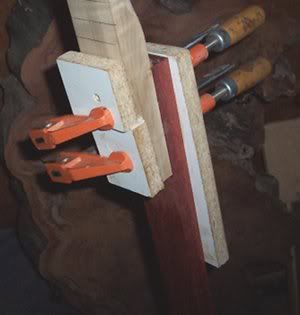
 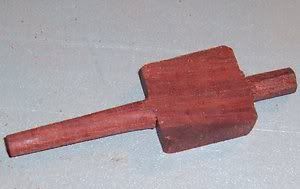 The pegs are also made of bloodwood, and they are semi-typical friction pegs. Friction pegs need to have a slight taper in order to work properly. The basic shape of the peg was hand cut with a coping saw and a small tail was left on the top. The tail of the peg was rounded with a rasp and placed in a drill press. As the peg spun in the drill, a block of wood, with a 1 degree cut on one face, was covered with sandpaper and used to create the taper of the peg. For some reason, the 1 degree cut in the block was done by my friend and it is the only part of the banjo creation that I didn't do myself.
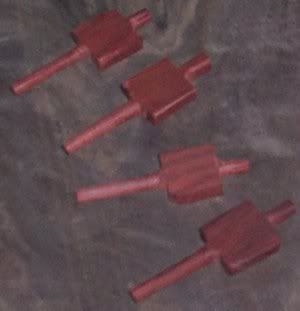 After a bit more time with the coping saw, rasp, and custom taper maker, I now had a total of 4 pegs, enough for the head. Damn that rasp! I was just too tired to create the 5th tuning peg so I relaxed in my buddy's backyard and looked for ducks.
Next up: making the 5th tuning peg, tapering the peg holes on the neck, shaping the neck and potrod, making a nut and bridge and string saddle, attaching the pot to the potrod, learning to play the banjo.
I am a fortunate person with good crafty friends.
A very good friend of mine happens to enjoy crafting wood and he agreed to let me make a banjo in his wood shop during the weekends. First thing first, select a piece of wood for the neck. To be honest, the first thing that I did was to purchase a candy tin from a local thrift store to be the pot of my banjo. Back to the neck. While searching through the scrap wood in the shop I found a piece of maple that my friend said was a poor choice because it was sap wood. Oh the poor rejected piece of wood. Just kidding, I chose the sap wood piece. It was about 35"x3"x1". There were probably a few 16ths, 32nds,8ths, or quarters that should be included in the measurement but I don't like fractions. Metric System; for the win!
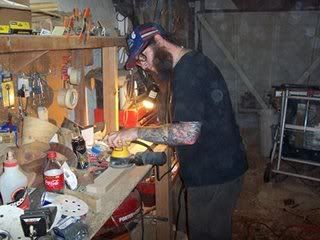 Anyway, after a lecture on shop safety and instruction on power tool usage, I was ready to start making the neck. A few passes on the joiner and the planer and the neck was squared up nicely and it was time to sand what would be the fret board ( I'm not actually using a seperate board for the fret board).
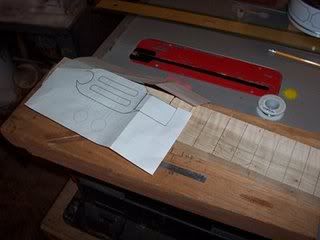 After cutting the channels for the frets, I needed to design a head stock. Thanks to inkscape, I soon had a nice printable vector graphic of my headstock.
 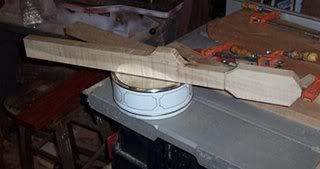 The rough cut shape with the tin that will be the banjo pot.
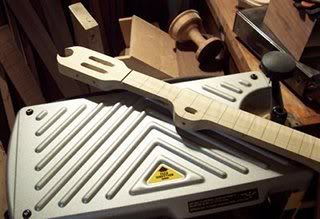 With a lot of rasp work, the neck is really starting to take shape. Someone should call Indiana Jones because I think the grail has been found.
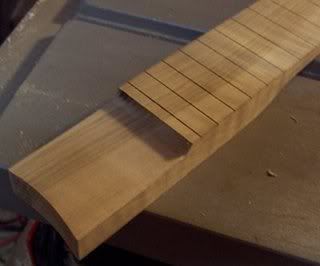 The base of the neck needed to be rounded in order to sit flush against the pot and a "strum area" was routed out.
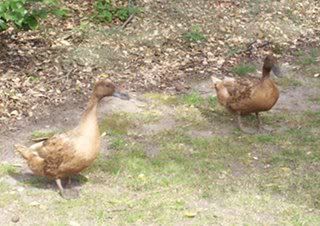 Later that day, these two ducks decided to visit my friends back yard in search of bugs.
That's it for part 1. Next weekend is tuning pegs and other assorted nick-nacks.
- Tubular Music Thingy Part 2
- Beaglebone console output and a faster boot
- Tubular Music Thingy (part 1)
- get and speak the weather
- Getreel youtube-dl wrapper
- Two hours with the Archos 43
- HTML5 for a specific platform? I prefer to develop native apps
- a bit of dev talk about MuttonChop media player
- case for my status server
- my tiny todo list and some ruby
- The Camp Mug (almost) Test
- 2012 Tizen Developers Conference in San Francisco
- Freedom Jar is Full
- Web UI speed up using HTML5 Server Sent Events
- LEDs, BeagleBone, and my ToDo List
- a case for the BeagleBone
- fixing the car mirror
- Basic HTTP server in Vala using GIO Sockets
- sewing up a bling thing
- Trip to Austin
- convert hexadecimal string to an integer with Vala
- Training for 2012: Wuggling
- ABC tune grabber/converter
- A trip to Lancaster
- a new media playing machine
- Don't turn Tizen into WebOS
- making some chili sauce
- grumpy kid
- beer network improvement
- Ripping my DVD collection
- ruby script to search files in a directory for a string
- Pacific Pinball Museum Mission
- A Tale of Two Mugs
- shishi odoshi prototype
- file downloader in Node.js that handles redirects
- Travelling Far Part II
- python shell-fm web interface
- not quite a letter to cherrypal
- Audio playing class in Ruby with Gstreamer
- A quick fix
- my resized images using Ruby and Imagemagick
- one pound of coffee
- noise-canceling headphones that actually work
- updating my dynamic IP DNS information with Ruby
- Hello World in Ruby
- Bacon Apple Cider
- clawhammer sudo modprobe
- a web.py introduction
- The Skillet
- banjer strap on the cheap
- The Letter to Dell
- Linux Outlaws episode 170
- Not the 2010 Petaluma Whiskerino
- Monte Rio
- a new power switch
- the coffee cup review
- seriously, that thing is garbage
- keeping a GTK TextView cursor in view
- A tale of three sticker
- minimize/close to system tray in Python GTK
- A markdown editor/viewer in Python
- Red Phone Mumble Test
- Saturday Sassafrass
- A Friday Frolic
- Toshiba laptop review
- Google no longer uses Microsoft
- regarding Heybuddy and python stuff
- I'm calling you!
- heybuddy identi.ca client
- making a change holder thing
- Did I win? Yes and No.
- photograph sticker
- share this on facebook
- the damn computer died
- kilt alteration
- audcast streamer in vala with gstreamer, gtk and webkit
- The Mullet Adventure
- A Letter to the California State Legislature
- will dogfooding the frenzy leave me bitter?
- basic sitemap file maker in Python
- rock and rolling down the street
- Time to Celebrate
- game of life : Vala, SDL
- game of life : python, clutter
- networked timed text-to-speech goodness
- battery status in a screen session
- Bright Bike
- turning gears
- incremental screenshot namer wrapper
- a nice little feature/bug
- drawing circles
- broken VHS fixed
- cloudy phone number finder
- network quitter fixer
- the hot sauce experiment
- non-delivered emails sent to AOL domains
- GIMP mathmap experiment results
- tri-force tuna gift
- leave early, take your time, enjoy the solitude
- N37°49'8 W122°28'48
- rotary phone computer interface in action
- python script to play the latest version of an audio broadcast
- rotary phone computer input device
- server log spam from Microsoft?
- creating a CAPTCHA
- hello HTML 5! a simple audio player
- How does that increase security?
- getting familiar with GWT, a porting experiment.
- You're Not Carnival Personnel!
- "disable" a web app's buttons using javascript and css
- litterbugs and jaywalkers
- a basic web-app with pyjamas
- shell script to aid in compiling Vala projects
- Banjo part 4: she's finished
- Accent Characters in Linux with Xorg
- Terminal emulator part deux!
- Community
- Terminal Emulator in Vala using GTK and VTE
- Where is the MPAA on this one?
- pyclutter stage fullscreen hack
- Banjo part 3
- from necessity comes something
- If you build it, they will spam
- writing blogging software ( using data from blogspot )
- From WBEZ Chicago......
- Simple Switch Input to Enter a Command
- perplexing ponderence, pertaining penguin presents
- baby steps: the evolution my feature-free PHP framework
- ruining a perfectly good lamp?
- thank you bazaar
- quick not-so-little bikey bag
- Vala musings : int to string, packages, and starting with main
- my motor vehicle warranty is about to expire? really?
- Bike Trailer Part 2
- getting dandy with a hair pretty
- a not so elegant fixer up
- use python and gstreamer to get the tags of an audio file
- trials with gstreamer, pygst, and goom visualization
- Gaarrrrrrrrr!
- more pyclutter: get a move on - behaviourpath
- scrollwheel css div Internet Explorer 7 problem fixed
- Hello World using pyclutter - a half assed tutorial