
In case you didn't know, I drink a fair amount of coffee, and although I've been known to drink other coffee, the majority of my coffee comes from my local coffee roaster: Petaluma Coffee and Tea. Since I commonly forget to reuse my coffee bags, I tend to collect a pile of empty coffee bags and need to do something with them.
Showing off the Goods


To make a long story shirt, the process goes like this:
- collect a bunch of empty coffee bags
- remove the Petaluma Coffee logo
- use clear packaging take to stick those chickens where they are needed
- pedal around town being hella cool
Keep Rollin
Bad Craftsmanship and a Terrible Design
My crappy bicycle seat bag had a zipper that stopped closing properly and would pop open on occasion. I blame the terrible design of the bag that puts far too much stress on the zipper. What I found most distasteful about the failing zipper is that I made the bag. To be fair, the bag did work well for two years and it survived at least one hooligan attack. Hopefully, the next bag will last longer...
Time to retire those shorts
 A long ago, I turned my favorite biking pants into a cap and a pair of shorts, and last Fall, those favorite shorts were retired to the scrap fabric pile after tearing in a non-duct-tape-repairable way. bummer.
Hack and Sew
 My plan was to be able to put my biking needs in the bag, roll the bag up tight, and then affix the bag to my bike. After hurting my thumb trying to cut the shorts with some degenerate right-handed scissors, I found some decent scissors and hacked the shorts into a usable bit of fabric which was then sewn into the form of a pocket with a very large flap.
At this time, I had no idea how I was going to keep the bag closed or how I was going to attach the bag to my bike. So I relaxed and did some other crap for the rest of the evening.
Velcro!
 After having my morning coffee, I stitched some velco to the inside of the flap as well as the outside/back of the pocket in order to keep the damn thing closed. More velcro was sewn to side of the pocket and to the base of the flap so that I could have some loopy-doos to keep the bag connected to my bikey.
Really?
 For some reason, when I went to put the bag on my bike, it attached quite easily with the velcro loopy-doos and I thought something must be wrong. Nope, it was all good. weird
Inside of the bag:
- an adjustable wrench
- two patch kits
- two tire irons
- a pair of plastic chopsticks
 Since I had the sewing machine out, I figured i should throw that Löwenbräu and sweet California Republic patch on my patch jacket.
Testing the Bag
The best way to test the bag, at least in my opinion, is to take a ride to the beautiful Shollenberger Park, which is a 7 to 10 mile ride depending upon the route one takes. However, while trying to adjust my speedometer the other day, I accidentally reset the device, erasing my recorded miles. At the same time, I broke the adjusting button and the speedometer now records in kilometers. That's cool, the metric system is better anyway.


On my 16 kilometer trip, I saw various birds(including a White Tailed Kite) and two snakes. It had been about 3 years since I have seen a California Kingsnake and I unfortunately only managed to take a picture of it's tail as the snake slithered into a burrow on the side of the path. The other snake was a Gopher snake that was hogging the path. Get out of the way bub!
All things considered, I'd say the bag test was a complete success.
Now quit reading, and go recycle some old clothing
In the Northern Hemisphere where I live, it is now wintertime and due to limited daylight, I am riding more and more at "night". While I don't really mind the cold, I really really do not like when drivers on the road cut me off or pull out in front of me.
Perhaps they don't see me very well. I had better remedy that situation.
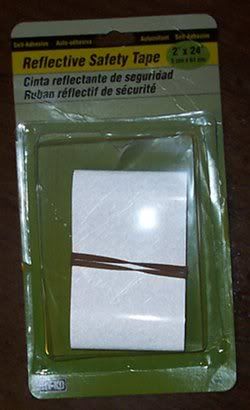 For a few bucks at the local hardware store, I purchased a 2" x 24" strip of reflective tape. In order to make a little bit go a long way, the the tape was cut into 8 strips at ¼" x 24".
Various lengths of the cut strips were then applied to various parts of my bicycle.
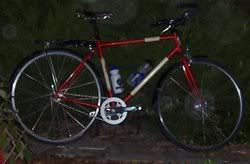 This is the before shot of my bicycle after dark. The camera flash does a decent enough job of lighting up the bike for the human eye, but I want a bit more pizazz.
Why is this such a bad picture? Fog. Taking flash pictures in fog tends to light up the water droplets in the air.
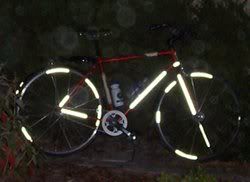 Now that is what I'm talking about!
Randomly placed strips on the bicycle rims will hopefully add a lot of visual noise when the bike is in motion.
Be seen.
only almost?
</jest>
This idea was inspired one evening when, riding 1.5 miles through town, I had three very close calls with drivers not paying attention.
There was one time that I drove my car to the car wash and maybe a car-pool or two with some friends, but for solo trips, it is walk or ride the bike, and all of the trips have been to a destination within 5 miles of my home ( that's 8 kilometers for my metric friends).
Many were the days towing groceries across town in the trailer, or pedaling to my favorite location of solitude along the river for some music practice.
At some point in the Spring of 2009, someone thought it would be a good idea to steal the speedometer off of my bicycle. Damn. Having grown accustomed to knowing how far I travelled when riding, I promptly purchased a new speedometer.
Today the new speedometer passed the thousand mile mark and I couldn't help but reminisce upon the various sights, sounds and people that made so many of my Summer bicycle trips so memorable. Thank you.
Now stop reading, and go ride to the store.
I found it very interesting that you chose a single speed bike. I had a look at Petaluma but couldn't really tell if you have much in the way of hills. About 3 months ago I started riding my bike to work, with a view to giving up my car. 7.5 - 8 miles each way depending on the route. But I'd be brave to use a single speed bike though. I travel from a hight of approx 130m to a low of 50m then up to 85m. Without doubt it is the gradient not much more than the actual hight that's a killer. (for an oldie like me anyway) Are you super fit or is Petaluma flat.
You may be interested in http://www.gmap-pedometer.com/ for determining distance and height of your routes.
I have two routes one to work where it's mostly down hill (just under 7.5 miles).
One back slightly longer (just over 7.5 miles) but longer. On this route as it does not drop to the lowest point. I hate having to go to the bottom of a hill, just to have to climb it.
Thanks
- pedaling
- steering
- balancing
- stopping
The most important of these principles is balancing and the least important is pedaling and with training wheels on a bike, a child only learns how to pedal ( and a few really bad habits).
It's all about balance. Without balance, a cyclist will fall over and won't have time to pedal, or steer, or stop. Unfortunately, when using training wheels, balance is never learned until after the training wheels are removed. If one learns balance first, everything elses will be a lot easier to learn.
Steering isn't learned when using training wheels? That's right. turning a bicycle left and right, especially at higher speeds, requires a cyclist to lean into turns. Since training wheels prohibit leaning over, a child will not learn how to properly navigate a bicycle.
Stop! The bike was moving and now it is not. What is the first thing a new rider should do? Put their feet on the ground. Because training wheels prohibit a bike from leaning over, one doesn't learn the importance of putting their feet on the ground when a bike is stopped and instead learns the bad habit of keeping their feet on the pedals.
A dandy horse doesn't need training wheels; teach the dandy horse method.
By removing training wheels from a bike, a new rider will need to learn to use their own legs to keep from falling over and at the same time they will learn how to balance on a bike. For propulsion, the child can simply run while seated on a bike. I shouldn't have to say it, but I will for safety sake: avoid hills when teaching a child to ride in this manner.
Happy Riding.
Anyway, I need some help I think.
Agree with all the above re training wheels - but unfortunately my daughter has them! In brief, she's 3 but fairly tall and certainly very physical and able... (she zips about at pace with good lean steering on her mini-micro scooter since before age 2 etc)
Anyway, we were in the bike shop where I was thinking a balance bike, but she immediately showed interest instead in the pedal bike (with training wheels) and hopped on and rode it round the store, pedalling steering stopping and all...and from this the salesperson told us that we'd missed her window for the balance bike....and so proud as punch her dad there and then bought her the purple pedal bike...which she loves!
So, now thing is she loves riding it, even going quite fast but I am nervous as anything as she has had a fall going round a corner; I think probably she turned too sharply while upright and the bike fell over (outwards)...and I've seen a couple of more nearly falls when at speed she's taken a curve and I've seen some leans (inwards) where the bike looks like it nearly tripped itself over its training wheel!...
What am I to do... tell her to go slowly, especially in the turns? Or go back and purchase a balance bike and lay down the law insisting she use it instead? (of the nice purple one..) Or try and get the pedals off the purple one? (not even sure this is possible given the back-pedal braking set up there also?)...
I just don't know where to go with this now. Please help. I certainly don't want to cramp her natural ability to learn! What do I do?
(and sorry for not being so brief in the and after all).
take off the pedals
lower the seat until she can place both of her feet flat on the ground with her knees slightly bent.
There is no need to purchase anything
Happens someone has now lent us a FIrstBike...which she is enjoying playing on and coasting about a little even, so yes I reckon it won't be long at all until I move to what you recommend, and then in due course give her the pedals back:
btw any guidance on when to be sure that a child has reached the stage when they're ready for the pedals?...

 Every year, on Bike To Work day, I stop at the Bike To Work station to get a cup of coffee, a bagel and a goody-bag. The goody-bag is a nice canvas bag containing band-aids, tube repair kits, a blinky light and informational fliers. The canvas bag, although quite nice, isn't exactly ideal for carrying stuff while riding. Fortunately, a little bit of cutting and stitching can repurpose a canvas bag into a bike-seat bag that holds:
an adjustable wrench
a spare tube
a patch kit
a spoke wrench
a tire pump
a pen
a lighter
a swiss army knife
a set of tire irons
a folder plastic bag
I should really get a small bike lock for the bag, as well as a some allen wrenches.
While riding my bicycle home from a friends house, I look down and saw that my right pant leg was not rolled up and I thought, "I should pull over and roll up my pant leg". Being three blocks from home, the pant leg rolling never took place, as I opted to just head home.
Can you guess where this is going?
Seconds later, I felt an extremely strong tug on my leg and heard a loud ripping sound in the vicinity of my right leg....... My pants, my favorite bike riding pants, my comfortable light pants, torn from ankle to knee were missing a large chunk of fabric that disappeared mysteriously. The damage was irreparable.
Looking on the bright side
A few months ago, a sewing machine that was destined for the thrift store, was diverted to my humble abode. Now, thanks to the sewing machine, my former favorite pants are my favorite shorts. But the fun doesn't stop there. After cutting of the pant legs to make shorts, I was left with some perfectly good black fabric. hmmmmm....
Thanks to a sewing pattern for a cycling cap, I now have a favorite cycling cap. Actually, it is a good all around cap, but the bill needs to be a bit wider. So without further ado, I present, "The Cap".
 Ah.... the award winning sideburns.
 Moving straight from Degoba and into our hearts.
 Just in case you where wondering what the cap would look like on a small bunya pine fruit.
 I know what you are thinking. "where the hell is bike trailer part 1?" Well... um.... I didn't take any pictures so I'll give you a quick run down of part one.
 A friend gave me an old baby stroller that he no longer needed. With hacksaw in hand, I chopped up the aluminum frame into what I envisioned to be workable pieces. A few PVC pipe fittings and a few nuts and bolts later, I had a working frame. Sweet sweet duct tape made the platform of the trailer.
Done.
On to part 2:
 As much as I love duct tape, a more firm trailer bed seemed to be in order so the duct tape was stripped off, leaving the frame in all of it's aluminium glory. ha, I said "aluminium". Previous to removing the duct tape, I had decided to use plywood slats for the bed of the trailer. Since I only needed about 2' by 2' piece of wood, I felt it would be best to ask the woodworkers that I know if they have any scrap wood that I could use. Being polite is the first step in asking a friend's father for some scrap plywood. In a show of pure awesomeness, my buddy's father not only gave me some scrap, but he cut and sanded the wood as well. A quick jaunt to my local Ace Hardware for some nuts,bolts, washers and brackets, and BOOYAH! One mighty fine trailer.
And here is the trailer attached to "The Green Squeaker" and ready for action.

 crackety snap! The grip shifter housing in my bicycle cracked and I was less than impressed. Oh well, salvation from my dilemma is only an adhesives drawer away. To be honest, I keep most of my adhesives in the same drawer that I keep my tools. Except, of course, for the random roll of duct-tape and an errant tube of epoxy .... and some solder.
 How oh how will I fix this damn thing?
It had dawned on me that since the housing was made of cheap plastic, it would be necessary to not just stick the pieces back together with some adhesive, but to also add some sort of structural support to keep the piece of crap from breaking again in the future. Standard epoxy would not be up to the task.
Thank you Caleb.
My late friend Caleb introduced me to JBweld in the mid-90s when I needed a way to fix a rather difficult problem: a cracked intake manifold on 68 Plymouth. Hot damn! JBweld is the stuff of legends. Caleb used to spin a yarn about repairing a cracked engine block with the gray goo of the gods. That sounds dirty.
 A squeeze of tube 1, a squeeze of tube 2, a little mixing with a toothpick, and I was glopping the glorious gunk on the cracked plastic. Enter the duct-tape. Nothing says "hold that crap in place while the JBweld dries" like duct-tape. There is always a chance that I used too much JBweld and the shifter will end up being stuck in one gear forever, but at least it won't break again.
 On a recent trip to the FNBG(friendly neighborhood bicycle graveyard), I came across a horribly weathered Brooks B15 saddle. By horribly weathered, I mean that the years of neglect in rain, and heat had turned the leather into a torn, dried out, shrunk, crumbling, decrepit piece of jerky on a rusted steel frame.
 So Sad. Wait... What? That isn't sad. That's an opportunity for some leather crafting! Here is a quick breakdown of the process I used to add some new leather to the saddle.
 First I used duct-tape to hold the old leather in what I figured was it's original shape. I then traced the shape onto some leather that was graciously supplied by my buddies father, who happens to be quite a leather crafter. In case you were wondering, it is 13-15# vegetable tanned butt leather.
 The leather was soaked in room temperature water for about an hour and then wrapped in a plastic grocery bag and the whole thing was placed in the fridge overnight. The next day, the leather was quite malleable and easily molded over the old leather. Duct-tape held the molded leather in place while it dried.
 Here is the molded leather and the frame with the old leather removed. 220 grit garnet paper cleaned the frame up to some of it's former glory.
 A leather punch and a pop-riveter attached the leather to frame quite well.
Cuir Bouilli, a process of using hot water to harden leather was used on my new saddle to really firm things up. A few coats of red stain later, I was ready to rock and roll. Shazaam!!


- Tubular Music Thingy Part 2
- Beaglebone console output and a faster boot
- Tubular Music Thingy (part 1)
- get and speak the weather
- Getreel youtube-dl wrapper
- Two hours with the Archos 43
- HTML5 for a specific platform? I prefer to develop native apps
- a bit of dev talk about MuttonChop media player
- case for my status server
- my tiny todo list and some ruby
- The Camp Mug (almost) Test
- 2012 Tizen Developers Conference in San Francisco
- Freedom Jar is Full
- Web UI speed up using HTML5 Server Sent Events
- LEDs, BeagleBone, and my ToDo List
- a case for the BeagleBone
- fixing the car mirror
- Basic HTTP server in Vala using GIO Sockets
- sewing up a bling thing
- Trip to Austin
- convert hexadecimal string to an integer with Vala
- Training for 2012: Wuggling
- ABC tune grabber/converter
- A trip to Lancaster
- a new media playing machine
- Don't turn Tizen into WebOS
- making some chili sauce
- grumpy kid
- beer network improvement
- Ripping my DVD collection
- ruby script to search files in a directory for a string
- Pacific Pinball Museum Mission
- A Tale of Two Mugs
- shishi odoshi prototype
- file downloader in Node.js that handles redirects
- Travelling Far Part II
- python shell-fm web interface
- not quite a letter to cherrypal
- Audio playing class in Ruby with Gstreamer
- A quick fix
- my resized images using Ruby and Imagemagick
- one pound of coffee
- noise-canceling headphones that actually work
- updating my dynamic IP DNS information with Ruby
- Hello World in Ruby
- Bacon Apple Cider
- clawhammer sudo modprobe
- a web.py introduction
- The Skillet
- banjer strap on the cheap
- The Letter to Dell
- Linux Outlaws episode 170
- Not the 2010 Petaluma Whiskerino
- Monte Rio
- a new power switch
- the coffee cup review
- seriously, that thing is garbage
- keeping a GTK TextView cursor in view
- A tale of three sticker
- minimize/close to system tray in Python GTK
- A markdown editor/viewer in Python
- Red Phone Mumble Test
- Saturday Sassafrass
- A Friday Frolic
- Toshiba laptop review
- Google no longer uses Microsoft
- regarding Heybuddy and python stuff
- I'm calling you!
- heybuddy identi.ca client
- making a change holder thing
- Did I win? Yes and No.
- photograph sticker
- share this on facebook
- the damn computer died
- kilt alteration
- audcast streamer in vala with gstreamer, gtk and webkit
- The Mullet Adventure
- A Letter to the California State Legislature
- will dogfooding the frenzy leave me bitter?
- basic sitemap file maker in Python
- rock and rolling down the street
- Time to Celebrate
- game of life : Vala, SDL
- game of life : python, clutter
- networked timed text-to-speech goodness
- battery status in a screen session
- Bright Bike
- turning gears
- incremental screenshot namer wrapper
- a nice little feature/bug
- drawing circles
- broken VHS fixed
- cloudy phone number finder
- network quitter fixer
- the hot sauce experiment
- non-delivered emails sent to AOL domains
- GIMP mathmap experiment results
- tri-force tuna gift
- leave early, take your time, enjoy the solitude
- N37°49'8 W122°28'48
- rotary phone computer interface in action
- python script to play the latest version of an audio broadcast
- rotary phone computer input device
- server log spam from Microsoft?
- creating a CAPTCHA
- hello HTML 5! a simple audio player
- How does that increase security?
- getting familiar with GWT, a porting experiment.
- You're Not Carnival Personnel!
- "disable" a web app's buttons using javascript and css
- litterbugs and jaywalkers
- a basic web-app with pyjamas
- shell script to aid in compiling Vala projects
- Banjo part 4: she's finished
- Accent Characters in Linux with Xorg
- Terminal emulator part deux!
- Community
- Terminal Emulator in Vala using GTK and VTE
- Where is the MPAA on this one?
- pyclutter stage fullscreen hack
- Banjo part 3
- from necessity comes something
- If you build it, they will spam
- writing blogging software ( using data from blogspot )
- From WBEZ Chicago......
- Simple Switch Input to Enter a Command
- perplexing ponderence, pertaining penguin presents
- baby steps: the evolution my feature-free PHP framework
- ruining a perfectly good lamp?
- thank you bazaar
- quick not-so-little bikey bag
- Vala musings : int to string, packages, and starting with main
- my motor vehicle warranty is about to expire? really?
- Bike Trailer Part 2
- getting dandy with a hair pretty
- a not so elegant fixer up
- use python and gstreamer to get the tags of an audio file
- trials with gstreamer, pygst, and goom visualization
- Gaarrrrrrrrr!
- more pyclutter: get a move on - behaviourpath
- scrollwheel css div Internet Explorer 7 problem fixed
- Hello World using pyclutter - a half assed tutorial